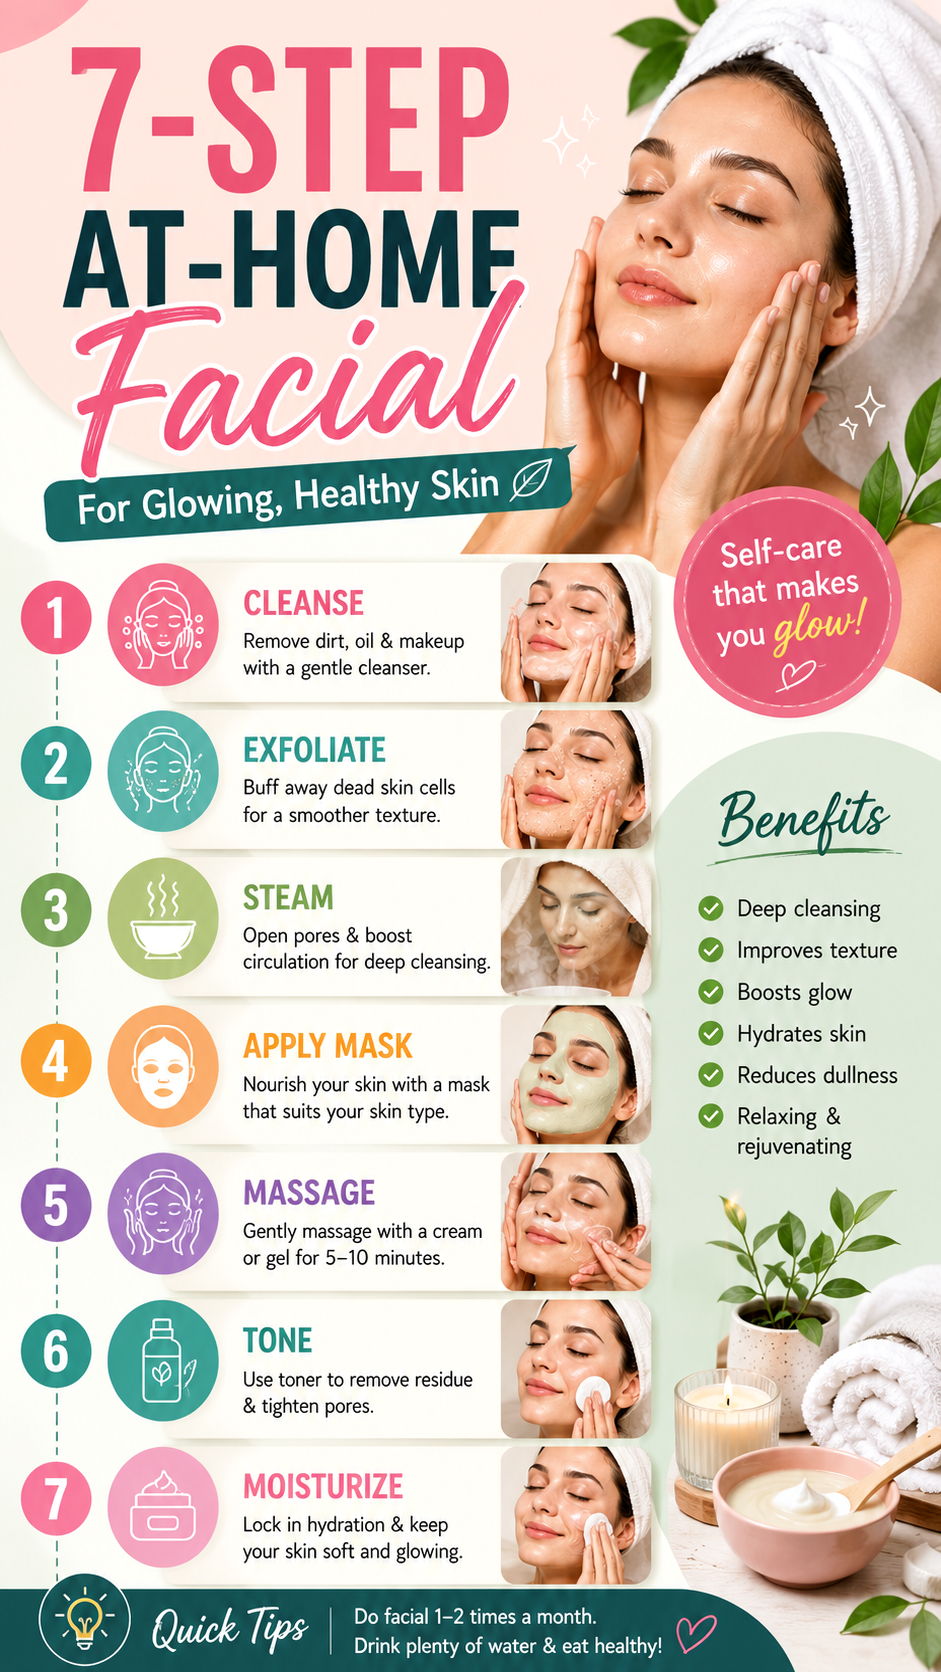
A healthy, radiant complexion is something many people strive for, but achieving glowing skin does not always require expensive spa appointments or complicated skincare regimens. A well-structured at-home facial can help refresh the skin, improve texture, and create a natural glow while giving you a relaxing self-care experience. By following a simple step-by-step process, you can cleanse, nourish, and revitalize your skin using techniques commonly found in professional facial treatments.
Whether you are preparing for a special occasion, looking to improve your skincare routine, or simply wanting to dedicate time to self-care, an at-home facial can be an effective way to support healthier-looking skin. The key is understanding the purpose of each step and using products suited to your skin type.
Key Takeaways
- A complete facial routine helps cleanse, refresh, and hydrate the skin.
- Exfoliation removes dead skin cells and promotes a smoother appearance.
- Steam can help prepare the skin for masks and treatments.
- Moisturizing is essential for maintaining hydration and softness.
- Consistency is more important than performing facials too frequently.
- Choosing products based on your skin type improves results.
Why an At-Home Facial Is Worth Adding to Your Routine
Modern skincare routines often focus on daily cleansing and moisturizing, but occasional facial treatments provide deeper care. An at-home facial goes beyond basic maintenance by combining multiple skincare techniques into one session.
When performed correctly, a facial can help remove impurities, improve the appearance of dull skin, encourage relaxation, and support better absorption of skincare products. It also creates an opportunity to slow down and dedicate time to yourself.
Important: Consistency often delivers better results than intensity. Performing a gentle facial once or twice a month can be more beneficial than using aggressive treatments too frequently.
Step 1: Cleanse Your Skin Thoroughly
The first and most important step of any facial is cleansing. Proper cleansing removes dirt, excess oil, sunscreen, makeup residue, and environmental pollutants that accumulate throughout the day.
Choose a cleanser that matches your skin type:
- Dry skin: Cream or hydrating cleansers.
- Oily skin: Gel or foaming cleansers.
- Sensitive skin: Fragrance-free and gentle formulas.
- Combination skin: Balanced cleansers that avoid excessive drying.
Massage the cleanser onto damp skin using circular motions for about one minute. Rinse thoroughly with lukewarm water and gently pat your face dry with a clean towel.
Benefits of Proper Cleansing
- Removes impurities and buildup.
- Creates a clean foundation for the rest of the facial.
- Reduces the appearance of clogged pores.
- Supports healthier skin texture.
Step 2: Exfoliate for a Smoother Complexion
Exfoliation removes dead skin cells from the surface of the skin. This process helps reveal fresher skin underneath and can improve overall brightness.
You can choose either a physical exfoliant with fine particles or a gentle chemical exfoliant containing ingredients such as lactic acid or glycolic acid.
When exfoliating, avoid applying excessive pressure. Gentle circular movements are sufficient. Over-exfoliation may lead to irritation, redness, and sensitivity.
Signs You May Be Over-Exfoliating
- Persistent redness
- Increased sensitivity
- Tight or uncomfortable skin
- Flaking or irritation
For most people, exfoliating once or twice weekly is enough to maintain smooth, healthy-looking skin.
Expert Insight
Gentle exfoliation can dramatically improve the appearance of dull skin by removing the layer of dead cells that often causes a tired or uneven complexion. The goal is renewal, not scrubbing aggressively.
Step 3: Steam to Prepare the Skin
Facial steaming is a popular step because it creates a spa-like experience while helping prepare the skin for subsequent treatments.
Steam may help soften debris within pores and make the skin feel refreshed. To steam your face safely:
- Fill a bowl with hot, not boiling, water.
- Position your face several inches above the steam.
- Drape a towel loosely over your head if desired.
- Steam for 5 to 10 minutes.
Individuals with highly sensitive skin or certain skin conditions may prefer shorter steaming sessions or skip this step entirely.
How Steam Enhances a Facial
- Provides a relaxing experience.
- Softens the skin surface.
- Prepares the skin for masks and treatments.
- Encourages a refreshed appearance.
Step 4: Apply a Face Mask
A face mask is often the centerpiece of a facial routine. Different masks target different skincare concerns, making this step highly customizable.
Choosing the Right Mask
- Clay masks: Suitable for oily or acne-prone skin.
- Hydrating masks: Ideal for dry or dehydrated skin.
- Brightening masks: Help improve dull-looking skin.
- Soothing masks: Beneficial for sensitive skin.
Apply the mask evenly and follow the recommended time listed on the product. Leaving masks on longer than instructed does not necessarily improve results and can sometimes irritate the skin.
Pro Tip: Keep a hydrating mask in the refrigerator for a cooling, soothing effect that feels especially refreshing during warmer months.
Step 5: Perform a Gentle Facial Massage
Facial massage is often overlooked, yet it can be one of the most enjoyable parts of a skincare routine. Using a cream, oil, or facial gel allows your fingers to glide smoothly across the skin.
Focus on upward and outward motions while applying light pressure. Spend approximately five to ten minutes massaging key areas such as:
- Cheeks
- Forehead
- Jawline
- Neck
Many people enjoy facial massage because it promotes relaxation and can leave the skin looking refreshed.
Benefits of Facial Massage
- Creates a relaxing self-care experience.
- Supports product absorption.
- Helps relieve facial tension.
- Contributes to a healthy-looking glow.
Step 6: Apply Toner
Toner is designed to refresh the skin after cleansing and treatment steps. Modern toners are often formulated with hydrating and soothing ingredients rather than harsh alcohol-based formulas.
Apply toner using a cotton pad or gently press it into the skin using clean hands. Focus on even application across the face and neck.
Benefits of toner may include:
- Refreshing the skin.
- Adding lightweight hydration.
- Preparing the skin for moisturizer.
- Helping the complexion feel balanced.
Step 7: Lock in Hydration with Moisturizer
The final step of the facial is moisturizing. Moisturizers help maintain hydration and support the skin barrier.
Select a moisturizer appropriate for your skin type:
- Lightweight gel formulas for oily skin.
- Rich creams for dry skin.
- Barrier-supporting formulas for sensitive skin.
Apply moisturizer using upward motions and allow it to absorb fully. This step helps leave the skin feeling soft, smooth, and comfortable.
Don’t Forget Your Neck
The neck is often neglected in skincare routines. Extend your moisturizer and other facial products down to the neck area to maintain a consistent appearance and hydration level.
Common Facial Benefits People Notice
While results vary from person to person, many individuals enjoy several noticeable benefits after performing a complete facial routine.
- Cleaner-looking skin
- Smoother texture
- Improved softness
- Temporary glow and radiance
- Enhanced relaxation
- A refreshed appearance
Important: Healthy skin is not about perfection. Consistent care, hydration, sun protection, and realistic expectations play a much larger role than any single treatment.
Tips for Different Skin Types
Dry Skin
- Use creamy cleansers.
- Prioritize hydrating masks.
- Choose richer moisturizers.
Oily Skin
- Select clay-based masks.
- Use lightweight moisturizers.
- Avoid harsh over-cleansing.
Sensitive Skin
- Use fragrance-free products.
- Limit exfoliation frequency.
- Perform patch tests when trying new products.
Combination Skin
- Balance hydration and oil control.
- Consider multi-masking techniques.
- Use gentle, versatile formulations.
How Often Should You Do an At-Home Facial?
Most skincare experts recommend performing a complete facial approximately one or two times per month. This frequency allows the skin to benefit from deeper treatments without becoming overwhelmed.
Daily skincare practices such as cleansing, moisturizing, and applying sunscreen remain the foundation of healthy skin. Think of facial treatments as an enhancement rather than a replacement for daily care.
At a Glance
- Start with cleansing and gentle exfoliation.
- Steam helps prepare skin for treatments.
- Choose a mask based on your skin type.
- Massage, tone, and moisturize for a polished finish.
- Repeat once or twice monthly for maintenance.
Conclusion
A simple seven-step at-home facial can be a powerful addition to your skincare routine. By cleansing, exfoliating, steaming, masking, massaging, toning, and moisturizing, you create a complete experience that supports cleaner, softer, and more radiant-looking skin.
The beauty of an at-home facial lies in its flexibility. You can tailor products and techniques to suit your individual skin needs while enjoying a relaxing self-care ritual. With consistency, gentle care, and attention to your skin type, you can create a routine that helps maintain a healthy glow throughout the year.
Tags
DIY Facial At Home Facial Glowing Skin Skincare Routine Beauty Tips Healthy Skin Home Spa Facial Steps