Miniature clay pie crafts are the perfect blend of cute, creative, and beginner-friendly. With tiny crusts, colorful fruit fillings, and playful handmade details, this easy DIY project turns simple clay into adorable pretend desserts that kids, beginners, and craft lovers can enjoy. Whether you are planning a rainy-day activity, a classroom craft, a birthday craft table, or a cozy weekend project at home, clay mini pies are small enough to feel manageable while still offering lots of room for imagination.
What makes this craft so appealing is its simplicity. Kids can shape basic pie shells, roll tiny clay berries, press soft crust edges, and decorate each piece with their favorite colors. The finished mini pies can be used for dollhouse displays, pretend bakery play, handmade charms, magnets, ornaments, or simply as a sweet collection of tiny art. This guide walks through the materials, techniques, design ideas, and practical tips that make clay crafts for kids easy, fun, and memorable.
Key Takeaways
- Mini clay pies are a beginner-friendly craft that works well for kids and adults.
- Simple shapes like circles, strips, and tiny balls create realistic pie details.
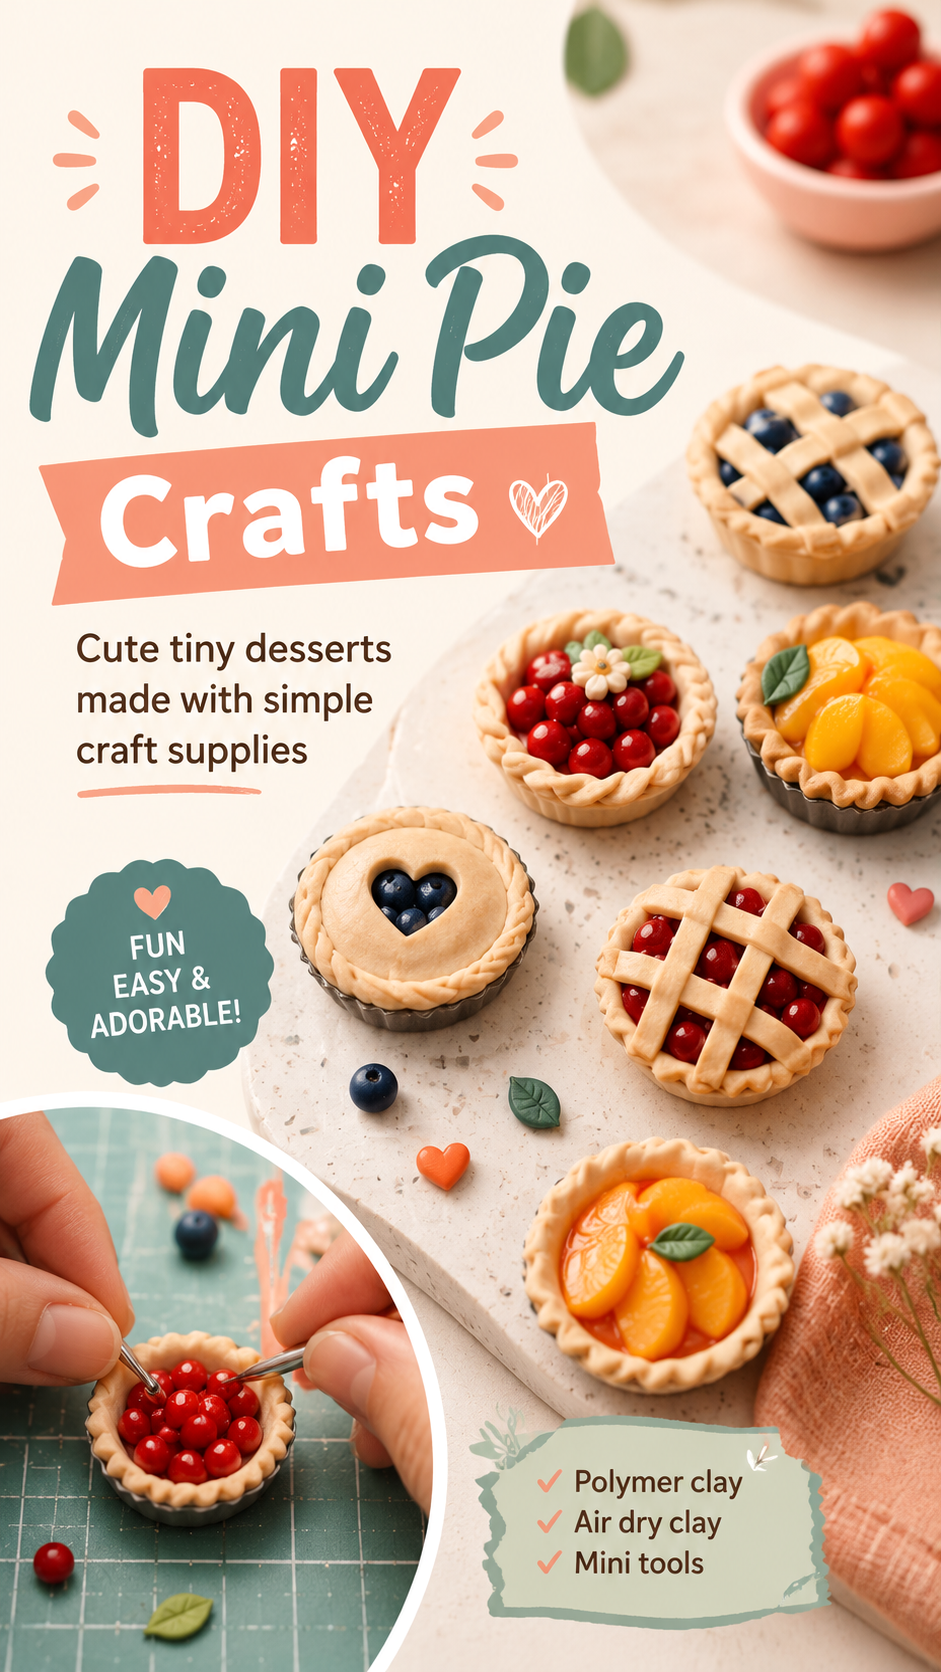
- Air dry clay is easy for children, while polymer clay offers a more durable finish with adult supervision.
- Fruit fillings can be made with colorful clay beads, small rolls, or pressed shapes.
- Finished pieces can become dollhouse food, magnets, charms, ornaments, or pretend play accessories.
- The project encourages fine motor skills, color mixing, pattern making, and creative confidence.
Why Mini Clay Pie Crafts Are Great for Kids
Clay crafting gives children a hands-on way to create something detailed without needing complicated tools. Mini pie crafts are especially fun because they combine familiar dessert shapes with playful colors and textures. A child can start with a simple round base, add a few tiny red berries, and instantly see the pie come to life.
Unlike many craft projects that require perfect cutting or precise measuring, clay pies are forgiving. A slightly uneven crust can look charming. A wavy lattice top can feel handmade in the best way. A mix of berry sizes adds character. This makes the project ideal for kids who are still developing patience and fine motor control.
Important: The best kids’ craft projects leave room for small imperfections. Mini clay pies look even sweeter when each one has a handmade personality, so focus on creativity rather than perfect results.
Best Clay Options for Easy DIY Mini Pies
The type of clay you choose can shape the entire crafting experience. For younger kids, soft air dry clay is often the easiest option because it does not need baking. It can be shaped, decorated, and left to dry naturally. This makes it great for classrooms, playdates, or quick craft sessions at home.
Polymer clay is another popular choice for miniature food crafts. It holds detail beautifully and becomes durable after baking. Because polymer clay must be cured according to package instructions, it is best used with adult supervision. Older kids and teens may enjoy polymer clay because it allows for smoother details, more realistic fruit textures, and long-lasting finished pieces.
Air Dry Clay
Air dry clay is soft, accessible, and easy to use. It works well for kids who want a low-pressure craft experience. Once shaped, the pieces dry over time and can be painted later if needed. White air dry clay can be colored with paint after drying, while colored air dry clay lets kids make bright designs right away.
Polymer Clay
Polymer clay is excellent for small, detailed crafts like tiny pies, dollhouse food, and miniature bakery items. It comes in many colors, so kids can use tan for crust, red for cherry filling, blue for blueberry filling, and orange or yellow for peach-style fruit. The texture stays workable until baked, which gives crafters more time to adjust details.
Modeling Clay for Practice
If you want a no-pressure practice session, non-drying modeling clay can be a smart choice. Kids can shape pies, take them apart, and start again. This option is especially useful for younger children before moving on to air dry clay or polymer clay for finished keepsakes.
Supplies You Need for Clay Mini Pie Crafts
You do not need a large craft kit to make adorable mini pies. Most of the charm comes from simple shapes and careful layering. A few basic supplies will help kids create pie shells, fruit fillings, lattice crusts, and cute finishing touches.
- Tan, beige, or light brown clay for pie crusts
- Red, blue, purple, orange, or yellow clay for fruit fillings
- Small round cutters, bottle caps, or clay tools for shaping circles
- Toothpicks, plastic clay tools, or child-safe sculpting tools
- A craft mat or smooth work surface
- Tiny tart tins, bottle caps, or silicone molds for shaping pie bases
- Optional gloss glaze for a shiny fruit effect
- Optional magnets, jewelry findings, or ornament loops for finished projects
If crafting with a group, set up the supplies in small bowls or trays. Keeping colors separated helps prevent muddy clay mixtures and makes the table look inviting. Kids often feel more inspired when they can see bright clay berries, tiny crust strips, and mini tools ready to use.
How to Make Easy Clay Mini Pies Step by Step
The process can be as simple or detailed as you want. For younger kids, keep the project focused on forming a pie shell and adding colorful filling. For older kids, add lattice crusts, braided edges, heart cutouts, leaves, or tiny whipped cream details.
Step 1: Shape the Pie Base
Start with a small ball of tan clay. Flatten it gently into a round disk. Press the center slightly to create a shallow bowl shape. This will become the crust base. Kids can use a fingertip, small spoon, rounded tool, or the bottom of a tiny cap to make the hollow center.
For a crimped edge, gently pinch around the rim with fingers. A toothpick can also be used to press small lines around the edge. These little marks create the look of a classic pie crust without needing advanced sculpting skills.
Step 2: Add the Fruit Filling
Roll tiny balls of red clay for cherry or berry pie, blue clay for blueberry pie, or orange clay for peach pie. Place the tiny pieces inside the crust. Kids can fill the center completely or leave some space for a top crust.
For a glossy fruit look, press the balls close together and add a clear glaze after the clay has dried or baked, depending on the clay type. This gives the fruit a juicy effect that makes the mini pies feel extra realistic.
Step 3: Create a Lattice Crust
Roll thin strips of tan clay. Lay a few strips across the top of the fruit, then add more strips in the opposite direction. The lattice pattern does not need to be perfect. Even a simple crisscross design makes the tiny pie look detailed and charming.
Trim the extra ends with a plastic tool or gently tuck them into the edge of the crust. Kids can press the rim again to seal the strips and add texture.
Step 4: Add Cute Details
Small details make these clay crafts feel special. Add a tiny leaf on top of a fruit pie, a small heart-shaped crust piece, a flower detail, or a braided edge. Older kids may enjoy experimenting with different crust patterns, while younger kids can add colorful clay dots for a playful look.
Pro Tip: To make a mini pie look polished, use one main filling color and one small accent color. For example, red berries with a green leaf or orange fruit slices with a cream-colored topping create a balanced design.
Step 5: Dry, Bake, or Finish
Finish the piece according to the clay type. Air dry clay should be left to dry fully on a flat surface. Polymer clay should be baked by an adult following the package directions. Once finished, the pies can be glazed, painted, or turned into small accessories.
Creative Mini Pie Design Ideas
One of the best parts of this easy DIY clay craft is how many variations kids can make. A single pie idea can turn into a whole pretend bakery collection. Encourage kids to choose colors based on their favorite fruits, seasons, or party themes.
Cherry Berry Pie
Use bright red clay balls for a cheerful cherry pie look. Add a lattice top or leave the berries uncovered. This is one of the easiest designs for kids because the filling can be made from simple round shapes.
Blueberry Mini Pie
Deep blue or purple clay creates a lovely blueberry pie. Kids can add a solid top crust with a tiny heart-shaped cutout, or they can use a few strips of crust across the top. A small dusting effect with pale chalk pastel can make the crust look baked, but this step is optional.
Peach or Apricot Tart
Orange and yellow clay pieces can be shaped into tiny fruit slices. Arrange them in a circle for a pretty tart design. This is a great option for kids who enjoy patterns and color placement.
Mixed Fruit Pie
Combine red, blue, purple, and yellow clay pieces for a colorful mixed fruit pie. This design is perfect when kids have leftover clay scraps from other projects. It also teaches color balance and composition in a playful way.
Expert Insight
Miniature food crafts are especially satisfying because they use repeatable shapes. Once kids learn how to make a tiny crust, berry ball, strip, and leaf, they can combine those shapes in endless ways to create new desserts.
How to Make This Craft Kid-Friendly
To keep clay crafts for kids easy and enjoyable, prepare the workspace before starting. Cover the table with a washable mat, divide clay colors into small portions, and set out only the tools needed for the project. Too many supplies can overwhelm younger crafters.
It also helps to make one sample pie before kids begin. The sample gives them a visual goal without forcing them to copy it exactly. Encourage them to choose their own fruit colors, crust styles, and decorations.
For Younger Kids
Keep the design simple. Use a round crust, colorful clay balls, and a few pressed edge marks. Skip small tools if they are frustrating. Let children focus on rolling, pressing, and arranging pieces.
For Older Kids
Add more detailed steps like lattice crusts, fruit slices, braided rims, and charm loops. Older kids may enjoy turning their clay pies into keychains, magnets, or dollhouse accessories.
For Group Crafts
Set up a mini pie station with clay colors, tools, and example designs. Keep the project short enough to hold attention, especially for parties or classrooms. A 30 to 45 minute craft window is usually enough for shaping and decorating.
Fine Motor Skills and Creative Benefits
Mini clay pies may look like a cute craft, but they also support useful developmental skills. Rolling tiny berries, pressing crust edges, and placing lattice strips all require hand control. These small movements help children practice coordination in a relaxed and enjoyable way.
The project also supports decision-making. Kids choose colors, decide where to place fruit pieces, and experiment with patterns. They learn that design choices can change the feeling of a finished piece. A red lattice pie feels classic, while a peach tart feels bright and sunny.
Important: Clay crafts are not just about the finished item. The rolling, pressing, arranging, and problem-solving involved in the process are valuable parts of the activity, especially for children who enjoy tactile learning.
Ways to Use Finished Mini Clay Pies
Once the mini pies are dry or baked, they can be used in many creative ways. This makes the project even more exciting for kids because the finished craft can become part of play, decor, or gift-making.
- Dollhouse food: Add mini pies to a pretend kitchen, bakery, or tea party scene.
- Magnets: Glue a small magnet to the back for a cute fridge decoration.
- Charms: Add jewelry findings to make backpack charms or keychains.
- Ornaments: Attach a small loop for seasonal handmade decor.
- Gift toppers: Use mini pies to decorate wrapped gifts or handmade cards.
- Play bakery setup: Create a full set of pretend desserts for imaginative play.
Tips for Making Mini Clay Pies Look More Realistic
Realistic miniature crafts often come down to texture, color, and scale. The good news is that these details can be simple. A toothpick can create crust lines. A tiny ball tool can press fruit into place. A soft brush of color can make the crust look warm and baked.
Use Warm Crust Colors
Mix tan clay with a small amount of light brown or cream to avoid a flat color. A slightly varied crust tone looks more natural and handmade.
Keep Fruit Pieces Small
Mini pies look more convincing when the fruit filling is scaled down. Tiny clay balls, short rolls, and small slices work best.
Add Texture to the Edges
Pinching or pressing the crust rim gives the pie a finished look. Even simple repeating marks make the piece feel more detailed.
Finish with Shine
A light glaze on the fruit filling can make cherries, blueberries, or peach slices look juicy. Keep the crust matte for contrast.
Common Mistakes to Avoid
Even easy clay crafts can become frustrating if the pieces are too tiny, too sticky, or too complicated. A few simple adjustments can make the activity smoother.
First, avoid giving young kids very small pieces if they are not ready for detailed work. Start slightly larger and let them shrink the scale as their confidence grows. Second, do not overload the pie with too many decorations. A clean design often looks better than one with every color included.
Finally, remember that clay can pick up lint, crumbs, and dust. Wipe the table and hands before crafting, especially when using light crust colors. A clean workspace makes the final mini pies look brighter and neater.
Easy Variations for Different Occasions
Mini clay pies can be adapted for different seasons, parties, and craft themes. For a spring craft, use pastel fruit colors and tiny flowers. For a summer activity, create bright berry and peach tarts. For a cozy fall craft, make apple-style pies with warm brown crusts and cinnamon-inspired colors.
For a birthday party, set up a mini bakery craft table where each child makes a tiny dessert to take home. For a classroom project, connect the activity to shapes, patterns, colors, or measurement. For a family craft night, let everyone design a different pie and display the collection together.
At a Glance
- Best for: kids, beginners, classrooms, parties, and family craft time
- Main materials: air dry clay or polymer clay, simple tools, bright colors
- Skill level: easy with room for advanced details
- Finished uses: magnets, charms, dollhouse food, ornaments, or pretend play
- Top design idea: tiny berry pies with lattice crusts and crimped edges
Conclusion: A Sweet and Simple Clay Craft Kids Will Love
Easy DIY clay mini pie crafts are a wonderful choice for kids because they are cute, creative, and flexible. The project uses simple shapes, cheerful colors, and hands-on techniques that feel satisfying from start to finish. Kids can roll berries, shape crusts, press patterns, and decorate tiny desserts in their own style.
Whether you use air dry clay for a no-bake craft session or polymer clay for lasting miniature pieces, this activity offers plenty of creative value. It is easy enough for beginners, detailed enough for older kids, and charming enough to display or gift. With a few basic supplies and a little imagination, a simple craft table can become a tiny handmade bakery filled with colorful mini pies.
Tags
Clay Crafts for Kids Easy DIY Crafts Miniature Food Crafts Polymer Clay Ideas Air Dry Clay Projects Kids Craft Ideas DIY Mini Pies