Cardboard crafts have moved far beyond simple school projects. With a little creativity, a few basic tools, and a smart eye for shape, cardboard can become beautiful home decor that looks modern, intentional, and surprisingly stylish. One of the best examples is a DIY cardboard vase: a tall sculptural piece made from layered or folded cardboard, styled with greenery, dried stems, or faux plants for a cozy handmade touch.
This kind of home decor cardboard DIY project is perfect for anyone who loves budget-friendly decorating, upcycling, and creating custom pieces without spending much money. It fits beautifully into boho rooms, modern shelves, craft corners, cozy apartments, dorm rooms, and creative studios. The finished look can feel earthy, minimal, playful, or elegant depending on the shape, color, and styling you choose.
Key Takeaways
- A DIY cardboard vase is a stylish way to turn recycled materials into home decor.
- The project works well with faux greenery, dried flowers, pampas grass, or simple branches.
- Layered cardboard creates structure, texture, and a sculptural handmade look.
- This craft is ideal for budget decorating, upcycled decor, and beginner-friendly DIY projects.
- Paint, paper wrapping, or natural cardboard tones can completely change the final style.
- The vase should be used as a decorative cover, not as a container for water.
Why DIY Cardboard Home Decor Is So Popular
DIY cardboard home decor is popular because it combines creativity, affordability, and sustainability. Cardboard is easy to find, simple to cut, and flexible enough to shape into decorative objects. Instead of throwing packaging away, you can transform it into something useful and beautiful for your home.
There is also something satisfying about making decor by hand. A cardboard vase does not need to look factory-perfect. In fact, the charm often comes from the texture, layers, and small handmade details. The ridges, edges, and natural kraft color can make the piece feel warm and organic.
Important: The best cardboard decor projects are not about hiding the material completely. They celebrate the texture of cardboard while giving it a clean shape, strong structure, and thoughtful styling.
For Pinterest lovers, this type of project is especially appealing because it is visual, practical, and easy to personalize. A tall cardboard vase instantly creates a focal point. It can be styled on a table, entryway console, shelf, floor corner, or craft room display. The result feels creative without being complicated.
The Core Idea: Turning Cardboard Into a Decorative Vase
The central idea behind this project is simple: build a vase shape from cardboard, strengthen it with layers, then style it as a decorative home accent. The vase can be tall and cylindrical, fluted, rounded, geometric, or sculptural. The look depends on how the cardboard is cut, folded, wrapped, and finished.
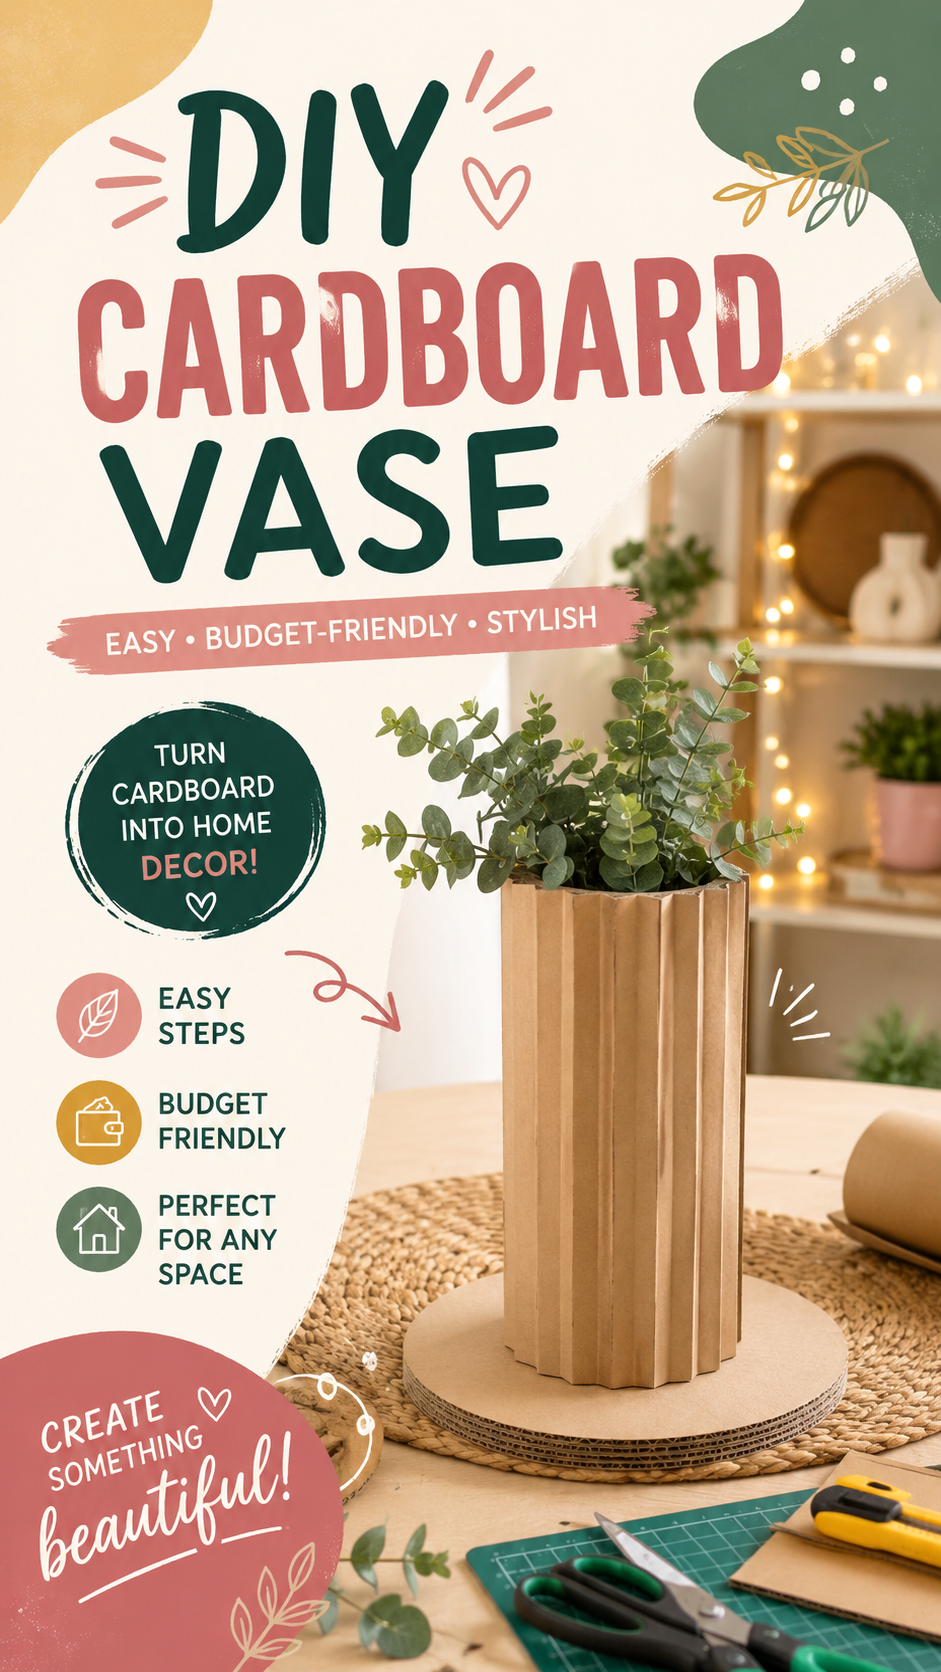
A popular version uses vertical cardboard strips or corrugated panels around a tube-like base. This creates a ribbed texture that resembles ceramic, wood, or handmade clay from a distance. When placed on a round cardboard base, the vase gains stability and a more finished appearance.
What Makes the Cardboard Vase Look Stylish
The difference between a basic craft and a polished decor piece is in the details. Clean edges, even spacing, balanced proportions, and a thoughtful finish all help the vase look more intentional. A tall shape feels elegant, while a wider base makes it feel grounded and stable.
Adding faux eucalyptus, dried wheat, pampas grass, or simple leafy stems gives the vase an instant designer-inspired look. The contrast between the natural cardboard and soft greenery makes the finished piece feel fresh, cozy, and suitable for many home styles.
Best Materials for a Home Decor Cardboard DIY Vase
You do not need expensive supplies for this project. Most materials are easy to find at home or in a basic craft kit. The goal is to choose cardboard that is strong enough to hold its shape while still being easy to cut and assemble.
Basic Supplies You May Need
- Corrugated cardboard from boxes or packaging
- A cardboard tube, rolled cardboard sheet, or tall base form
- Craft knife or strong scissors
- Hot glue gun or strong craft glue
- Ruler and pencil for measuring
- Round cardboard pieces for the base
- Paint, paper, fabric, or natural finish for decoration
- Faux plants, dried flowers, or decorative stems
If you want a cleaner result, use a sharp blade and measure each strip before cutting. Uneven strips can still look handmade and charming, but consistent sizing gives the vase a more modern finish.
Pro Tip: Corrugated cardboard is especially useful because the ridged center adds strength. It also creates beautiful texture when the edges are visible or when strips are layered vertically.
How to Design a DIY Cardboard Vase That Looks High-End
A cardboard vase can look surprisingly expensive when the design is simple and well balanced. Instead of adding too many decorations, focus on shape, texture, and styling. A clean silhouette often looks more refined than a busy one.
Choose a Strong Shape
Start with the overall form. A tall cylinder is classic and easy to style. A fluted vase feels trendy and sculptural. A rounded vase looks softer and more artistic. A geometric vase works well for modern interiors.
For beginners, a straight vase is usually the easiest option. You can create it by wrapping cardboard strips around a tube or building panels around a simple base. Once you feel confident, you can try curved sides, layered rings, or asymmetrical shapes.
Add Texture With Layers
Layering is what makes cardboard crafts feel more dimensional. You can stack circular pieces to create a thick base, add vertical strips to form ridges, or glue shaped pieces around the vase for a sculptural effect.
Layered cardboard also improves durability. A single thin piece may bend too easily, but several layers glued together can become sturdy enough for decorative use. This is especially important for taller pieces that need to stand upright.
Keep the Color Palette Natural or Soft
The natural brown tone of cardboard works beautifully with neutral home decor. It pairs well with cream, white, sage green, black metal, woven baskets, and warm wood tones. For a softer look, paint the vase beige, clay, terracotta, ivory, or muted green.
A matte finish usually looks more elegant than a shiny finish. Spray paint, chalk paint, or acrylic paint can all work, depending on the look you want. You can also wrap the vase with textured paper, linen-style fabric, or peel-and-stick wallpaper for a more finished appearance.
Expert Insight
The secret to making cardboard decor look polished is restraint. Choose one strong shape, one main texture, and one simple styling idea. Too many colors or embellishments can make the project look cluttered, while a clean design feels more modern and home-ready.
Step-by-Step Concept for Making a Cardboard Vase
There are many ways to make a DIY cardboard vase, but the basic process is similar for most designs. You create a structure, strengthen it, cover or decorate it, then style it with lightweight stems.
Step 1: Build the Base
Cut two or more circles from sturdy cardboard and glue them together. This creates a thicker base that helps the vase stand securely. A round base gives the project a clean decorative finish and prevents the tall center from looking unfinished.
You can leave the base visible as part of the design or cover it with paper, paint, or fabric. If the vase is tall, make the base wider for better balance.
Step 2: Create the Tall Vase Form
The center form can be made from a cardboard tube, rolled cardboard, or panels glued into a cylinder. If you want a ribbed look, cut long vertical strips and attach them around the outside. Keep the spacing even for a cleaner appearance.
For a more sculptural look, use folded cardboard panels. Folding creates sharp ridges and shadows, which can make the vase look like a modern ceramic piece from a distance.
Step 3: Strengthen the Structure
Glue is important here. Hot glue works quickly and helps hold the shape while you build. Craft glue can also work, but it may need more drying time. Reinforce the bottom where the vase meets the base, since this is the area that supports most of the weight.
If the cardboard feels too flexible, add an extra inner layer or glue another strip behind weak areas. Strong structure is what makes the final piece feel more like decor and less like temporary packaging.
Step 4: Finish the Surface
You can keep the natural cardboard color for a raw, organic look. This works especially well with boho, earthy, Scandinavian, and minimal decor styles. If you prefer a more polished finish, paint the entire vase in a soft neutral shade.
Another option is to dry brush the ridges with a lighter color. This brings out the texture and makes the vase look more dimensional. You can also add a thin coat of matte sealer if you want extra protection from dust and handling.
Step 5: Style With Decorative Stems
Since cardboard should not be filled with water, use faux greenery, dried flowers, paper flowers, pampas grass, cotton stems, or branches. Lightweight stems work best because they do not put too much pressure on the structure.
For a modern look, keep the arrangement simple. A few tall eucalyptus stems or dried grasses can make the vase feel elegant. For a playful craft room look, use colorful paper flowers or handmade leaves.
Important: Treat a cardboard vase as a decorative vessel rather than a functional water vase. If you want to use real flowers, place a separate waterproof container inside and make sure moisture never touches the cardboard.
Decor Styles That Work Beautifully With Cardboard Vases
A DIY cardboard vase is surprisingly versatile. Because the material is neutral and easy to customize, it can fit many different interiors. The styling choices make all the difference.
Boho Home Decor
For boho decor, keep the cardboard natural or paint it in warm beige, sand, or clay tones. Pair it with pampas grass, dried palms, woven trays, rattan furniture, macrame accents, and soft lighting. The handmade texture feels right at home in a relaxed bohemian space.
Modern Minimal Decor
For a modern minimal look, choose a clean shape and a single matte paint color. White, cream, charcoal, taupe, or sage green can make the vase feel sleek and intentional. Style it with one or two sculptural branches instead of a full arrangement.
Cozy Cottage Style
For cottage-inspired decor, soften the vase with dried flowers, small floral patterns, or a creamy painted finish. Place it on a shelf with books, candles, framed prints, and vintage-style accents. The handmade quality adds warmth and character.
Creative Craft Room Decor
A cardboard vase is also perfect for craft rooms and studios. Keep the look colorful, playful, and expressive. You can add painted details, paper cutouts, hand-drawn patterns, or labels. This makes the decor feel connected to the creative energy of the space.
Where to Display a DIY Cardboard Vase
Once finished, your cardboard vase can be styled in many places around the home. Because it is lightweight, it is easy to move and restyle whenever you refresh a room.
- Entryway table: Create a welcoming handmade accent near the door.
- Living room shelf: Add height and texture beside books or framed art.
- Desk corner: Bring greenery into a workspace without using water.
- Bedroom dresser: Style it with soft dried stems for a calm look.
- Craft room display: Show off your handmade decor as part of your creative setup.
- Dining sideboard: Use it as a seasonal centerpiece with branches or faux florals.
When styling the vase, think about height. Tall stems look best when they are balanced by nearby objects, such as a stack of books, a small lamp, or a framed print. This creates a layered display that feels intentional.
Easy Ways to Customize Your Cardboard Vase
The best part of this home decor cardboard DIY idea is how easy it is to personalize. You can make several vases from the same basic material and give each one a completely different look.
Paint It Like Ceramic
Use matte paint in a stone, clay, or ivory tone to mimic ceramic. A slightly textured paint can make the surface feel even more realistic. You can also mix a small amount of baking soda into acrylic paint for a pottery-inspired finish.
Wrap It With Paper or Fabric
Textured paper, kraft paper, linen fabric, or neutral wallpaper scraps can cover seams and create a finished look. This is a good option if your cardboard has printed labels or marks that you want to hide.
Add a Fluted Effect
A fluted effect is one of the most stylish choices for a cardboard vase. Glue narrow vertical strips around the vase to create repeated ridges. This adds depth and makes the piece look more architectural.
Create a Matching Set
Try making two or three vases in different heights. A grouped arrangement looks more decorative than a single piece and works especially well on shelves or sideboards. Keep the color palette consistent so the set feels cohesive.
Pro Tip: A set of three cardboard vases in different heights can make a simple shelf look styled and intentional. Use the tallest vase for stems, the medium one as a sculptural accent, and the smallest one as a decorative object.
Common Mistakes to Avoid
Even simple cardboard crafts can look messy if a few details are overlooked. These common mistakes are easy to avoid and can make your finished vase look much more polished.
Using Thin Cardboard Only
Thin cardboard may bend or collapse, especially in taller designs. If your cardboard is lightweight, double it up or reinforce the inside. A sturdy structure is essential for a vase that stands straight.
Skipping Measurements
Freehand cutting can work for organic designs, but measured strips create a cleaner finish. Use a ruler and pencil to mark your pieces before cutting. Even small improvements in accuracy can make the vase look more professional.
Adding Too Much Weight
Heavy stems, stones, or real water can damage cardboard. Keep the styling lightweight. If you need extra stability, add hidden cardboard layers to the base rather than filling the vase with heavy materials.
Overdecorating the Surface
Too many colors, patterns, and embellishments can distract from the beautiful shape. Choose one clear style direction and keep the finish simple. This helps the vase blend naturally with your home decor.
Why This Project Is Great for Budget-Friendly Decorating
Decorating a home can become expensive quickly, especially when buying vases, planters, and shelf accessories. A cardboard DIY vase offers a creative alternative. It gives you the satisfaction of making something custom while keeping costs low.
This project is also beginner-friendly. You do not need advanced crafting skills or special equipment. Basic cutting, gluing, and styling are enough to create a piece that feels fresh and decorative. It is also forgiving because small imperfections can be covered with paint, paper, or extra layers.
Another benefit is flexibility. If you change your decor style, you can repaint the vase or make a new one. This makes cardboard crafts great for seasonal decorating, rental-friendly spaces, and anyone who enjoys refreshing their home often.
At a Glance
- Best for: DIY home decor, upcycling, and craft lovers
- Main material: Sturdy corrugated cardboard
- Style options: Boho, modern, cottage, minimal, or creative
- Best fillers: Faux greenery, dried flowers, branches, or pampas grass
- Key reminder: Keep it decorative and avoid water exposure
Conclusion: A Simple Cardboard Craft With Big Decor Potential
A DIY cardboard vase proves that beautiful home decor does not have to be expensive or complicated. With cardboard, glue, a strong shape, and thoughtful styling, you can create a decorative accent that feels modern, handmade, and full of personality.
This project is ideal for anyone who enjoys home decor cardboard DIY ideas, recycled crafts, and creative room styling. It turns everyday packaging into something worth displaying, while giving you complete freedom to choose the size, finish, and look. Whether you keep the natural cardboard texture or paint it to match your space, the result can be charming, useful, and uniquely yours.
Use it as a shelf accent, a centerpiece, a craft room decoration, or a cozy corner detail. Style it with greenery or dried stems, pair it with warm textures, and enjoy the satisfaction of making home decor with your own hands.
Tags
Cardboard DIY DIY Cardboard Vase Home Decor Crafts Upcycled Decor Budget Home Decor Recycled Crafts Handmade Decor DIY Room Decor