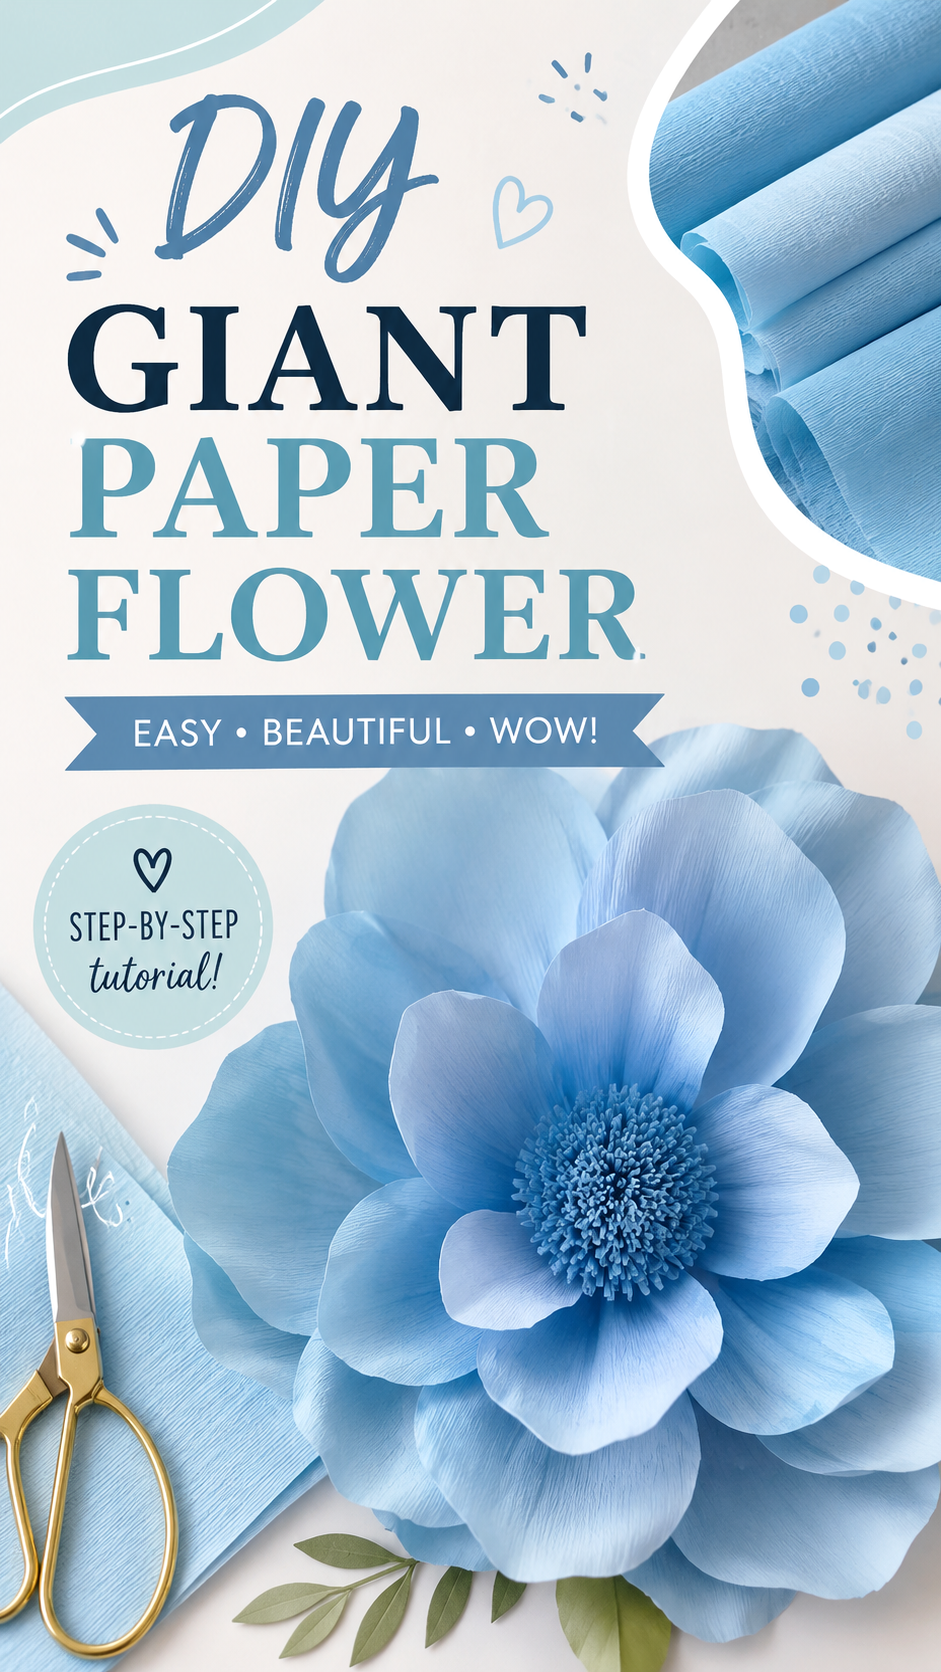
Big paper flowers have a way of turning simple craft supplies into something instantly impressive. With soft blue petals, layered texture, and a beautiful oversized shape, this DIY giant paper flower idea is perfect for anyone who wants handmade decor that feels elegant, cheerful, and surprisingly achievable. Whether you are decorating for a party, styling a nursery wall, creating a photo backdrop, or refreshing a craft corner, oversized paper blooms bring color, dimension, and personality without needing expensive materials.
The beauty of a giant paper flower DIY project is that it looks dramatic but starts with familiar supplies: paper, scissors, glue, and a little patience. The design shown here focuses on a large statement flower with curved petals, a detailed center, and a soft pastel color palette. It has that handmade charm people love on Pinterest, especially because it feels both decorative and beginner-friendly.
Key Takeaways
- Giant paper flowers are ideal for party backdrops, wall decor, craft rooms, and photo displays.
- Soft crepe paper or textured craft paper gives petals a more realistic, delicate finish.
- Layered petals create the full, dimensional look that makes oversized paper flowers stand out.
- A detailed center adds texture and makes the flower feel polished and complete.
- Pastel blue is a fresh color choice for spring decor, baby showers, birthdays, and elegant DIY styling.
Why Giant Paper Flowers Are So Popular
Giant paper flowers are popular because they offer maximum visual impact with minimal materials. They can fill a blank wall, frame a dessert table, brighten a bedroom, or add a whimsical touch to an event space. Unlike fresh flowers, paper flowers last long after the celebration ends, making them a budget-friendly option for reusable decor.
They also photograph beautifully. Large petals catch light, create soft shadows, and add movement to a background. That is why oversized paper flowers are often used for Pinterest-style party decorations, bridal showers, baby showers, birthdays, craft tutorials, classroom displays, and handmade home accents.
Important: The secret to a beautiful big paper flower is not perfection. It is layering. Slight variations in petal shape, curve, and size make the final bloom look more natural and full.
The Look: Soft Blue Petals With Handmade Texture
The standout detail in this design is the gentle blue color. Blue paper flowers feel fresh, calming, and a little unexpected. While pink, white, and blush paper flowers are common for feminine party decor, blue creates a soft statement that works beautifully for baby showers, spring events, coastal-inspired interiors, craft rooms, and nursery decorations.
The petal texture also matters. A slightly ribbed or crepe-like paper gives the flower a more realistic finish. The fine lines in the paper help the petals look delicate, almost like fabric. When the petals are shaped and layered, the texture catches light in a way that makes the flower appear more dimensional.
Best Paper Types for Big Paper Flowers
Choosing the right paper can make the project easier and more beautiful. Crepe paper is one of the best options because it stretches slightly, bends naturally, and creates soft petal curves. Cardstock is stronger and holds shape well, but it can look more structured. Tissue paper creates an airy look, though it may tear more easily.
- Crepe paper: Great for realistic petals and soft movement.
- Cardstock: Best for sturdy flowers and crisp shapes.
- Tissue paper: Ideal for lightweight, fluffy blooms.
- Textured craft paper: A lovely choice for handmade depth and detail.
Supplies You Need for an Easy DIY Giant Paper Flower
One reason this craft is so appealing is that it does not require complicated tools. A basic set of supplies is enough to create a large flower that looks impressive. For a polished result, focus on clean cutting, sturdy adhesive, and a good balance of large and small petals.
Basic Materials
- Blue crepe paper, craft paper, or cardstock
- Scissors or a craft cutting tool
- Hot glue gun or strong craft glue
- Round cardboard base
- Pencil for tracing petal templates
- Ruler for sizing petals
- Small strips of paper for the flower center
Gold scissors, pastel paper rolls, and a clean work surface create the kind of craft setup that feels inspiring before you even begin. A tidy workspace also helps keep your petal shapes organized by size, which is important when building a large layered bloom.
How to Plan the Petal Shapes
A giant paper flower usually looks best when it has several petal sizes. The outer petals should be the largest because they form the overall shape. Middle petals add fullness, while smaller inner petals create a soft transition toward the center.
For a flower like the one shown, rounded petals work beautifully. They give the bloom a soft, open look, similar to a poppy, magnolia, or decorative fantasy flower. You do not need every petal to match exactly. In fact, a little variation helps the flower look more organic.
Suggested Petal Sizes
- Large petals: Use these for the first outer layer.
- Medium petals: Add them between the large petals for fullness.
- Small petals: Place them closer to the center for detail.
- Curved accent petals: Use a few slightly folded petals to create movement.
Pro Tip: Before gluing, arrange all petals in a loose circle. This lets you preview the flower shape and adjust spacing before anything becomes permanent.
Building the Flower Layer by Layer
The most satisfying part of a giant paper flower DIY project is watching flat paper turn into a bold decorative bloom. Start with a round base, then attach the largest petals around the edge. Slightly overlap each petal so the flower looks full instead of sparse.
After the first layer is complete, add the second layer of medium petals. Place these between the gaps of the outer petals. This simple trick creates a fuller look and prevents the flower from feeling too uniform. Continue with smaller petals until the center area is ready for texture.
Creating Natural Curves
Curving the petals is what transforms the flower from flat to dimensional. You can gently stretch crepe paper with your fingers, curl the edges around a pencil, or pinch the base of each petal before gluing. These small shaping steps make a big difference in the final design.
The petals should not all curve in the same direction. Some can cup inward, while others can open outward. This gives the flower a more lifelike appearance and helps it look beautiful from different angles.
Expert Insight
A large paper flower looks more expensive when the center is detailed. Even if the petals are simple, a textured center adds depth and gives the whole piece a finished, designer-style appearance.
How to Make a Textured Paper Flower Center
The center of the flower is one of the most eye-catching details. In this design, the center has a clustered, textured look that gives the bloom personality. You can create a similar effect by cutting thin strips of paper, fringing the edges, rolling them tightly, and fluffing them outward.
For a soft monochrome look, use the same blue family as the petals. For contrast, choose a slightly darker blue for the center. This adds depth while keeping the overall design cohesive and elegant.
Simple Center Technique
- Cut several long strips of paper.
- Fringe one side with small, close cuts.
- Roll the strip tightly from one end to the other.
- Glue the bottom to keep the roll secure.
- Fluff the fringe gently to create texture.
- Attach the center to the middle of the flower.
This center technique is simple, but it adds a lot of visual interest. It also makes the flower look more handmade in the best way, because the texture feels detailed and thoughtful.
Where to Use Big Paper Flowers
Oversized paper flowers are incredibly versatile. Their scale makes them perfect for spaces or events that need a strong decorative focal point. A single giant flower can work as wall art, while a group of flowers can create a full backdrop.
Party Backdrops
Big paper flowers are a favorite for birthdays, bridal showers, baby showers, graduation parties, and garden-inspired celebrations. They can be attached to a wall, foam board, wood panel, or backdrop frame. Pairing several blue flowers with white, silver, cream, or pale green accents can create a dreamy display.
Nursery and Kids Room Decor
Soft blue paper flowers work beautifully in a nursery or child’s room. They add a gentle, creative detail without feeling too busy. Because paper flowers are lightweight, they can be easier to hang than heavier wall decor. Always attach them securely and keep them away from cribs or areas where small children can pull on them.
Craft Room Styling
A handmade flower is also a lovely addition to a craft room. It reinforces a creative atmosphere and brings color to shelves, walls, or inspiration boards. If you enjoy paper crafts, keeping a few finished flowers on display can make your workspace feel more personal and inspiring.
Important: For event decor, make flowers in different sizes. A mix of large, medium, and small blooms creates a more balanced backdrop than using only one oversized shape.
Color Ideas for DIY Giant Paper Flowers
Blue is beautiful, but the same flower style can be adapted to many different palettes. The color you choose will change the mood of the project. Soft pastels feel sweet and romantic, while bright colors feel playful and energetic. Neutrals create an elegant look that works well for weddings and modern interiors.
Popular Color Combinations
- Blue and white: Fresh, airy, and perfect for baby showers or spring decor.
- Blush and cream: Romantic and soft for weddings or bridal showers.
- Lilac and lavender: Sweet, dreamy, and ideal for feminine decor.
- Yellow and peach: Cheerful and sunny for birthdays or summer parties.
- Ivory and sage: Elegant, natural, and calming for home styling.
Styling Tips for a Pinterest-Worthy Finish
A Pinterest-worthy paper flower is not just about the craft itself. Presentation matters too. Clean edges, balanced layers, and thoughtful color choices help the final piece look polished. If you plan to photograph your DIY paper flower, use a bright background and natural light to highlight the petal texture.
Pair the flower with simple craft tools like scissors, paper rolls, or ribbon for a tutorial-style image. This makes the project feel approachable and helps viewers immediately understand that it is handmade. For wall decor photos, leave enough space around the flower so the full shape can stand out.
Make It Look More Professional
- Use consistent paper texture for all petals.
- Layer petals tightly enough to avoid empty gaps.
- Shape each petal before gluing.
- Keep the center neat and full.
- Use a simple background when photographing the finished flower.
Common Mistakes to Avoid
Even an easy paper flower tutorial can become frustrating if a few basic details are overlooked. One common mistake is using paper that is too thin for large petals. If the petals flop too much, the flower may lose its shape. Another mistake is placing every petal in a perfectly even circle, which can make the bloom look flat and unnatural.
Using too little glue can also cause petals to lift or fall away over time. On the other hand, too much glue can create lumps or visible marks. Apply adhesive near the base of each petal and press firmly until it holds.
Pro Tip: If your flower looks flat, add a few smaller curled petals near the center. This instantly creates depth and makes the bloom feel more layered.
How to Store and Reuse Paper Flowers
One of the best parts of DIY giant paper flowers is that they can be reused. After a party or event, carefully remove the flowers from the backdrop and store them in a large box. Avoid stacking heavy items on top of them because the petals can crease.
If a petal gets bent, you can often reshape it gently with your fingers. Crepe paper is especially forgiving because it has natural flexibility. For long-term storage, keep the flowers away from moisture and direct sunlight so the color stays fresh.
At a Glance
- Use textured paper for soft, realistic petals.
- Cut petals in multiple sizes for a full flower shape.
- Curve petals before gluing for natural movement.
- Add a fringed center for extra detail.
- Store finished flowers carefully so they can be reused.
Conclusion: A Beautiful DIY Flower With Big Decorative Impact
A DIY giant paper flower is the kind of craft that feels simple, creative, and rewarding all at once. With layered blue petals, a textured center, and a soft handmade finish, this project can become a stunning piece of decor for parties, bedrooms, nurseries, photo backdrops, and creative spaces. It is easy to customize with different colors, sizes, and paper textures, which makes it a versatile idea for many occasions.
Whether you are making one oversized bloom or building a full wall of paper flowers, the process is enjoyable and the result is memorable. Focus on layering, shaping, and texture, and your finished flower will look elegant, dimensional, and ready to display.
Tags
DIY Paper Flowers Giant Paper Flower Easy Paper Crafts Party Backdrop Ideas Crepe Paper Flowers Handmade Decor Paper Flower Tutorial