Origami is one of the most enjoyable ways to transform a simple sheet of paper into something beautiful. Among the many paper folding projects available, the origami butterfly stands out because it is elegant, beginner friendly, and suitable for both children and adults. With only a square sheet of paper and a few carefully placed folds, you can create a colorful butterfly that can be used for decorations, greeting cards, classroom projects, gifts, or creative displays.
Whether you are looking for an easy craft for kids, a relaxing hobby, or a fun DIY activity to enjoy at home, learning how to fold an origami butterfly is an excellent place to begin. The simple folding sequence makes this project approachable while still producing an impressive finished result that looks much more complicated than it actually is.
Key Takeaways
- Origami butterflies require only one square sheet of paper.
- This project is ideal for beginners and children.
- Paper folding improves focus, patience, and fine motor skills.
- Finished butterflies make beautiful decorations and gifts.
- You can personalize every butterfly using different colors, patterns, and paper textures.
Why Origami Butterflies Are So Popular
The butterfly symbolizes creativity, transformation, and beauty, making it one of the most loved subjects in paper crafting. Unlike many advanced origami models that require dozens of complicated folds, a butterfly offers a satisfying balance between simplicity and elegance.
Because the finished design looks graceful from every angle, it works perfectly for home décor, party decorations, scrapbooks, handmade cards, and seasonal displays. Teachers also appreciate butterfly origami because it introduces children to geometry, symmetry, and careful observation in a playful way.
Important: Simple origami projects build confidence quickly. Completing an attractive butterfly encourages beginners to explore more advanced paper folding techniques while developing patience and precision.
Materials You Need
One of the greatest advantages of origami is that it requires very few supplies. Most people already have everything they need at home.
- Square origami paper or regular paper cut into a square
- A clean, flat workspace
- Your hands for making crisp folds
- An optional ruler or folding tool for sharper creases
While traditional origami paper is lightweight and easy to fold, colorful craft paper also works beautifully. Double-sided paper creates especially attractive butterflies because both colors become visible throughout the design.
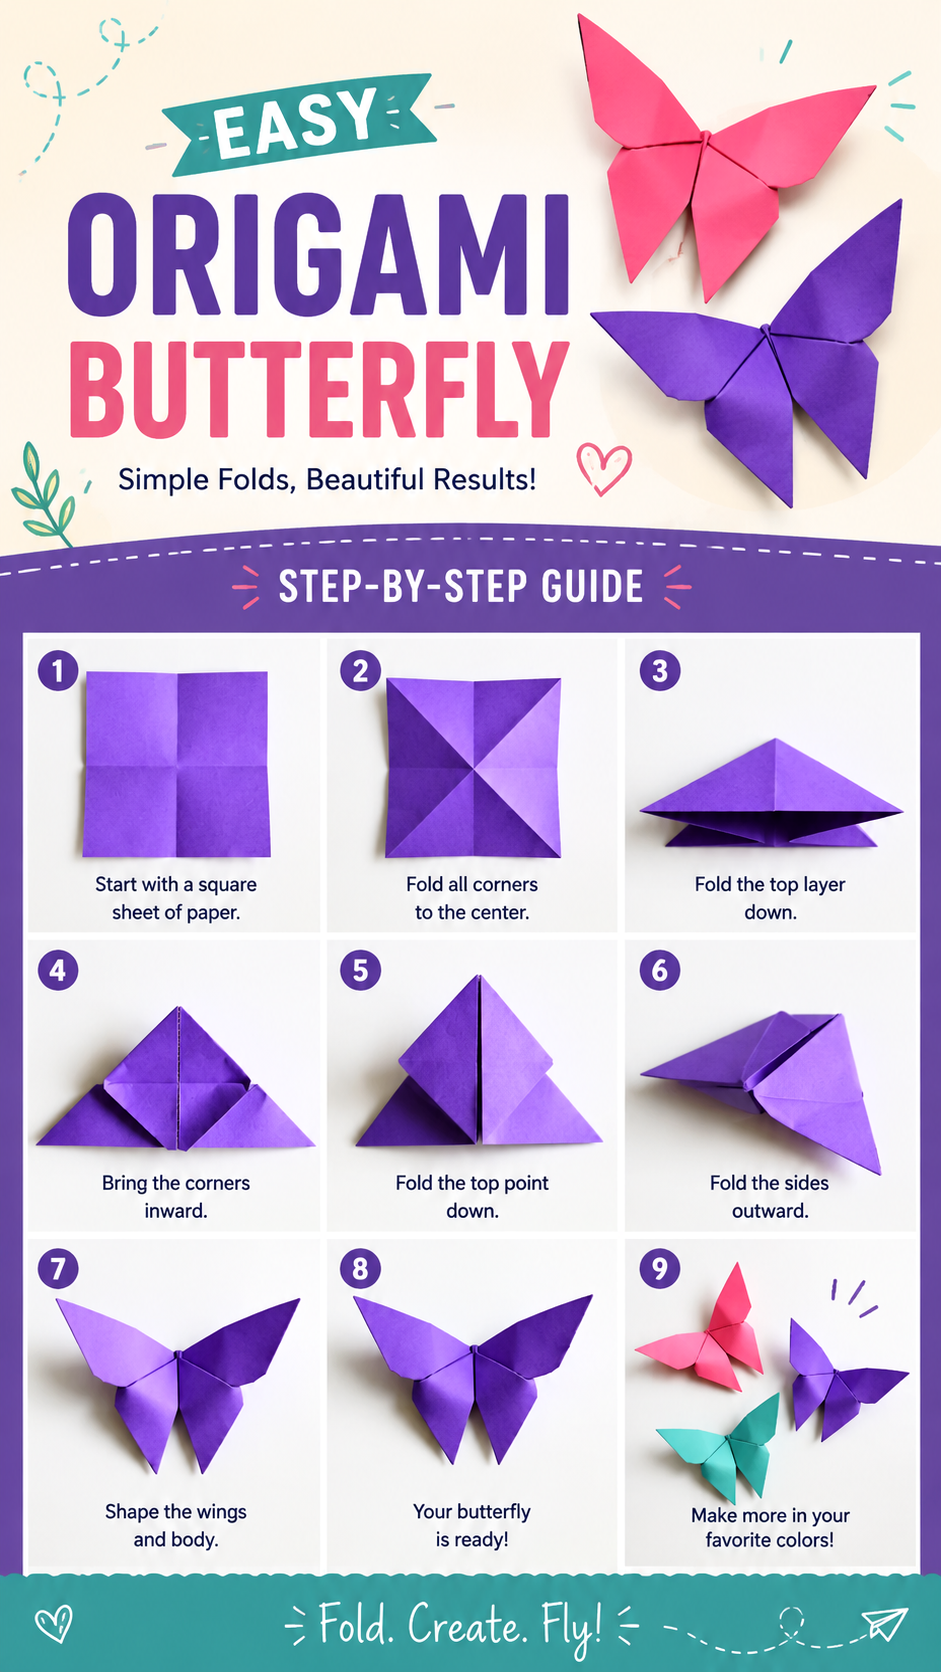
Understanding the Basic Folding Process
The project begins with a square sheet of paper. Initial folds create reference lines that guide every following step. Diagonal creases and center folds help establish symmetry, allowing the butterfly to develop naturally as each fold builds upon the last.
Step 1: Prepare the Base
Create horizontal, vertical, and diagonal creases. These folds become the framework that allows the paper to collapse into the proper base shape.
Step 2: Form the Triangle
Using the guide creases, gently collapse the paper into a triangular structure. Accuracy during this stage makes later folds much easier.
Step 3: Shape the Wings
Fold sections toward the center while keeping both sides symmetrical. These folds begin defining the upper and lower wings.
Step 4: Finish the Butterfly
Complete the remaining folds, gently adjust the wings, and give the model its final three-dimensional appearance.
Expert Insight
Sharp creases are far more important than folding quickly. Take a few extra seconds on every fold, and your finished butterfly will look cleaner, more symmetrical, and more professional.
Benefits of Making Origami Butterflies
Paper folding offers much more than an attractive finished project. It develops practical skills that benefit both children and adults.
Improves Fine Motor Skills
Each fold strengthens hand coordination and finger control. Young children especially benefit from these movements while developing handwriting and everyday motor abilities.
Encourages Concentration
Following a sequence of folds teaches patience and attention to detail. Every step depends on the previous one, encouraging careful observation.
Promotes Creativity
Once the basic butterfly has been mastered, endless creative possibilities become available. Experiment with different paper colors, patterns, and decorative techniques to make every butterfly unique.
Pro Tip: Try folding butterflies in several sizes. Mixing miniature and larger butterflies creates beautiful wall displays, table decorations, and hanging mobiles with added visual depth.
Creative Ways to Use Origami Butterflies
- Decorate greeting cards.
- Create colorful wall art.
- Make party decorations.
- Design nursery or classroom displays.
- Build spring themed centerpieces.
- Decorate gift wrapping.
- Use as scrapbook embellishments.
- Create handmade bookmarks.
The lightweight nature of paper butterflies makes them incredibly versatile. They can be attached to strings for hanging decorations, mounted onto canvas artwork, or arranged inside shadow boxes for elegant home décor.
Choosing the Best Paper
The type of paper you choose affects both the folding experience and the finished appearance.
Traditional Origami Paper
Lightweight, colorful, and easy to fold, this remains the most popular option for beginners.
Patterned Paper
Decorative prints create unique butterflies that stand out in displays and handmade crafts.
Recycled Paper
Old magazines, wrapping paper, or colorful flyers can be transformed into beautiful butterflies while reducing waste.
Common Beginner Mistakes
- Using paper that is too thick.
- Making uneven folds.
- Skipping guide creases.
- Rushing through the process.
- Pressing folds too lightly.
Remember that nearly everyone makes small mistakes during their first few attempts. Each butterfly helps improve folding accuracy and confidence.
Important: Do not worry if your first butterfly is not perfect. Origami rewards practice. Even experienced paper artists continually refine their folding precision over time.
Fun Activities for Kids
Origami butterflies easily become part of larger creative projects.
- Create a butterfly garden on poster board.
- Hang butterflies from the ceiling using thread.
- Build colorful classroom bulletin boards.
- Make butterfly themed birthday decorations.
- Decorate handmade journals.
These projects encourage teamwork, creativity, and imaginative storytelling while giving children a sense of accomplishment.
Tips for Better Results
- Always start with a perfect square.
- Fold on a smooth, flat surface.
- Match corners carefully before creasing.
- Press folds firmly.
- Work slowly for greater accuracy.
- Practice using several paper sizes.
- Experiment with bright colors.
At a Glance
- Easy project suitable for beginners.
- Requires only one square sheet of paper.
- Perfect for home, school, and family activities.
- Encourages creativity and concentration.
Conclusion
An origami butterfly is proof that remarkable creativity can begin with something as simple as a single piece of paper. This enjoyable project combines relaxation, learning, and artistic expression into an activity that people of all ages can appreciate. Whether you are introducing children to paper crafts, decorating your home, or simply looking for a calming hobby, this timeless origami design delivers rewarding results every time.
Practice the folding sequence, experiment with different paper colors and patterns, and soon you will have an entire collection of elegant butterflies ready to brighten cards, gifts, classrooms, and creative displays. Every fold builds confidence, and every finished butterfly showcases the beauty of simple paper craftsmanship.
Tags
Origami Butterfly Paper Crafts DIY Crafts Kids Activities Easy Origami Paper Folding Beginner Crafts Creative Projects