DIY clay crafts for kids are one of the most rewarding and accessible creative activities for families, teachers, and hobbyists who want to encourage hands-on learning without complicated tools or expensive supplies. The idea of shaping something from simple materials and turning it into a cute, functional object brings joy to children while also supporting their development in meaningful ways. One of the most popular projects in this space is making mini clay pots using air-dry clay, a simple yet versatile material that allows endless creativity.
This type of craft is especially appealing because it blends fun with learning. Kids are not just playing, they are developing fine motor skills, improving focus, and learning patience as they wait for their creations to dry. The finished mini pots can be used as tiny planters, ring holders, or decorative items, making the activity even more satisfying.
Key Takeaways
- DIY clay crafts help children develop creativity and motor skills
- Air-dry clay is safe, simple, and perfect for beginners
- Mini pots can be used as decor, gifts, or functional items
- Low-cost materials make this activity highly accessible
- Painting and decorating adds personalization and fun
- Ideal for home activities, classrooms, and group workshops
Why DIY Clay Crafts for Kids Are So Popular
In recent years, DIY crafts have seen a huge rise in popularity, especially among families looking for screen-free activities. Clay crafts stand out because they are tactile, calming, and highly creative. Children enjoy the sensory experience of kneading and shaping clay, while parents appreciate how simple and affordable the process is.
Important: Clay crafting is more than just entertainment. It plays a key role in early childhood development by improving hand strength, coordination, and spatial awareness. These are foundational skills that support writing, drawing, and other academic tasks.
Unlike many structured activities, clay crafting allows complete freedom. There are no strict rules or limits, which means every child can create something unique. This freedom builds confidence and encourages self-expression.
Understanding Air-Dry Clay for Kids Projects
Air-dry clay is one of the easiest materials to use for beginners. It does not require baking or special equipment, making it ideal for home use and classroom environments. Once shaped, it naturally hardens when exposed to air.
There are several reasons why air-dry clay is perfect for mini pots:
- It is soft and easy to mold
- It does not require a kiln or oven
- It is safe for supervised children’s activities
- It can be painted and decorated once dry
Pro Tip: Always keep a small bowl of water nearby when working with air-dry clay. Lightly wetting your fingers helps smooth surfaces and prevent cracks while shaping.
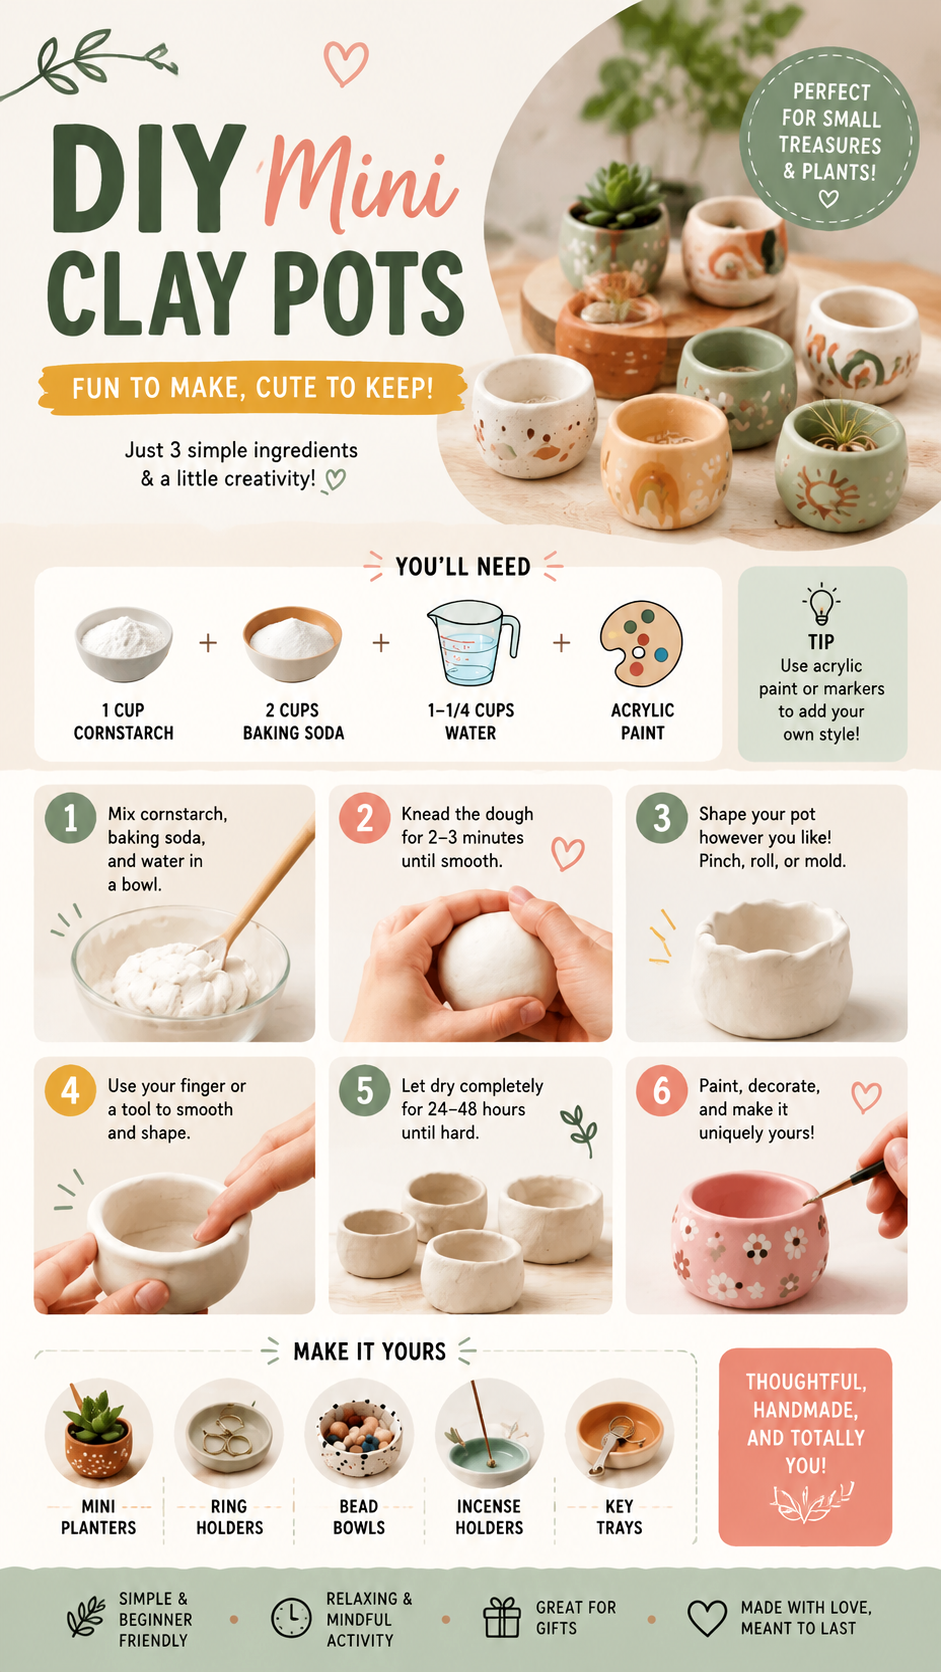
Materials Needed for Mini Clay Pots
One of the best parts of this craft is how minimal the supplies are. You likely already have most of what you need at home.
- Air-dry clay
- A clean flat surface
- Small bowl of water
- Basic sculpting tools or household items (like spoons or sticks)
- Acrylic paint or markers for decoration
Optional items include glitter, stamps, or texture tools to create patterns on the clay surface. These additions can make each pot feel more personalized and artistic.
Step-by-Step Guide to Making Mini Clay Pots
Creating mini clay pots is a simple process that can be completed in a few enjoyable steps. Each stage gives children a chance to learn and experiment.
Step 1: Preparing the Clay
Start by softening the clay. Knead it with your hands until it becomes smooth and pliable. This step is important because it removes air bubbles and makes shaping easier.
Step 2: Shaping the Pot
Take a small portion of clay and roll it into a ball. Press your thumb into the center and gently rotate it while shaping the walls. You can also pinch and mold the edges to create different styles.
Step 3: Smoothing the Surface
Use your fingers or a simple tool to refine the shape. Smooth out cracks and uneven areas with a little water for a clean finish.
Step 4: Adding Details
This is where creativity comes alive. Kids can carve patterns, press textures, or create shapes like hearts, stars, or dots on the surface.
Step 5: Drying the Pot
Important: Let the clay dry completely for 24 to 48 hours. Avoid moving it during this time to prevent cracks or deformation.
Step 6: Painting and Decorating
Once dry, the real fun begins. Use acrylic paint, markers, or even stickers to decorate each mini pot. This step allows full personalization and creativity.
Expert Insight
Combining clay crafting with storytelling can enhance creativity. Encourage children to name their pots or create characters for each design. This transforms a simple craft into imaginative play that supports emotional development and communication skills.
Creative Uses for Mini Clay Pots
Mini clay pots are not just decorative items. They can serve multiple purposes depending on how they are designed and used. This versatility makes them even more valuable as a craft project.
- Small indoor planters for succulents
- Ring holders for jewelry organization
- Bead or trinket storage bowls
- Incense holders for relaxation spaces
- Desk organizers for tiny items like clips or pins
These functional uses help children see the real-world value of their creations, making the activity more meaningful and engaging.
Benefits of Clay Crafts for Kids Development
Clay crafting supports a wide range of developmental benefits that go beyond simple entertainment. It is a well-rounded activity that supports cognitive, physical, and emotional growth.
Important: Hands-on crafts like this improve concentration and patience. Children learn to follow steps, wait for results, and take pride in completing a project from start to finish.
Additional benefits include:
- Improved fine motor control
- Enhanced creativity and imagination
- Better problem-solving skills
- Stress relief and emotional expression
At a Glance
- Simple and beginner-friendly craft activity
- Uses affordable, easy-to-find materials
- Encourages creativity and hands-on learning
- Suitable for both home and classroom settings
- Results in functional and decorative items
Tips for Better Clay Craft Results
To achieve the best results when working with air-dry clay, a few simple techniques can make a big difference. These tips help ensure smoother finishes and longer-lasting creations.
- Avoid over-wetting the clay
- Work on a clean, flat surface
- Let each piece dry naturally without heat
- Use primer before painting for better color quality
- Store unused clay in an airtight container
Perfect for Group Activities and Learning Spaces
Mini clay pot crafting is an excellent group activity for schools, workshops, and birthday parties. It encourages teamwork, sharing, and communication among children while still allowing individual expression.
Teachers can use this activity to complement lessons in art, science, or even storytelling. It also works well as a seasonal project or themed classroom activity.
Conclusion
DIY clay crafts for kids, especially mini air-dry clay pots, offer a perfect blend of creativity, learning, and fun. This simple activity transforms basic materials into meaningful handmade objects that children can proudly use or gift. It encourages imagination, builds essential developmental skills, and creates memorable hands-on experiences that go far beyond the craft itself.
Whether used at home for family bonding or in classrooms for educational enrichment, this project remains one of the most accessible and rewarding creative activities available today. With just a little clay and imagination, children can bring their ideas to life in the most charming way possible.
Tags
DIY Clay Crafts
Kids Activities
Air Dry Clay
Creative Crafts
Handmade Projects
DIY Home Activities
Kids Learning Crafts