Whimsical DIY decor has a special way of making a home feel personal, cheerful, and full of heart. A simple handmade piece can bring warmth to a shelf, entryway, craft room, beach house, kids’ room, or summer party setup. This coastal-inspired project captures that playful spirit perfectly with soft ocean colors, seashell accents, rope lettering, and a relaxed handmade look that feels charming without being complicated.
The best part about a whimsical DIY project like this is how approachable it feels. You do not need advanced crafting skills, expensive materials, or a perfectly styled workspace. With basic supplies such as craft sticks, paint, rope, shells, and glue, you can create a decorative piece that looks fresh, beachy, and creative. It is the kind of project that invites you to slow down, enjoy the process, and make something that feels uniquely yours.
Key Takeaways
- Whimsical DIY decor works best when it feels playful, personal, and slightly imperfect.
- Soft blue, aqua, cream, sand, and white tones create an easy coastal craft palette.
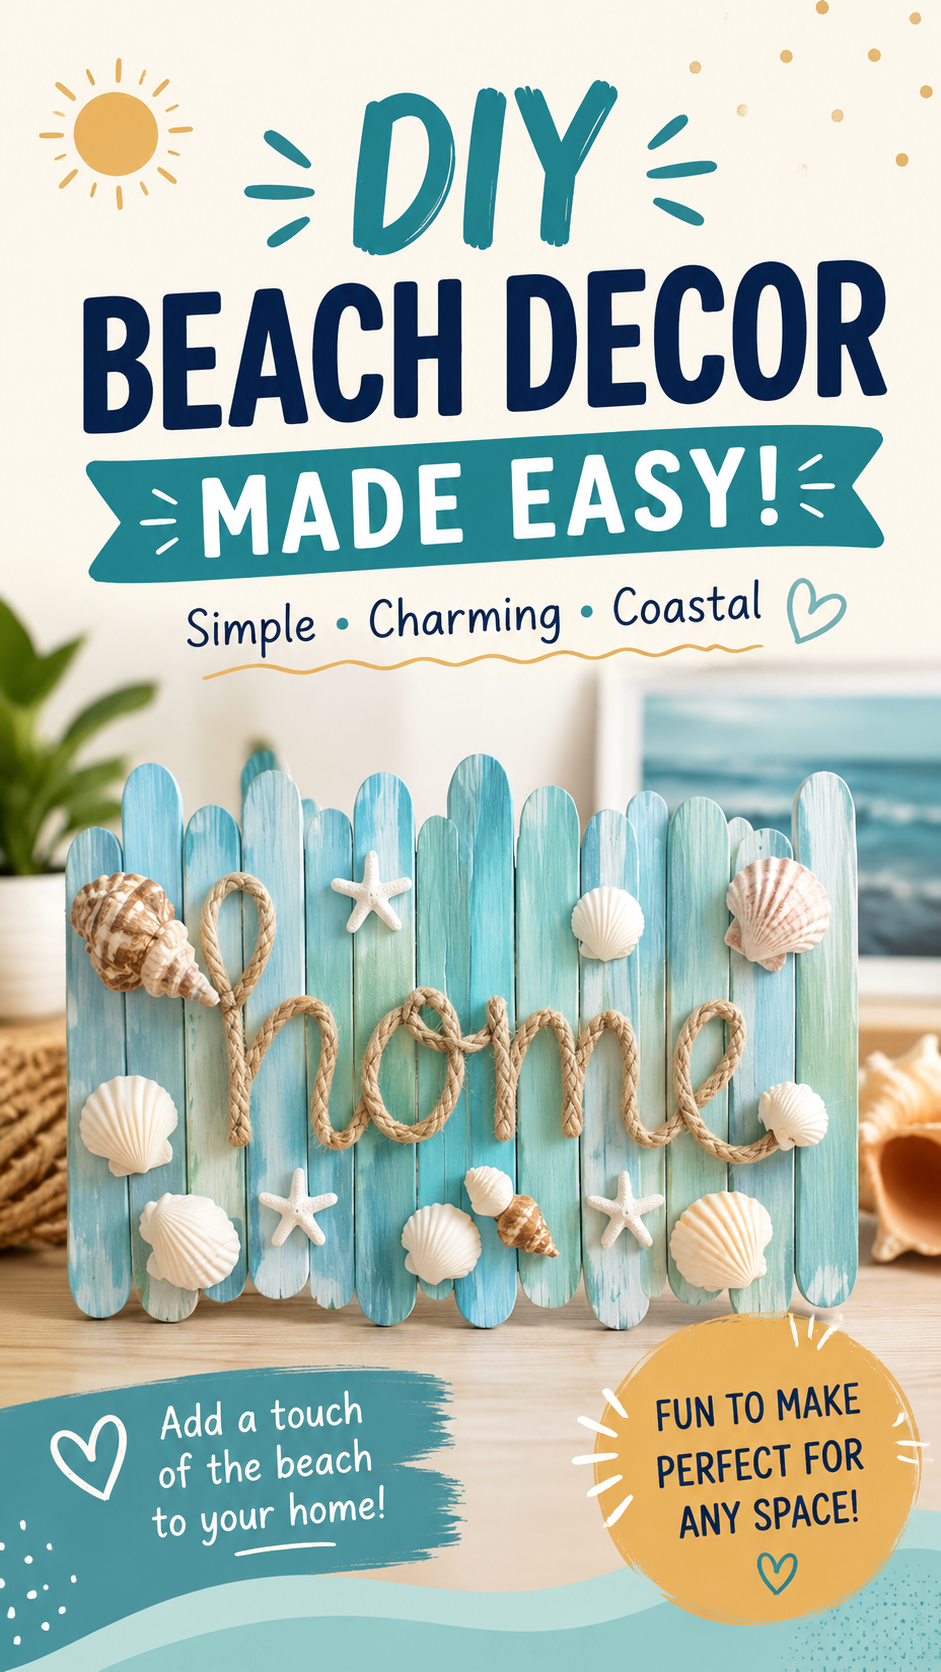
- Craft sticks, rope, seashells, and starfish accents can create a charming handmade beach sign.
- Clear typography and simple styling make DIY Pinterest pin ideas more save-worthy.
- This project style is ideal for summer decor, beach house accents, kids’ crafts, and weekend creativity.
What Makes Whimsical DIY So Appealing?
Whimsical DIY is all about adding personality to ordinary materials. Instead of aiming for a flawless store-bought finish, this style celebrates softness, creativity, texture, and charm. A brushstroke that looks slightly uneven, a shell placed at a playful angle, or a rope letter with a natural curve can make the finished piece feel more inviting.
This type of decor is especially popular because it blends creativity with comfort. It gives your space a handmade detail that feels relaxed rather than formal. In the case of beach decor, the whimsical style pairs beautifully with coastal elements because seashells, rope, weathered wood, and ocean colors already have a casual, collected-over-time quality.
Important: Whimsical DIY decor should never feel too stiff or overdesigned. The charm comes from the balance between thoughtful arrangement and a handmade finish that still feels natural.
The Coastal Craft Theme Behind This DIY Idea
This project is built around a classic beach-inspired mood. The soft blue craft sticks resemble weathered seaside wood, while the rope lettering adds nautical texture. Seashells and starfish create a playful beachcomber feel, making the design perfect for summer decorating, coastal homes, vacation rentals, dorm rooms, craft rooms, or seasonal displays.
The word “home” adds warmth to the piece and turns it from a simple craft into a meaningful decorative accent. It suggests comfort, belonging, and the idea of bringing a little bit of the beach into everyday life. That emotional detail is what makes handmade signs so popular in DIY home decor.
Unlike overly themed coastal decor, this kind of whimsical project feels light and easy to adapt. You can make it brighter for a kids’ room, softer for a neutral living room, or more rustic for a beach cottage. The foundation stays simple, but the personality changes with your color palette and embellishments.
A Fresh Take on Beach House Style
Beach house style does not have to mean a full room makeover. Sometimes one small handmade piece can add just enough coastal character to refresh a space. A whimsical DIY sign can sit on a shelf, hang near an entryway, decorate a bathroom wall, or become part of a summer mantel display.
The beauty of this project is that it uses familiar seaside details in a simple way. The colors suggest water and sky. The rope adds texture. The shells bring natural shape and dimension. Together, these details create a relaxed coastal look without feeling cluttered.
Best Materials for a Whimsical DIY Beach Decor Project
A project like this can be made with affordable supplies from a craft store, dollar store, or even items collected from a beach trip. The goal is not to use the most expensive materials. The goal is to combine simple textures in a way that feels creative and polished.
Craft Sticks or Popsicle Sticks
Craft sticks create the base of the design. They are easy to paint, lightweight, and simple to arrange in a fence-like shape. Rounded edges make the piece feel soft and playful, which works well for whimsical DIY decor.
For a more rustic look, you can vary the height of the sticks slightly. This gives the sign a relaxed handmade edge, almost like a mini beach fence. Keeping the sticks perfectly even can look cleaner, but a little variation often adds more charm.
Aqua, Blue, and White Paint
Paint is what gives the project its coastal personality. Soft aqua, pale turquoise, sky blue, seafoam green, white, and sandy beige are ideal choices. You can paint each stick one solid color or blend several tones for a weathered effect.
Dry brushing white paint over blue sticks can create a sun-faded look. This technique works especially well for beach crafts because it mimics driftwood, worn paint, and seaside textures.
Natural Rope or Jute Cord
Rope lettering brings the design to life. It adds dimension and gives the piece a nautical feel. Jute cord, cotton rope, or thin braided rope can all work, depending on the size of the sign.
For easier shaping, choose rope that is flexible enough to bend into letters. A thinner cord may be easier for beginners, while thicker rope creates a bolder statement. The natural tan color also contrasts beautifully with blue and white paint.
Seashells and Starfish Accents
Seashells are the detail that makes the craft instantly beachy. Small scallop shells, spiral shells, and tiny starfish shapes add texture and visual interest. You can use real shells, craft shells, resin pieces, or lightweight decorative accents.
The key is balance. A few well-placed shells can look elegant and charming. Too many shells may make the design feel crowded. Try arranging everything before gluing so you can see how the composition feels.
Expert Insight
For a more polished whimsical DIY look, repeat each texture at least two or three times. For example, use rope in the lettering, shells in several areas, and soft white paint across multiple sticks. Repetition makes handmade decor feel intentional.
How to Plan the Layout Before You Start
A strong DIY project often begins before the glue gun is even warm. Planning the layout helps you avoid overcrowding and makes the finished piece look more professional. Start by deciding whether the sign will be horizontal, vertical, square, or shaped like a small fence.
For a Pinterest-worthy result, think about visual hierarchy. The largest and most important element should be the main word or phrase. In this case, “home” works beautifully as the focal point because it is meaningful and easy to read. Decorative shells and starfish should support the word rather than compete with it.
Start with the Base Shape
Lay your craft sticks side by side until you have the width you want. You can keep the top edges level for a clean look or vary the heights for a more relaxed coastal fence style. Once the arrangement feels right, attach support sticks across the back to hold everything together.
If you want a sturdier sign, consider using a thin piece of cardboard, wood, or foam board as a backing. This helps the project hold its shape, especially if you plan to hang it.
Map the Rope Lettering
Before gluing rope onto the sign, lightly sketch the word with a pencil or place the rope loosely on the surface. Script-style lettering works especially well because rope naturally bends into loops and curves. However, simple lowercase letters are often easier to create than complex calligraphy.
Pro Tip: Use small dots of hot glue along the rope instead of covering the entire back at once. This gives you more control as you shape each letter and helps keep the curves smooth.
Place Shells with Breathing Room
Shell placement can make or break the design. Arrange larger shells near the corners or edges, then use smaller shells to fill gaps. Try to keep the center area readable so the rope word remains the star of the piece.
For a more whimsical effect, mix shell sizes and shapes. A tiny starfish near a letter curve or a small shell tucked beside the rope can make the piece feel playful and handmade.
Color Palette Ideas for Whimsical Coastal DIY
Color is one of the easiest ways to personalize this craft. The reference style leans into soft ocean blues and creamy whites, but there are many ways to adapt the palette depending on your decor style.
Soft Beach Cottage Palette
Use seafoam green, faded aqua, white, cream, and light tan. This palette feels airy, calm, and timeless. It is perfect for a beach cottage, bathroom shelf, coastal bedroom, or breezy summer mantel.
Playful Summer Craft Palette
Try brighter turquoise, coral, sunny yellow, and crisp white. This version feels cheerful and energetic, making it ideal for kids’ crafts, summer parties, poolside decor, or classroom art projects.
Neutral Coastal Palette
Use warm beige, driftwood gray, ivory, muted blue, and natural rope. This look feels more subtle and grown-up while still keeping the beach theme. It pairs nicely with modern farmhouse, organic modern, and minimalist coastal interiors.
Step-by-Step Whimsical DIY Beach Sign Idea
This project can be adjusted to suit your supplies and skill level, but the basic process is simple. Take your time with each stage and allow paint or glue to dry fully when needed.
- Arrange the craft sticks. Place them side by side in the size and shape you want for your sign.
- Secure the backing. Glue support sticks or a backing panel behind the design.
- Paint the base. Use soft blue, aqua, white, or seafoam paint. Add dry-brushed white for a weathered look.
- Create the rope word. Shape flexible rope into a simple word such as “home,” “beach,” “summer,” or “coast.”
- Add shells and accents. Place shells, starfish, and small embellishments around the sign.
- Finish and display. Let everything dry, then place it on a shelf or add a hanger to the back.
This is a forgiving project, which makes it great for beginners. If a letter does not sit perfectly or a shell shifts slightly, it often adds to the handmade charm. Whimsical DIY decor is not about perfection. It is about personality.
Where to Display Whimsical DIY Beach Decor
A small handmade coastal sign can work in many spaces. Because the colors are soft and the materials are lightweight, it can blend into both seasonal and year-round decor.
Entryway Table
Place the sign on a console table with a woven tray, a small vase, and a candle. This creates a welcoming first impression and gives your entryway a breezy coastal touch.
Bathroom Shelf
Beach decor works beautifully in bathrooms because the water-inspired theme feels natural there. Pair the sign with rolled towels, glass jars, shells, or a small plant for a spa-like look.
Craft Room or Creative Corner
A whimsical DIY sign can brighten a craft room and remind you to keep making things by hand. It adds color, texture, and a little inspiration to your creative space.
Summer Party Decor
Use a beach sign as part of a summer party table, lemonade station, pool party setup, or coastal-themed gathering. Handmade details make party styling feel more thoughtful and memorable.
Important: If you plan to display the piece outdoors, use weather-resistant glue and seal the painted surface. Most craft sticks and shells are best suited for indoor or covered patio use.
How to Make the Project Look More Pinterest-Worthy
Pinterest-friendly DIY projects usually have three qualities: they are easy to understand, visually attractive, and inspiring enough to save for later. This whimsical beach decor idea checks all three boxes because it uses familiar materials in a creative way.
To make your finished craft stand out, focus on clean contrast. The rope lettering should be readable against the painted background. Shells should be visible but not overwhelming. The overall color palette should feel cohesive.
Use a Clear Focal Point
Choose one main word or phrase for the center of the sign. Short words work best because they are easier to shape with rope and easier to read from a distance. “Home,” “coast,” “beach,” “relax,” and “summer” are all strong options.
Keep the Background Simple
The base can have texture, but avoid making it too busy. A soft washed paint effect gives enough movement without distracting from the rope and shell details.
Photograph It in Natural Light
If you are sharing your DIY project online, place it near a window or style it on a light wood surface. Add a few supporting props such as extra shells, rope, or a small plant, but keep the finished sign as the main subject.
Creative Variations for the Whimsical DIY Theme
Once you understand the basic idea, it is easy to create different versions. This makes the project perfect for crafting in batches, gifting, decorating multiple rooms, or creating seasonal variations.
Mini Fridge Magnet Version
Use fewer craft sticks and smaller shells to create a mini coastal magnet. Add magnetic strips to the back and use it on a refrigerator, locker, or office board.
Door Hanger Version
Make the sign slightly larger and add a rope loop at the top. This works well for a beach house bedroom door, craft room door, or covered porch display.
Kids’ Summer Craft Version
Let kids paint the craft sticks in different shades of blue and choose their favorite shells. Instead of rope lettering, younger crafters can use foam letters, painted wooden letters, or stickers.
Elegant Neutral Version
Use whitewashed sticks, ivory shells, natural rope, and minimal accents. This creates a softer coastal piece that fits beautifully with modern neutral interiors.
Common Mistakes to Avoid
Even simple crafts can feel more polished when you avoid a few common mistakes. The goal is to keep the project easy while still making it look intentional.
- Using too much glue: Excess glue can show around shells and rope. Use small amounts and add more only if needed.
- Overcrowding the design: Leave enough blank space so the word remains readable.
- Skipping layout planning: Arrange everything first before attaching permanent pieces.
- Choosing stiff rope: Flexible cord is much easier to shape into letters.
- Using too many colors: Stick to a small palette for a cleaner coastal look.
These small details can make the difference between a project that feels rushed and one that looks beautifully handmade.
Why Whimsical DIY Decor Is Great for Beginners
Beginner-friendly crafts should be simple, flexible, and satisfying. This beach decor idea is all three. The materials are easy to find, the steps are straightforward, and the finished piece gives you something decorative to enjoy right away.
It also allows room for creativity. You can change the word, colors, shell placement, size, and overall mood. That flexibility makes the project feel less intimidating and more fun.
Pro Tip: Make a small test version first if you are unsure about rope lettering. Practicing on a mini sign helps you understand how the cord bends before creating a larger display piece.
At a Glance
- Best style: whimsical coastal DIY decor
- Best materials: craft sticks, rope, seashells, paint, glue
- Best colors: aqua, white, seafoam, tan, sandy beige
- Best use: shelf decor, bathroom styling, summer crafts, beach house accents
- Best tip: keep the design simple, readable, and full of texture
Conclusion: Bring a Little Coastal Whimsy Home
Whimsical DIY decor is a beautiful way to turn simple supplies into something meaningful, cheerful, and personal. A beach-inspired craft made with painted sticks, rope lettering, seashells, and soft coastal colors can brighten a room and add a handmade touch that feels both relaxed and creative.
This style works because it is not trying too hard. It feels approachable, charming, and full of texture. Whether you display it on a shelf, use it for summer decor, make it with kids, or create a more refined version for your coastal home, the project offers plenty of room for creativity.
With a few basic materials and a little imagination, you can create a whimsical DIY piece that brings the feeling of the beach into your space. Keep the colors soft, the lettering readable, and the details playful. The result will be a handmade accent that feels fresh, fun, and truly one of a kind.
Tags
Whimsical DIY Beach Crafts Coastal Decor DIY Home Decor Seashell Crafts Summer Crafts Handmade Decor Craft Ideas