Painted jars are one of those DIY projects that instantly make everyday storage feel sweeter, brighter, and more personal. With a few clean glass jars, a small set of paints, and a simple creative plan, old containers can become charming stash jars, vanity organizers, craft supply holders, desk decor, kitchen accents, or handmade gifts. The look is playful and practical at the same time, especially when the designs include soft florals, tiny hearts, strawberries, leaves, and cheerful pastel details.
This style of DIY jar decor is perfect for anyone who loves easy upcycling projects with a cozy handmade feel. Instead of tossing empty mason jars or food jars, you can turn them into useful storage pieces that look intentional on open shelves, bedside tables, craft carts, coffee bars, or bathroom counters. The best part is that each jar can have its own personality. One can feel romantic with scattered hearts, another can look cottage-inspired with painted strawberries and daisies, while another can feel calm and modern with botanical shapes and soft abstract brush marks.
Key Takeaways
- Painted jars are a budget-friendly way to create cute storage and home decor.
- Floral, strawberry, heart, and botanical patterns work beautifully on clear glass.
- Old mason jars, candle jars, and food jars can be cleaned and reused for this project.
- Acrylic paint pens are ideal for beginners because they give more control on glass.
- Matching colors across several jars helps the final display look polished and intentional.
- These DIY stash jar ideas make practical handmade gifts for craft lovers and home decor fans.
Why Painted Stash Jars Are So Popular
Painted stash jars have become a favorite DIY idea because they combine two things people love: cute decor and useful organization. A plain jar may be practical, but a painted jar feels like part of the room. It can hold cotton pads, hair ties, tea bags, pens, buttons, beads, coffee pods, spare change, paper clips, craft tools, or small keepsakes while still looking decorative.
The charm comes from the handmade detail. A tiny row of hearts, a field of flowers, or a cluster of strawberries can make a simple jar feel special. Unlike store-bought organizers, painted jars can be customized to match your room colors, seasonal decor, or favorite aesthetic. They can look soft and cottagecore, bright and playful, minimal and botanical, or bold and whimsical.
Important: The most successful painted jar projects usually start with a simple color palette. Choosing three to five colors before you begin helps every jar look coordinated, even if each one has a different design.
The Best Jars to Use for DIY Painted Jar Decor
Almost any clean glass jar can work for this project, but some shapes are easier to decorate than others. Smooth-sided jars are the best option for beginners because the brush or paint pen can glide across the surface without getting interrupted by raised lettering or heavy texture. Mason jars are popular because they already have a charming shape and a lid, making them ideal for stash jar ideas and small storage projects.
Mason Jars
Mason jars are classic for painted jar crafts. Their lids make them useful for storing small items, and their clear glass lets painted designs stand out beautifully. Wide-mouth jars are especially practical if you want to use them for craft supplies, makeup brushes, snacks, or desk accessories.
Recycled Food Jars
Jam jars, sauce jars, pickle jars, and small condiment jars can all be reused. Once the labels are removed, they can become adorable mini stash jars. These are great for beads, pins, paper clips, loose tea, dried flowers, or tiny bathroom essentials.
Old Candle Jars
Cleaned candle jars often have a sleek, modern shape that works well with botanical or abstract painted details. They are especially nice for vanity storage, cotton swabs, hair clips, or decorative shelf styling.
Cute Painted Jar Ideas to Try
The most eye-catching jar designs often come from simple motifs repeated in a clean way. You do not need advanced painting skills to create something beautiful. Small flowers, dots, leaves, berries, and hearts are beginner-friendly and still look impressive when arranged thoughtfully.
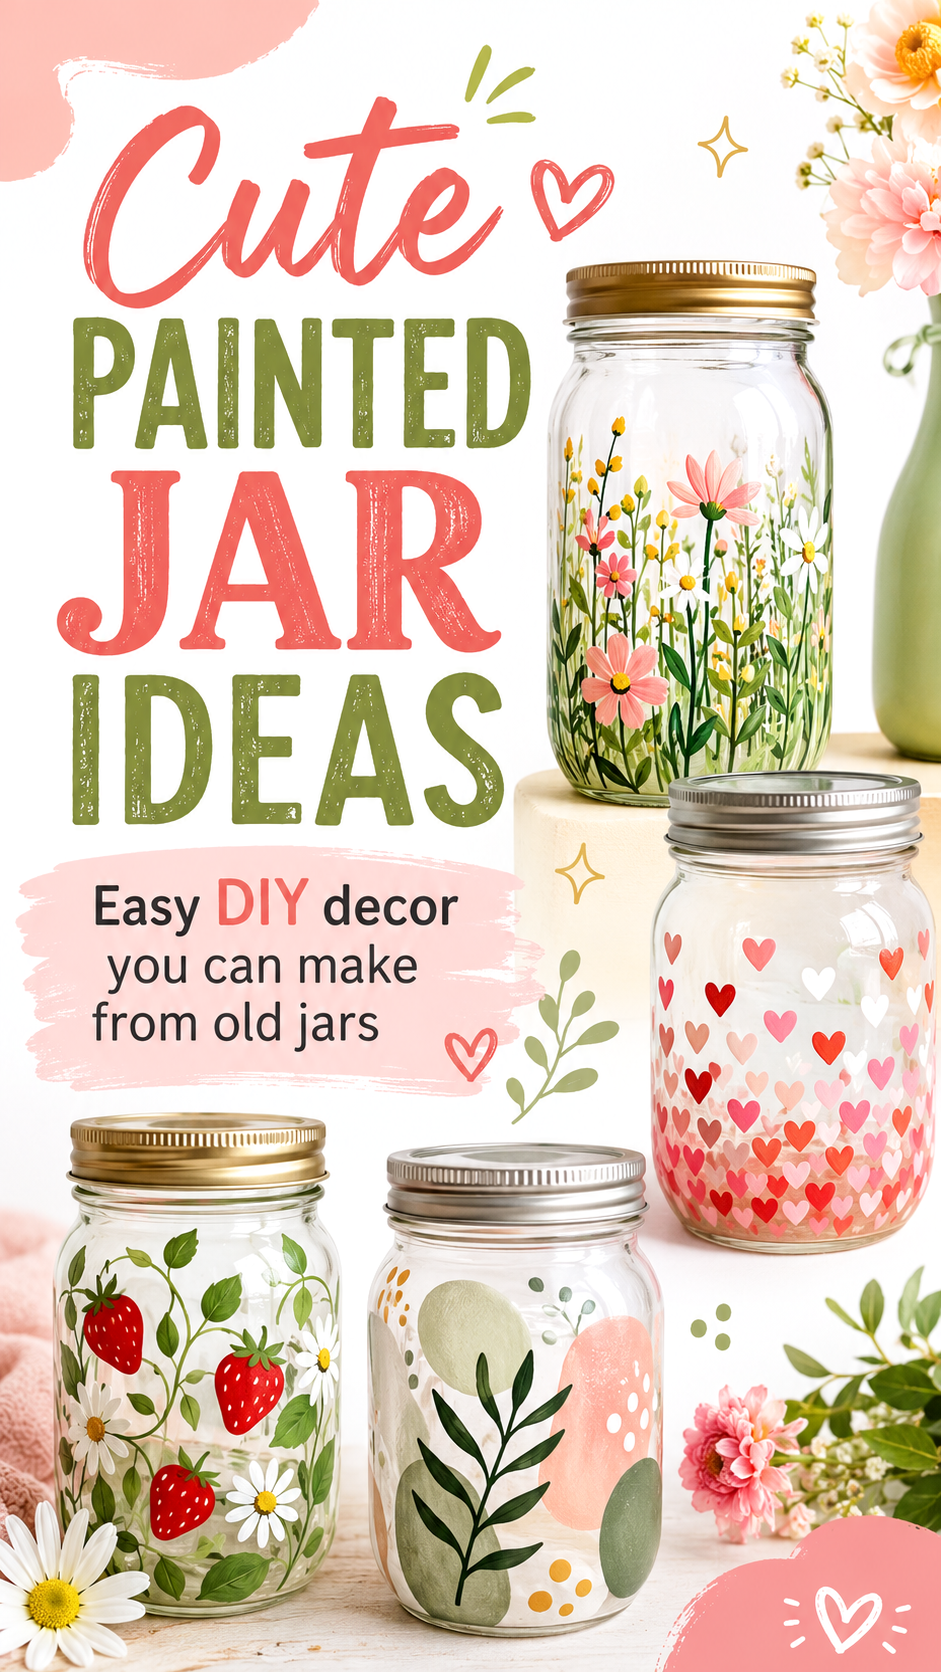
1. Floral Meadow Jar
A floral meadow jar is a perfect choice if you love soft, cheerful decor. Paint thin green stems rising from the bottom of the jar, then add tiny yellow buds, white daisies, and pink blossoms. This design works beautifully because it follows the natural shape of the jar. The flowers grow upward, making the jar feel light, fresh, and full of movement.
For a balanced look, vary the height of the stems. Some flowers can be tall and delicate, while others can sit closer to the base. Use small dots for flower centers and keep the leaves simple. This kind of painted jar looks lovely on a windowsill, craft desk, bathroom shelf, or bedside table.
2. Tiny Heart Stash Jar
A heart-patterned stash jar is playful, sweet, and very easy to make. Paint tiny hearts around the lower half of the jar in shades of pink, coral, red, blush, and white. Let the hearts look denser near the bottom and more scattered toward the middle for a soft confetti effect.
This design is ideal for Valentine-inspired decor, gift jars, vanity storage, or a cute bedroom accent. It also works well for beginners because the shapes do not need to be perfectly identical. In fact, slightly varied hearts often make the jar feel more handmade and charming.
3. Strawberry and Daisy Jar
Strawberries and daisies create a bright, cottage-inspired look that feels cheerful and nostalgic. Paint a few red strawberries with green tops, then add small white daisies and leafy vines around them. This design is especially cute for kitchen storage, tea stations, breakfast bars, or summer shelf decor.
The key is to keep the strawberry shapes simple. A rounded triangle or heart-like shape works well. Add tiny white or yellow seed dots, then paint green leaves around each berry. Pairing the fruit with daisies keeps the jar feeling fresh and decorative rather than too busy.
4. Soft Botanical Abstract Jar
For a more modern look, try a botanical abstract jar. Use pale green, sage, peach, cream, and mustard accents. Paint a few organic oval shapes, then layer simple dark green leaves or branches over them. Add white dots or tiny gold-toned details for texture.
This style works well for minimalist rooms, neutral decor, boho shelves, and modern craft spaces. It feels artistic without requiring perfect drawing skills. The abstract background shapes can be imperfect and still look intentional, which makes this a relaxing project for beginners.
Expert Insight
Painted glass looks best when the design has breathing room. Instead of covering every inch of the jar, leave some clear areas so the glass still feels light, clean, and decorative.
Supplies You Need for Painted Stash Jars
You do not need a long list of supplies to make cute painted jar decor. A few basic materials can create many different looks. Start with clean jars, paint that works on glass, and a few small tools for detail work.
- Clean glass jars with lids
- Acrylic paint or acrylic paint pens
- Small detail brushes
- Rubbing alcohol for cleaning the glass
- Cotton pads or paper towels
- Optional sealant for extra durability
- Pencil and paper for sketching design ideas
- Tray or cardboard to protect your work surface
Paint pens are often the easiest choice for small details because they give you more control. They are useful for hearts, flower centers, dots, leaves, stems, and outlines. Brushes can create softer petals and larger shapes. Many crafters like using both for a layered effect.
Pro Tip: Clean the outside of every jar with rubbing alcohol before painting. Even small amounts of oil, dust, or label residue can stop paint from sticking smoothly to glass.
How to Paint Old Jars Step by Step
Painting jars is simple, but taking your time with preparation will make the finished project look much better. The steps below work for most painted mason jar ideas, stash jar crafts, and decorative glass jar projects.
Step 1: Remove Labels and Residue
Soak the jars in warm soapy water to loosen paper labels. If any sticky residue remains, rub it gently with oil or a label remover, then wash again. The glass should feel smooth before you start painting.
Step 2: Clean the Glass Surface
Once the jars are dry, wipe the outside with rubbing alcohol. This removes fingerprints and helps the paint adhere more evenly. Try not to touch the cleaned surface too much afterward.
Step 3: Choose a Design Direction
Pick one main style for each jar. A floral meadow jar, heart jar, strawberry jar, or botanical abstract jar can all look beautiful together if they share a similar color palette. Sketch a loose idea on paper before painting directly on the glass.
Step 4: Start With the Largest Shapes
Paint the biggest elements first, such as flowers, strawberries, abstract blobs, or large leaves. Let them dry before adding smaller details. This helps prevent smudging and keeps the design crisp.
Step 5: Add Details and Texture
Use a fine brush or paint pen to add dots, tiny leaves, seeds, flower centers, outlines, stems, and little accents. These details are what make the jars feel finished and Pinterest-worthy.
Step 6: Let the Paint Cure
Allow the painted jars to dry fully according to the paint instructions. Some glass paints need extra curing time. If the jars will be handled often, consider adding a clear sealant made for glass crafts.
Color Palette Ideas for a Polished Look
A cohesive color palette can make DIY jar crafts look much more elevated. The most appealing painted jar displays often use soft, repeating colors across several designs. For example, blush pink, coral, sage green, cream, and golden yellow create a bright but gentle craft aesthetic.
Soft Cottage Palette
Use strawberry red, daisy white, leaf green, butter yellow, and warm cream. This palette works beautifully for fruit and flower designs.
Romantic Pastel Palette
Use blush pink, coral, soft red, white, and pale peach. This is perfect for heart jars, gift jars, and vanity storage.
Modern Botanical Palette
Use sage green, olive, muted peach, cream, mustard yellow, and deep green. This creates a calm, stylish look that fits modern home decor.
Important: If you are decorating multiple jars for the same shelf or room, repeat at least two colors across every jar. This simple design trick makes the collection feel coordinated instead of random.
Ways to Use Painted Stash Jars Around the Home
Painted jars are more than cute craft projects. They can solve small storage problems while adding handmade charm to your space. Because they come in different sizes, you can use them almost anywhere.
Craft Room Storage
Use painted jars to store buttons, beads, thread, glue sticks, small scissors, markers, ribbon scraps, or washi tape. Floral or heart designs make craft supplies feel cheerful and easy to display.
Vanity and Bathroom Organization
Small jars are great for cotton pads, cotton swabs, hair ties, clips, makeup sponges, or bath salts. A soft pastel jar design can make a vanity setup look more styled and less cluttered.
Kitchen and Pantry Decor
Strawberry and daisy jars look especially cute in the kitchen. Use them for tea bags, wrapped sweets, coffee accessories, mini cookie cutters, or reusable straws. Clear glass keeps the contents visible, while the painted details add personality.
Desk and Office Organization
Painted jars can hold pens, pencils, binder clips, sticky notes, paper clips, and small tech accessories. A botanical abstract design works well for a calm workspace, while heart patterns add a more playful touch.
Gift Packaging
A painted jar can become part of the gift itself. Fill it with candy, bath salts, tea packets, mini craft supplies, or handwritten notes. Add a ribbon around the lid for a simple handmade finish.
Beginner Tips for Cleaner Painted Jar Designs
If you are new to painting on glass, start with small simple designs. Tiny flowers, dots, leaves, and hearts are easier than large detailed illustrations. The goal is not perfection. The goal is a charming design that feels personal, neat, and fun to display.
- Use light pressure when painting with markers or paint pens.
- Let each layer dry before adding another color on top.
- Keep cotton swabs nearby to clean small mistakes before the paint dries.
- Practice flowers, hearts, and leaves on paper first.
- Rotate the jar slowly while painting instead of moving your hand awkwardly.
- Use a limited color palette to keep the design from looking cluttered.
One of the easiest ways to make jars look professional is to focus the design in one area. For example, paint flowers around the bottom third of the jar, hearts fading upward from the base, or a leafy branch centered on the front. Leaving clear space makes the design easier to see and helps the jar look lighter.
Quick Note
- For a cute display, group jars in odd numbers, such as three or five.
- Mix jar heights so the arrangement feels layered.
- Keep lids simple if the painted design is already detailed.
How to Style Painted Jars for Pinterest-Worthy Decor
Once the jars are finished, styling them well can make them look even more beautiful. Place them on a light wood tray, a cream shelf, a desk corner, or a kitchen counter. Add a small vase of flowers, a folded cloth, or a few craft supplies nearby to create a cozy handmade scene.
For a bright and airy look, pair painted jars with white backgrounds, soft pink accents, green plants, and natural textures. The jars should feel like the star of the display, so avoid placing too many busy items around them. A small floral accent or a simple tray is enough.
Pro Tip: When photographing painted jars, use natural light from the side and avoid harsh overhead lighting. Clear glass can reflect strongly, so soft light helps the painted details stand out without glare.
Easy Variations for Different Decor Styles
Painted jars are easy to adapt to different aesthetics. The same basic project can feel cottagecore, modern, romantic, minimalist, or playful depending on the colors and patterns you choose.
Cottagecore Painted Jars
Choose strawberries, daisies, tiny wildflowers, mushrooms, gingham-inspired lids, and warm natural colors. These jars look beautiful in kitchens, craft rooms, and cozy bedrooms.
Minimal Botanical Jars
Use simple green leaves, thin stems, muted colors, and plenty of clear glass. This style is perfect for modern shelves, desk decor, and calm neutral interiors.
Playful Heart Jars
Use pink, red, coral, and white hearts in scattered patterns. These jars are cheerful for gifts, bedroom decor, craft storage, or seasonal displays.
Soft Abstract Jars
Paint rounded shapes, dots, lines, and simple leaves. This look feels artsy and relaxed without being difficult to create.
Common Mistakes to Avoid
Even a simple DIY jar project can go wrong if the glass is not prepared or the design becomes too crowded. Fortunately, most mistakes are easy to avoid with a little patience.
- Do not paint over label residue or dusty glass.
- Avoid using too many colors on one jar.
- Do not rush drying time between layers.
- Avoid painting areas that will be washed heavily unless the paint is durable and sealed.
- Do not overfill the design with tiny details.
- Avoid placing wet jars on fabric or paper that may stick to the paint.
Another common mistake is choosing a design that is too complex for a curved glass surface. Flat sketches do not always translate perfectly onto jars. Keep shapes flexible and simple. Repeated small elements often look better than one large complicated illustration.
Painted Jar Gift Ideas
Painted stash jars make thoughtful handmade gifts because they are both pretty and useful. You can customize the design to fit the person receiving it, then fill the jar with small treats or practical items.
For a Craft Lover
Fill a floral painted jar with buttons, beads, embroidery floss, paint pens, or mini washi tapes.
For a Friend Who Loves Cozy Decor
Paint hearts or soft botanicals, then fill the jar with tea bags, candy, handwritten notes, or tiny self-care items.
For Kitchen Lovers
Create a strawberry and daisy jar and fill it with wrapped sweets, recipe cards, coffee packets, or baking decorations.
For Desk Organization
Paint a modern botanical jar and pair it with pens, clips, sticky notes, or mini office supplies.
At a Glance
- Best beginner designs: hearts, dots, flowers, leaves, and strawberries.
- Best supplies: clean jars, acrylic paint pens, small brushes, and optional sealant.
- Best styling spots: shelves, desks, vanity tables, kitchens, and craft rooms.
- Best color approach: use soft coordinated shades for a polished display.
- Best use: cute storage, upcycled decor, and handmade gift packaging.
Conclusion: Turn Everyday Jars Into Cute DIY Decor
Painted jars are a simple, affordable, and creative way to give old glass containers a fresh purpose. Whether you love floral meadow designs, tiny heart patterns, strawberry and daisy details, or soft botanical art, this project can be customized to match your home and your personal style. It is practical enough for storage and charming enough to display, which is why painted stash jar ideas remain such a favorite for DIY home decor lovers.
The beauty of this craft is that it does not require perfection. A hand-painted jar should feel personal, warm, and slightly whimsical. With clean glass, a thoughtful color palette, and a few easy motifs, you can create decorative jars that brighten your shelves, organize your small items, and make lovely handmade gifts. Start with one jar, try a simple pattern, and let each new design inspire the next.
Tags
Stash Jar Ideas DIY Painted Jars Mason Jar Crafts Upcycled Decor Cute Storage Ideas Glass Jar Painting DIY Home Decor Handmade Gift Ideas