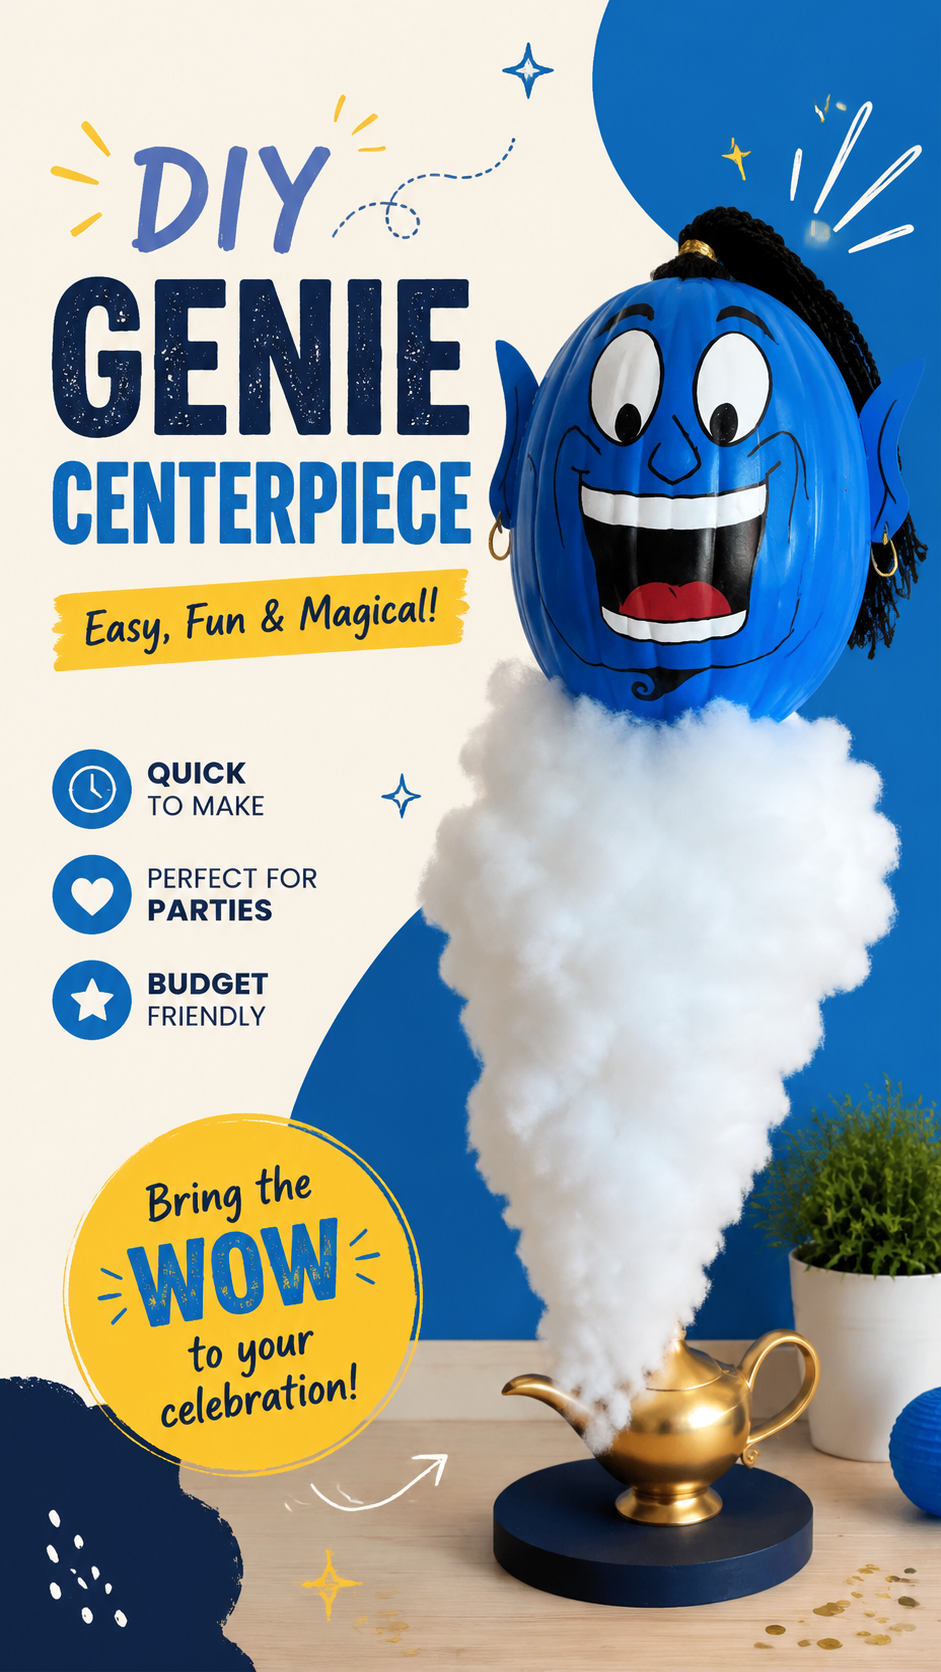
If you are looking for a show-stopping seasonal craft that instantly transforms your space, this DIY genie pumpkin centerpiece is the kind of idea that grabs attention the moment someone walks into the room. Combining playful creativity with festive Halloween energy, this centerpiece blends a painted pumpkin character design with a whimsical “magic smoke” effect rising from a classic genie lamp base. It is bold, fun, and surprisingly easy to recreate at home with the right materials and a bit of imagination.
Key Takeaways
- A creative DIY centerpiece using a painted pumpkin as a genie-style character
- Perfect for Halloween parties, themed décor, and classroom displays
- Uses simple materials like faux pumpkin, paint, cotton, and a decorative lamp
- Great beginner-friendly craft with high visual impact
- Combines whimsical design with seasonal Halloween aesthetics
A Magical Twist on Pumpkin Crafting
Pumpkin decorating has evolved far beyond traditional carving. Today, crafters are exploring painted designs, themed characters, and decorative installations that turn simple pumpkins into storytelling pieces. This genie pumpkin centerpiece is a perfect example of that creative shift. Instead of focusing on a spooky face or classic jack-o’-lantern design, this project transforms the pumpkin into a lively, expressive genie character bursting with personality.
Important: This type of craft is especially popular for themed parties because it creates an instant focal point without requiring complex tools or carving skills. It is safe, mess-free, and highly customizable depending on your color palette and décor theme.
Why This Genie Pumpkin Centerpiece Stands Out
What makes this design so visually captivating is the illusion of motion and magic. The pumpkin itself is styled as a cheerful genie face, complete with expressive eyes and a wide smile. The addition of cotton “smoke” rising from a golden lamp base creates a floating effect, as if the genie is emerging right before your eyes. This layered composition makes it far more dynamic than standard Halloween decorations.
Unlike traditional carved pumpkins that rely on candlelight, this design uses structure, texture, and color contrast. The bright blue tones of the genie face immediately stand out against neutral backgrounds, while the soft white cotton adds depth and softness to the overall presentation.
Materials You Need for the Project
One of the best things about this DIY centerpiece is that it does not require expensive supplies. Most materials can be found at a local craft store or even repurposed from home décor items.
- Artificial pumpkin (foam or plastic recommended)
- Acrylic paint in blue, black, white, and accent colors
- Paint brushes and fine detail markers
- Hot glue gun and glue sticks
- Cotton or polyester stuffing for “smoke” effect
- Small decorative genie lamp or metallic teapot
- Base platform or sturdy stand
- Optional: glitter, varnish, or decorative accessories
Step-by-Step Creative Process
Creating this centerpiece is all about layering design elements in a way that feels natural and visually balanced. Start with your pumpkin as the central character, then build the surrounding effects to enhance its magical appearance.
Step 1: Designing the Character Face
Begin by sketching the genie face lightly on the pumpkin surface. Focus on exaggerated expressions such as large eyes and a wide smile to give it a cartoon-like personality. Once satisfied with the outline, fill in the base colors using acrylic paint. Blue is commonly used for the genie skin tone, but you can experiment with purples or turquoise for a unique variation.
Step 2: Adding Depth and Expression
After the base coat dries, add shading and highlights to bring the face to life. This step is crucial because it adds dimension and prevents the design from looking flat. Use darker shades around the edges and lighter tones around the cheeks and forehead.
Pro Tip: Small details like eyebrows, cheek highlights, and tooth outlines can dramatically improve the character’s personality and make the design more engaging from a distance.
Step 3: Creating the Magical Smoke Effect
The cotton smoke is what truly transforms this project from a simple craft into a centerpiece. Stretch and layer cotton material to create a fluffy, rising effect. Attach it securely using hot glue, starting from the lamp base and building upward toward the pumpkin. The goal is to create a natural flow, as if the genie is actively emerging.
Step 4: Assembling the Base Structure
Place the decorated pumpkin above a small decorative lamp or metallic vessel. This creates the illusion that the character is floating out of a magical container. Ensure the base is stable and balanced, especially if the centerpiece will be used for events or parties.
Expert Insight
Layering textures is the secret to making this craft visually impactful. Combining hard surfaces like painted pumpkin and metallic base with soft elements like cotton creates contrast that naturally draws the eye. This technique is widely used in professional set design and display crafting.
Styling Ideas for Different Occasions
Although this centerpiece is perfect for Halloween, it can easily be adapted for other celebrations. By changing colors and accessories, you can match different themes and environments.
- Halloween Party: Add darker tones, glowing accents, or spooky lighting
- Birthday Celebration: Use brighter colors and playful decorations
- School Projects: Focus on safe, simple materials and bold visuals
- Themed Events: Customize colors to match Arabian nights or fantasy décor
Creative Variations You Can Try
Once you master the basic design, you can explore variations that make your centerpiece even more unique. Some creators add LED lighting inside the cotton to create a glowing smoke effect. Others experiment with glitter paint or metallic finishes for a more luxurious look.
Another popular variation is scaling the design into multiple mini pumpkins arranged together as a themed display. This works especially well for event tables or storefront decorations where visual impact is key.
Common Mistakes to Avoid
While this craft is beginner-friendly, there are a few mistakes that can reduce its overall impact. Overloading the cotton can make the design look messy instead of magical. Similarly, skipping facial shading can result in a flat and less expressive appearance.
Important: Always allow paint layers to fully dry before assembling components. Rushing the process can cause smudging and reduce the durability of the final piece.
Quick Points
- Use contrast between soft and hard materials
- Focus on expressive facial design for character appeal
- Keep structure stable for tabletop display
- Balance colors to maintain visual harmony
Final Thoughts
This DIY genie pumpkin centerpiece is more than just a seasonal decoration. It is a creative expression that blends storytelling, design, and hands-on crafting into a single visually striking piece. Whether you are decorating for Halloween, planning a themed event, or simply exploring new DIY ideas, this project offers a rewarding experience with impressive results.
With its bold colors, playful character design, and magical smoke effect, it stands out as a centerpiece that naturally draws attention and conversation. Most importantly, it proves that pumpkin crafting can go far beyond tradition when imagination leads the way.
Tags
DIY pumpkin craft genie centerpiece Halloween decor pumpkin decorating ideas fall crafts party centerpiece ideas DIY Halloween projects