There is something especially satisfying about a craft project that looks polished, feels personal, and does not require a kiln, a studio, or a giant list of supplies. That is exactly why marbled terracotta-style clay crafts have become such a favorite in the DIY world. With a few simple ingredients and a little hands-on shaping, you can create beautiful air dry clay pots, trays, bowls, and catchalls that bring warmth and texture into your home.
These marbled clay pieces capture the look of handcrafted pottery while staying approachable for beginners. The soft swirls of clay color create a natural stone-like finish, the shapes can be customized to fit your space, and the finished pieces work just as well as decor as they do for organizing jewelry, styling shelves, or displaying small plants. If you have been looking for an easy clay craft that feels elevated without being complicated, this is a project worth trying.
Key Takeaways
- Marbled air dry clay pots are beginner-friendly and can be made with simple household ingredients or store-bought clay.
- The marbled effect adds a pottery-inspired look that instantly makes trays, bowls, and planters feel more decorative.
- Small clay crafts are practical for jewelry storage, plant styling, desk organization, and handmade gifts.
- Consistent thickness, smooth edges, and proper drying time make a major difference in the final finish.
- Soft terracotta tones pair beautifully with boho, rustic, modern organic, and minimalist home decor styles.
- Sealing finished pieces can help improve durability and make decorative items easier to wipe clean.
Why marbled air dry clay crafts are so appealing
DIY clay decor sits in that sweet spot between creativity and usefulness. Instead of making something that gets tucked away in a drawer, you are shaping pieces that can become part of your everyday space. A marbled clay pot can hold a succulent on a coffee table. A small tray can catch rings on a nightstand. A shallow bowl can organize keys by the front door. The project feels artistic, but the result is practical enough to use daily.
The marbled finish is a big part of the charm. Rather than painting on a design after the fact, the color is worked right into the clay itself, creating organic swirls that look different every time. That means each piece ends up with its own personality. Even if you follow the same method for every pot or tray, no two will ever look exactly alike, which is part of what makes handmade decor so special.
Important: The beauty of this project is that perfection is not the goal. A little variation in the marbling, a softly uneven edge, or a handmade texture can actually make the finished piece look more authentic and charming.
The core idea behind these terracotta-style clay pots
The project centers around creating a soft marbled dough or clay in a warm terracotta palette, then shaping it into small decor pieces. The overall look leans earthy and calming. Think creamy clay with rust, blush, or terracotta swirls, finished in simple rounded forms that feel organic rather than rigid.
What makes this style so Pinterest-friendly is its versatility. The same marbled clay can be shaped into:
- Mini planters for succulents or faux stems
- Ring dishes for jewelry and small keepsakes
- Rectangular trays for vanity organization or coffee table styling
- Small bowls for paper clips, hair ties, or wrapped treats
- Decorative catchalls for entryway essentials
That flexibility makes the project ideal for crafters who want to make several pieces in one session. Once the clay is mixed and marbled, you can divide it into portions and experiment with different forms rather than committing to a single finished object.
What you need to make marbled clay decor
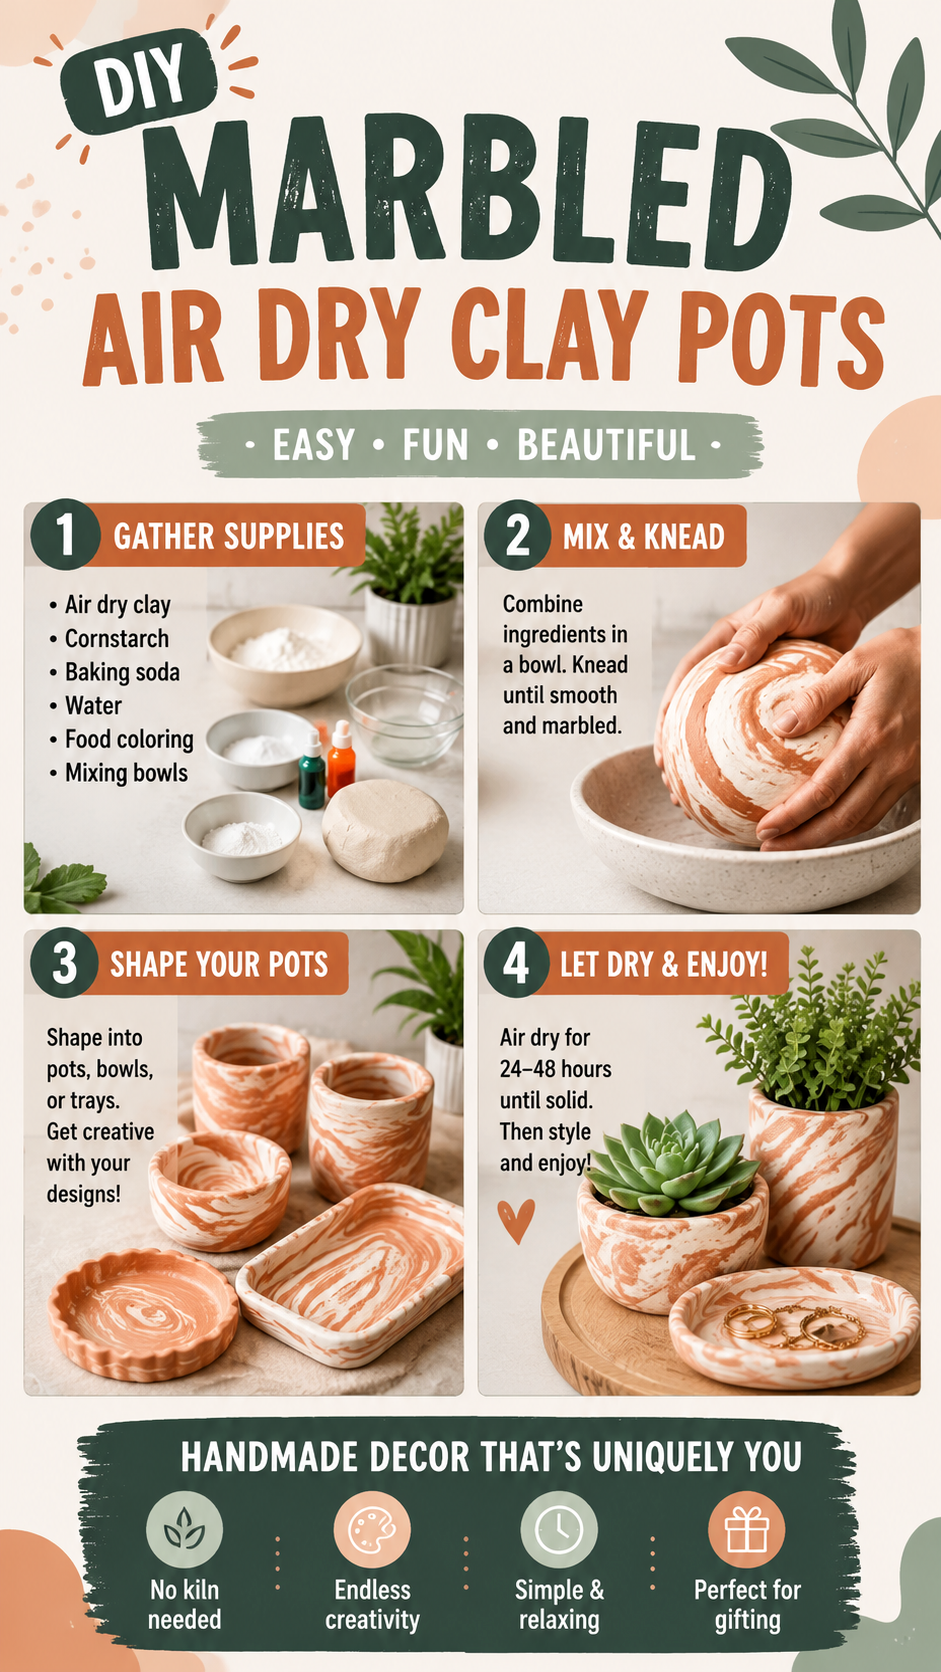
One of the reasons this craft gets so much attention is that it feels accessible. Many tutorials use a homemade air dry clay mixture made from baking soda, cornstarch, water, and a small amount of glycerin, then tint part of the mixture with food coloring to create the marbled effect. Others use ready-made air dry clay and simply blend in color by hand. Either route can work beautifully for decorative pieces.
Basic supplies for the project
- Air dry clay or a homemade clay mixture
- Coloring in terracotta, rust, blush, or warm brown tones
- Mixing bowls and a spoon if making clay from scratch
- A clean work surface for kneading and shaping
- A small rolling pin, cup, or smooth bottle for flattening clay if needed
- A craft knife or simple shaping tools for trimming edges
- Parchment paper or a drying surface
- Optional sealer for finished decorative pieces
You do not need a full pottery toolkit to get a good result. In fact, part of the appeal here is the low barrier to entry. Hands, a bowl, and a little patience are often enough to make simple forms that look stylish and intentional.
Expert Insight
Warm clay tones look especially high-end when you keep the palette tight. Combining a creamy base with one terracotta shade and one slightly deeper rust tone usually creates more elegant marbling than using too many colors at once.
How to create the marbled effect without overworking the clay
Marbling is simple in theory, but the technique matters. The goal is to blend the colors enough to create movement while still keeping distinct swirls visible. If you knead too aggressively for too long, the colors can flatten into one muddy shade. If you stop too early, the color may look patchy rather than naturally marbled.
A simple marbling method
- Start with a larger portion of plain or lightly tinted clay as your base.
- Create one or two smaller pieces in a stronger terracotta shade.
- Press the colored pieces onto the base clay and fold the clay over itself.
- Twist, roll, and gently knead a few times.
- Stop once you can still see visible ribbons and swirls throughout the clay.
That is really the sweet spot. You want movement, not complete blending. Once the clay has a marbled look, it is ready to shape into your chosen form.
Pro Tip: If you are making multiple items from one batch, cut the clay into sections after marbling rather than kneading each section separately. That helps the whole collection feel cohesive, as if the pieces were designed to go together.
Shaping ideas for pots, trays, and small bowls
Once the clay is marbled, the fun part begins. The image theme points toward small home decor vessels and trays, which is one of the easiest and most rewarding directions to take this craft. You do not need advanced sculpting skills to make pieces that look polished. Focus on clean silhouettes and comfortable proportions.
Mini clay pots
For mini pots, start with a ball of clay and pinch or press out the center while rotating the piece in your hand. Keep the walls fairly even and avoid making them too thin. Rounded pots work beautifully because the marbling wraps around the curve and creates a soft pottery-inspired effect. These are ideal for faux greenery, dried stems, or tiny succulents if the finished piece is used as a decorative outer pot rather than a directly planted container.
Ring dishes and catchalls
Shallow dishes are one of the best beginner projects because they are forgiving and highly useful. Flatten a piece of clay, trim it into a circle or organic shape, then gently pinch or lift the edges to create a lip. These dishes are perfect on bedside tables, bathroom counters, or dressers where little items tend to collect.
Rectangular trays
A marbled tray instantly looks elevated. Roll the clay to an even thickness, cut a rectangle or rounded rectangle, and raise the edges slightly. Keep the corners soft rather than sharp if you want a more handmade, modern-organic finish. A tray like this can hold candles, perfume bottles, jewelry, or office supplies while doubling as decor.
Small bowls for styling and storage
Little bowls are surprisingly versatile. Use them in the kitchen for wrapped sweets, on a desk for clips and pins, or in the bathroom for cotton rounds and hair ties. If you are creating a gift set, pairing a bowl with a tray or matching pot can make the whole project feel intentional and curated.
How to make handmade clay decor look polished
There is a difference between handmade in a charming way and handmade in a rushed way. The good news is that a few simple habits can dramatically improve the finished result, even if you are brand new to air dry clay projects.
1. Keep the thickness consistent
Uneven thickness can lead to awkward drying, fragile spots, and a less refined look. Whether you are shaping a pot by hand or rolling out a tray, try to keep the clay fairly consistent from edge to edge. It does not need to be mathematically perfect, but a balanced thickness makes the piece stronger and visually cleaner.
2. Smooth the edges before drying
Use fingertips or a slightly damp touch to soften rough edges and fingerprints before the clay sets. This step takes only a minute, but it can make a project look far more finished. If you like the organic look of hand-shaped pieces, keep the form natural while still refining the rim and outer edge.
3. Let the marbling do the decorating
The swirls are already visually interesting, so there is no need to overcomplicate the design. Simple silhouettes often work best because they allow the color variation to take center stage. A clean bowl or rounded pot can be more striking than a shape with too many details.
Important: If your goal is a high-end look, focus less on adding extra embellishment and more on refining shape, smoothing edges, and choosing a cohesive color palette. Those small decisions do more for the final result than complicated details ever will.
Drying and curing tips for air dry clay pieces
Drying time will vary based on the thickness of the clay and the humidity in your space, but small decorative clay crafts generally need time to fully harden before use. Rushing this stage can lead to dents, warping, or cracks, especially if a tray or bowl is moved before it is set.
Best practices while pieces dry
- Place items on a flat surface so the base stays even.
- Leave enough room around each piece for airflow.
- Avoid handling them too often while they are still soft.
- Let thicker pieces dry longer than you think they need.
- If needed, rotate pieces gently during drying to encourage even curing.
For decorative pots and trays, patience is part of the process. Once the clay has hardened fully, the pieces become much easier to style, photograph, gift, or use around the home.
Should you seal air dry clay decor?
For display pieces, sealing is optional, but it can be helpful. A clear sealer may add a slight layer of protection, make the surface easier to wipe clean, and help preserve the finish if the item will live in a bathroom, on a vanity, or in another area where it may be handled often.
That said, it helps to be realistic about what these pieces are best for. Marbled air dry clay crafts shine as decorative accessories, jewelry holders, shelf styling accents, and lightweight organizers. They are not the same as fired ceramics, and they are best treated as handmade decor rather than heavy-duty kitchenware or fully waterproof planters.
Why This Matters
- Sealing can help decorative trays and dishes stay cleaner with regular use.
- Air dry clay pieces are ideal for styling and organizing, but they should not be treated like kiln-fired pottery.
- Using a finished piece as an outer decorative pot is often more practical than planting directly into it.
How to style marbled terracotta clay crafts at home
One of the best things about this project is how easily it blends into different interiors. The creamy terracotta palette feels warm and grounded, which makes it especially versatile for homes that lean organic, neutral, boho, rustic, or minimalist. Because the shapes are small, you can tuck them into spaces that need texture without adding clutter.
Easy ways to use them in your decor
- On a bedside table: Use a ring dish for jewelry and a mini pot for dried lavender or a faux stem.
- In the bathroom: Style a marbled tray with perfume, skincare, or a candle.
- On a desk: Keep paper clips, push pins, or USB drives in a small bowl.
- In an entryway: Set a catchall near the door for keys and loose change.
- On open shelving: Layer a clay pot beside books, framed art, and woven baskets for a cozy handmade look.
They also make thoughtful gifts. A matching tray and ring dish set can feel boutique-worthy with very little added cost, especially when paired with a candle, a handwritten note, or a small potted plant.
Why these clay projects work so well for beginners
Not every DIY trend is truly beginner-friendly, but this one comes close. The forms are small, the materials are approachable, and the marbled look is forgiving by nature. You do not need perfect sculpting skills for the finished piece to feel attractive. In fact, a little softness in the shape can make the result look more artisanal.
There is also room to make the craft your own. You can keep the palette classic with terracotta and cream, shift it toward blush and sand for a softer look, or go deeper with rust and cinnamon tones for a more dramatic finish. You can make a set of matching trays, a collection of little planters, or a mixed group of pieces that work together across a room.
Pro Tip: If you are just starting out, begin with a ring dish and a small tray before attempting taller pots. Those flatter pieces help you get comfortable with marbling, smoothing, and drying without worrying about wall thickness or shape collapse.
Creative variations to try once you master the basics
After you make your first set of marbled clay decor, it is easy to see how the technique can branch out into other projects. The same aesthetic works beautifully for holiday gifting, party favors, desk accessories, and seasonal home styling.
Ideas for your next clay session
- Make a matching bedside set with a jewelry dish, bud vase, and trinket tray.
- Create mini herb marker holders or decorative plant labels.
- Try an oval vanity tray with a marbled soap dish for a bathroom refresh.
- Use the same color palette to craft holiday ornaments or gift tags.
- Shape small favor bowls for weddings, showers, or dinner party place settings.
Once you understand how much kneading creates the marbled effect you like, the process becomes very repeatable. That is what makes it such a satisfying craft to revisit.
Common mistakes to avoid with air dry clay crafts
Even simple projects can go sideways if you rush a few steps. If you want your marbled clay pots and trays to look as beautiful as possible, watch for these common issues:
- Overmixing the colors: This can turn marbling into a flat blended shade.
- Making walls too thin: Thin pots or bowls are more likely to warp or crack.
- Skipping edge smoothing: Rough rims can make an otherwise pretty piece look unfinished.
- Moving pieces too early: Clay that is not fully dry can dent easily.
- Using the piece for the wrong purpose: Decorative clay crafts are wonderful, but they should be used with their material limits in mind.
Thankfully, most of these problems are easy to avoid once you know what to look for. This is one of those crafts where a slower pace almost always leads to a better result.
At a Glance
- Use a simple terracotta and cream palette for a timeless marbled look.
- Start with trays and ring dishes if you are new to air dry clay.
- Keep clay thickness even and smooth the edges before drying.
- Let finished pieces dry completely before styling or sealing.
- Think of these crafts as decorative home accents with handmade charm.
The charm of handmade clay decor that feels personal
Marbled terracotta clay crafts are a reminder that beautiful home decor does not have to come from a store shelf. A few ingredients, a warm color palette, and an hour of creative time can turn into something you will actually use and enjoy. Whether you shape a simple ring dish, a softly rounded planter, or a tray for your favorite everyday items, the finished piece brings a little artistry into daily life.
That is what makes this kind of DIY so rewarding. It is approachable enough for beginners, flexible enough for experienced crafters, and stylish enough to hold its own in a carefully decorated space. If you love projects that are equal parts calming, useful, and beautiful, marbled air dry clay pots and trays are an easy craft to keep coming back to.