Colorful DIY yard art is one of the easiest ways to make an outdoor space feel cheerful, personal, and full of charm. Whether you have a small patio, a front porch, a garden fence, or a flower-filled backyard, handmade garden wall decor can turn plain corners into happy focal points. The best part is that many of the cutest ideas can be made with simple supplies, repurposed materials, paint, clay pots, scrap wood, tin cans, stones, and a little imagination.
This style of garden decorating is bright, playful, and welcoming. Think painted mushrooms tucked into flower beds, smiling flower pot people sitting on a bench, hand-painted welcome signs, ladybug rocks, and colorful tin can planters that bring personality to a fence or wall. These DIY garden wall decor ideas are perfect for anyone who wants outdoor decor that feels fun, budget friendly, and completely unique.
Key Takeaways
- DIY yard art adds color, personality, and charm to patios, fences, porches, and garden walls.
- Painted signs, flower pots, rocks, and tin cans are affordable materials for outdoor crafts.
- Bright colors and simple shapes help handmade garden decor stand out beautifully.
- Garden wall decor can be cute, practical, and easy enough for a weekend project.
- Sealing outdoor crafts helps protect them from sun, rain, and everyday wear.
Why DIY Garden Wall Decor Is So Popular
DIY garden wall decor has become a favorite outdoor decorating trend because it blends creativity with everyday charm. Instead of buying generic pieces, you can create decor that matches your home, your flowers, your color palette, and your personality. A handmade garden sign or painted planter instantly feels warmer than something mass produced.
Another reason this trend works so well is that outdoor spaces are naturally flexible. A fence can become a display wall. A blank shed can become a colorful backdrop. A small balcony can hold hanging planters. A boring corner can become a sweet little garden scene with a painted pot, a flower stake, or a set of decorative stones.
Important: The most memorable DIY yard art usually has one clear personality trait. It might be whimsical, cottage-inspired, bold and colorful, rustic, or sweet and playful. Choosing one mood helps your garden wall decor feel intentional instead of cluttered.
Start With a Cheerful Outdoor Color Palette
The most eye-catching garden crafts often use happy, saturated colors. Pink, turquoise, yellow, white, coral, green, and teal are especially effective because they pop against plants, mulch, stone, and wood fencing. These shades also photograph beautifully, which makes them ideal for Pinterest-worthy outdoor decor.
For a playful garden wall or yard art display, choose three to five colors and repeat them across your projects. For example, a pink welcome sign can coordinate with a pink flower pot, a turquoise tin can planter, and yellow painted flowers. Repeating colors makes even a mixed collection of DIY pieces feel connected.
Cute Color Combos for DIY Yard Art
- Pink, teal, and yellow: Bright, playful, and perfect for cheerful backyard decor.
- White, mint, and coral: Soft, fresh, and great for cottage garden style.
- Turquoise, lime, and hot pink: Bold and fun for summer yard art.
- Lavender, cream, and sage: Sweet and calming for a flower-filled garden wall.
- Red, black, and green: Ideal for ladybug rocks, mushroom crafts, and nature-inspired pieces.
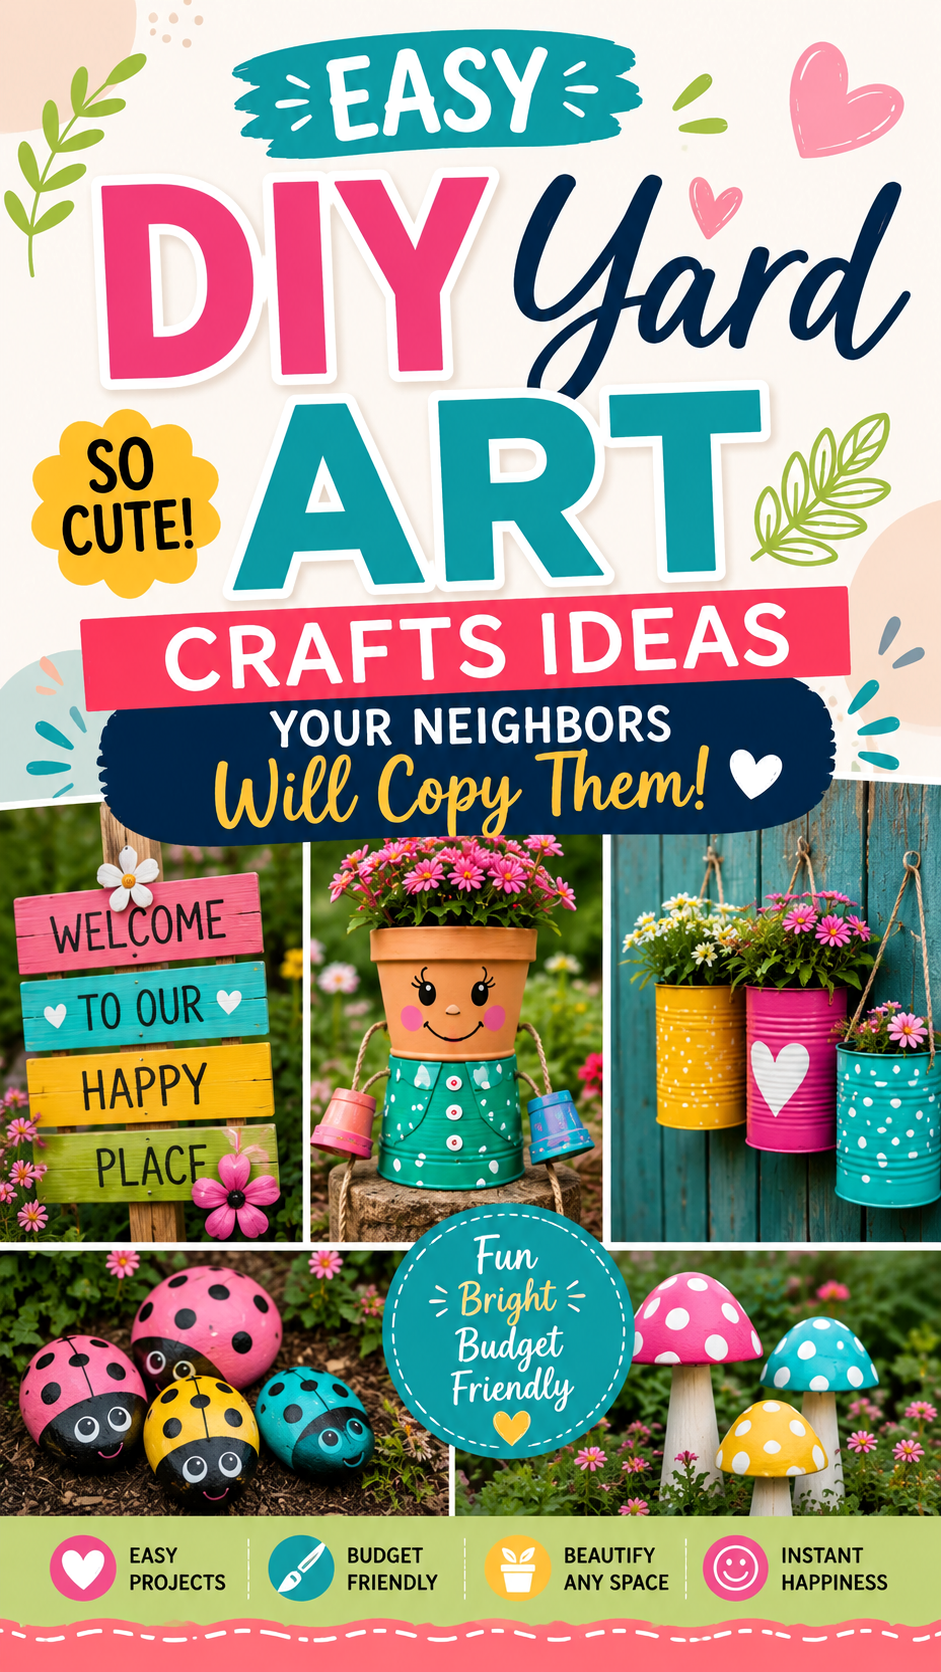
Painted Welcome Signs for Garden Walls and Fences
A painted welcome sign is one of the simplest DIY garden wall decor ideas, and it instantly makes an outdoor area feel more inviting. You can use scrap wood, pallet boards, old fence pickets, or lightweight craft boards. Paint each board a different color, add simple wording, then attach the boards vertically or horizontally.
Words like “Welcome,” “Happy Place,” “Garden,” “Bloom,” or “Stay Awhile” work beautifully for outdoor spaces. Keep the lettering large and easy to read, especially if the sign will be viewed from a distance. For a handmade look, imperfect brush lettering can actually add charm.
How to Make a Simple Garden Welcome Sign
- Sand your wood pieces lightly to remove rough edges.
- Paint each board with outdoor-safe paint in bright garden colors.
- Let the paint dry fully before adding words or small details.
- Use a paint pen, stencil, or small brush for lettering.
- Seal the finished sign with a clear outdoor sealer.
- Hang it on a fence, lean it against a wall, or place it near a flower bed.
Small decorative details can make the sign feel even sweeter. Add simple hearts, flowers, dots, stripes, bees, butterflies, or leaves. The goal is not perfection. The goal is charm.
Flower Pot People for Playful Garden Decor
Flower pot people are a classic DIY yard art idea because they are cute, customizable, and surprisingly easy to make. Stacked terra cotta pots can become a whimsical garden character with painted clothes, a smiling face, rope arms, and tiny flower pot hands. Add blooming flowers at the top, and the whole piece becomes both decor and a planter.
This type of craft works beautifully on a garden bench, front step, patio table, porch corner, or low wall. You can make one large flower pot person as a focal point or create a pair for a more playful scene.
Pro Tip: When painting faces on flower pots, keep the features simple. Big eyes, round cheeks, and a small smile are enough to create a friendly look without making the project difficult.
Supplies for a Flower Pot Person
- Terra cotta pots in several sizes
- Outdoor acrylic paint
- Clear outdoor sealant
- Rope or sturdy cord
- Small pots for hands or feet
- Paint pens for facial details
- Flowers or trailing greenery
For a garden wall decor twist, you can place smaller painted pot characters on shelves attached to a fence or wall. This gives the display height and makes the decor feel like part of the vertical garden design.
Painted Rock Art for Flower Beds and Garden Borders
Painted rocks are one of the most budget-friendly DIY garden art projects. Smooth stones can become ladybugs, bees, flowers, smiley faces, strawberries, mushrooms, or abstract color pops. They are small, easy to move, and perfect for filling empty spaces around plants.
Ladybug rocks are especially popular because they look adorable nestled into mulch or along a garden path. Use red, pink, yellow, or teal paint for the body, then add black dots and a cheerful face. Once sealed, these little pieces can brighten garden beds all season long.
Best Places to Use Painted Garden Rocks
- Along flower bed borders
- Beside stepping stones
- Inside container gardens
- At the base of potted plants
- Near a garden sign or fence display
- Grouped around a tree or shrub
Painted rocks are also great for family craft days because each person can create a different design. A mixed collection of colorful garden stones can make the whole yard feel joyful and handmade.
Expert Insight
The strongest DIY garden displays use a mix of heights. Combine low rock art, medium-height signs, hanging wall decor, and taller planters so the eye moves naturally through the space.
Tin Can Planters for Budget Friendly Garden Wall Decor
Tin can planters are perfect for garden wall decor because they are lightweight, easy to paint, and simple to hang. Clean empty cans can be transformed with paint, patterned details, hearts, flowers, stripes, polka dots, or even a rustic distressed finish. Once finished, they can hold small flowers, herbs, or faux blooms.
Attach them to a fence, pallet wall, trellis, or wooden board to create a colorful vertical garden. You can line up several cans in a row or arrange them at different heights for a more relaxed look.
How to Style Tin Can Planters Outdoors
For a clean look, paint all cans in one color and fill them with the same type of flower. For a playful look, use several colors and mix different plants. A teal can with a pink heart, a yellow can with white dots, or a coral can with simple painted petals can make a plain wall feel bright and charming.
Always add drainage holes if you are planting real flowers. If the cans will hang directly on a wall or fence, consider placing a layer of small pebbles at the bottom to help control moisture.
DIY Garden Mushrooms for a Whimsical Yard
Painted garden mushrooms add a storybook feel to outdoor spaces without needing anything complicated. They can be made from bowls and wood stems, cement forms, terra cotta pots, or weather-resistant craft materials. Bright caps with white polka dots are instantly recognizable and add a playful touch near greenery.
Place DIY mushrooms in clusters rather than alone. A group of three in different heights and colors looks more natural and more decorative. Pink, yellow, turquoise, red, and white are all great choices for a cheerful flower bed.
Where Mushroom Yard Art Looks Best
- Near hostas, daisies, or low groundcover
- Beside a garden path
- Under a small tree
- At the base of a fence
- In a children’s garden corner
- Beside painted rocks or flower stakes
Mushroom yard art pairs especially well with cottage garden decor, fairy garden style without magical symbols, colorful backyard crafts, and playful outdoor decorating themes.
Flower Stakes and Painted Garden Blooms
If your garden needs height and color, DIY flower stakes are a smart choice. They can be made from wood cutouts, metal lids, plastic plates, bottle caps, or painted craft shapes attached to garden stakes. A large painted flower placed in a pot or along a fence can brighten the space even when real flowers are not blooming.
Simple flower shapes work best. Use rounded petals, a contrasting center, and a green stem. Add dots, stripes, or tiny painted lines for extra detail. You can make one oversized statement flower or a cluster of smaller blooms in different colors.
Important: DIY flower stakes are especially useful in areas where plants are still growing in. They fill visual gaps and keep the garden looking colorful before the natural blooms fully appear.
How to Create a Cute Garden Wall Display
A garden wall display works best when it feels layered but not overcrowded. Start with one main feature, such as a welcome sign, a row of tin can planters, or a large painted flower. Then add smaller accents around it. This could include hanging pots, small wood shapes, painted stones at the base, or a bench with flower pot decor.
Think of the wall as a mini outdoor gallery. You want a balance of color, texture, height, and negative space. Not every inch needs to be filled. Leaving space between items helps each DIY project stand out.
Simple Layout Ideas
- Centered display: Place a large sign in the middle and surround it with small hanging planters.
- Vertical row: Hang tin can planters in a straight line for a neat, modern look.
- Playful cluster: Mix signs, flowers, and pots at different heights.
- Bench vignette: Place a decorated pot person or planter on a bench below the wall.
- Fence garden: Attach painted wood art and add flower beds below for a full outdoor scene.
Best Materials for Outdoor DIY Yard Art
Choosing the right materials makes your garden crafts last longer. Since outdoor decor is exposed to sun, moisture, wind, and temperature changes, sturdy materials are important. You do not need expensive supplies, but you do need items that can handle outdoor conditions.
Good Materials to Use
- Terra cotta pots
- Scrap wood or pallet boards
- Metal cans
- Smooth rocks
- Outdoor acrylic paint
- Paint pens made for outdoor surfaces
- Rope, jute, or weather-resistant cord
- Clear exterior sealant
Materials to Use Carefully
Paper, untreated cardboard, indoor-only glue, and unsealed foam may not hold up well outside. If you want to use lightweight craft materials, make sure they are protected from direct rain or sealed thoroughly. For long-lasting garden wall decor, paint and seal every side of the project, not just the front.
Weatherproofing Tips for Handmade Garden Decor
Weatherproofing is the step that makes the difference between a craft that lasts a week and a decoration that can be enjoyed for a season or longer. Outdoor paint is helpful, but a clear sealer adds another layer of protection.
Before sealing, make sure the paint is completely dry. Apply a thin, even coat of outdoor clear sealant. Let it dry, then add a second coat if the item will sit in direct sun or rain. For wood pieces, seal the edges and back as well, since moisture can enter from any unfinished surface.
Pro Tip: If your DIY yard art includes pots or cans with live plants, keep drainage in mind. Trapped water can damage paint, weaken materials, and harm plant roots.
Easy Weekend DIY Garden Art Projects
If you want a quick project, start small. A full garden wall display can be built over time, one handmade piece at a time. The easiest projects are usually painted rocks, mini signs, and decorated planters. These require minimal tools and can be finished in a single afternoon.
Beginner Friendly Project Ideas
- Paint three ladybug rocks for a flower bed.
- Make a small “Welcome” sign from scrap wood.
- Paint a tin can planter with a heart or flower design.
- Decorate a terra cotta pot with a smiling face.
- Create a colorful flower stake for a large planter.
- Paint a set of wood arrows with garden words.
These simple garden crafts are also easy to personalize. You can match your home’s exterior colors, use your favorite flowers as inspiration, or create a playful theme for a children’s garden area.
How to Make DIY Yard Art Look Polished
Handmade decor should feel charming, but it can still look polished. The secret is repetition. Repeat colors, shapes, materials, or motifs throughout the space. If one project has white polka dots, add white dots to another piece. If one planter uses teal paint, repeat teal on a sign or flower stake.
Another helpful trick is to limit the number of focal points. A colorful garden wall can handle plenty of personality, but too many large pieces can compete. Choose one main statement piece and let the smaller crafts support it.
Design Details That Make a Difference
- Use a consistent color palette.
- Keep lettering large and readable.
- Group decor in odd numbers, such as three or five pieces.
- Mix low, medium, and tall decorations.
- Add real plants to soften painted decor.
- Use sealant for a cleaner, longer-lasting finish.
Where to Place Garden Wall Decor for Maximum Impact
Placement matters as much as the craft itself. The best location is usually somewhere visible from a seating area, walkway, window, patio door, or front entrance. A handmade piece has more impact when people can see and enjoy it often.
A fence behind a flower bed is ideal because the plants create a natural frame. A porch wall can become a seasonal display area. A shed wall can be softened with bright signs and hanging planters. Even a narrow side yard can feel more intentional with a small vertical garden display.
Great Spots for DIY Garden Decor
- Backyard fences
- Garden gates
- Patio walls
- Porch corners
- Shed exteriors
- Raised garden beds
- Balcony railings
- Outdoor benches and side tables
At a Glance
- Use painted signs for instant personality.
- Add tin can planters to create vertical color.
- Place rock art near flowers, paths, and borders.
- Repeat colors for a cohesive garden wall display.
- Seal every outdoor craft to help it last longer.
Conclusion: Turn Your Outdoor Space Into a Happy Handmade Garden
DIY garden wall decor and yard art are all about making your outdoor space feel joyful, welcoming, and personal. A few painted pots, a colorful sign, a cluster of ladybug rocks, or a set of hanging tin can planters can completely change the mood of a patio, fence, porch, or backyard corner.
The beauty of these projects is that they do not need to be expensive or complicated. With paint, repurposed materials, simple shapes, and a bright color palette, you can create outdoor crafts that feel cute, creative, and budget friendly. Start with one small project, then build your garden display over time. Before long, your outdoor space can become the kind of cheerful happy place that makes everyone smile.
Tags
DIY Garden Decor Garden Wall Decor DIY Yard Art Outdoor Crafts Painted Garden Signs Flower Pot Crafts Budget Garden Ideas