Kandi charm patterns are a fun, colorful way to turn simple pony beads into tiny pieces of wearable art. The bright crayon-inspired bead charms shown here instantly suggest creativity, nostalgia, and playful DIY energy. With bold color blocking, clean outlines, and easy-to-recognize shapes, this style is perfect for anyone who loves kandi bracelets, rave accessories, backpack charms, keychains, or handmade gifts that feel personal and cheerful.
What makes kandi charm patterns so appealing is how approachable they are. You do not need advanced jewelry-making skills or expensive supplies to start. A handful of pony beads, elastic cord, clear string, or sturdy craft lace can become a charming design with personality. Crayon shapes are especially beginner-friendly because they use simple vertical rows, repeated colors, and high-contrast details that make the finished piece look neat and intentional.
Key Takeaways
- Kandi charm patterns are great for colorful DIY accessories, keychains, bag charms, and festival kandi.
- Crayon-inspired designs work well because they use simple shapes, bold outlines, and easy color sections.
- Pony beads are beginner-friendly, affordable, and available in many bright shades.
- Repeating patterns help create clean, balanced designs that look polished when finished.
- Custom color palettes make each kandi charm feel personal and giftable.
- Good tension and careful row alignment are key to making bead charms hold their shape.
What Are Kandi Charm Patterns?
Kandi charm patterns are small bead designs made with pony beads, elastic, fishing line, or craft cord. They often feature playful icons, characters, shapes, symbols, or themed objects. Unlike a standard kandi bracelet, a charm usually has a defined shape that can hang from a bracelet, necklace, bag, zipper pull, keychain, or phone strap.
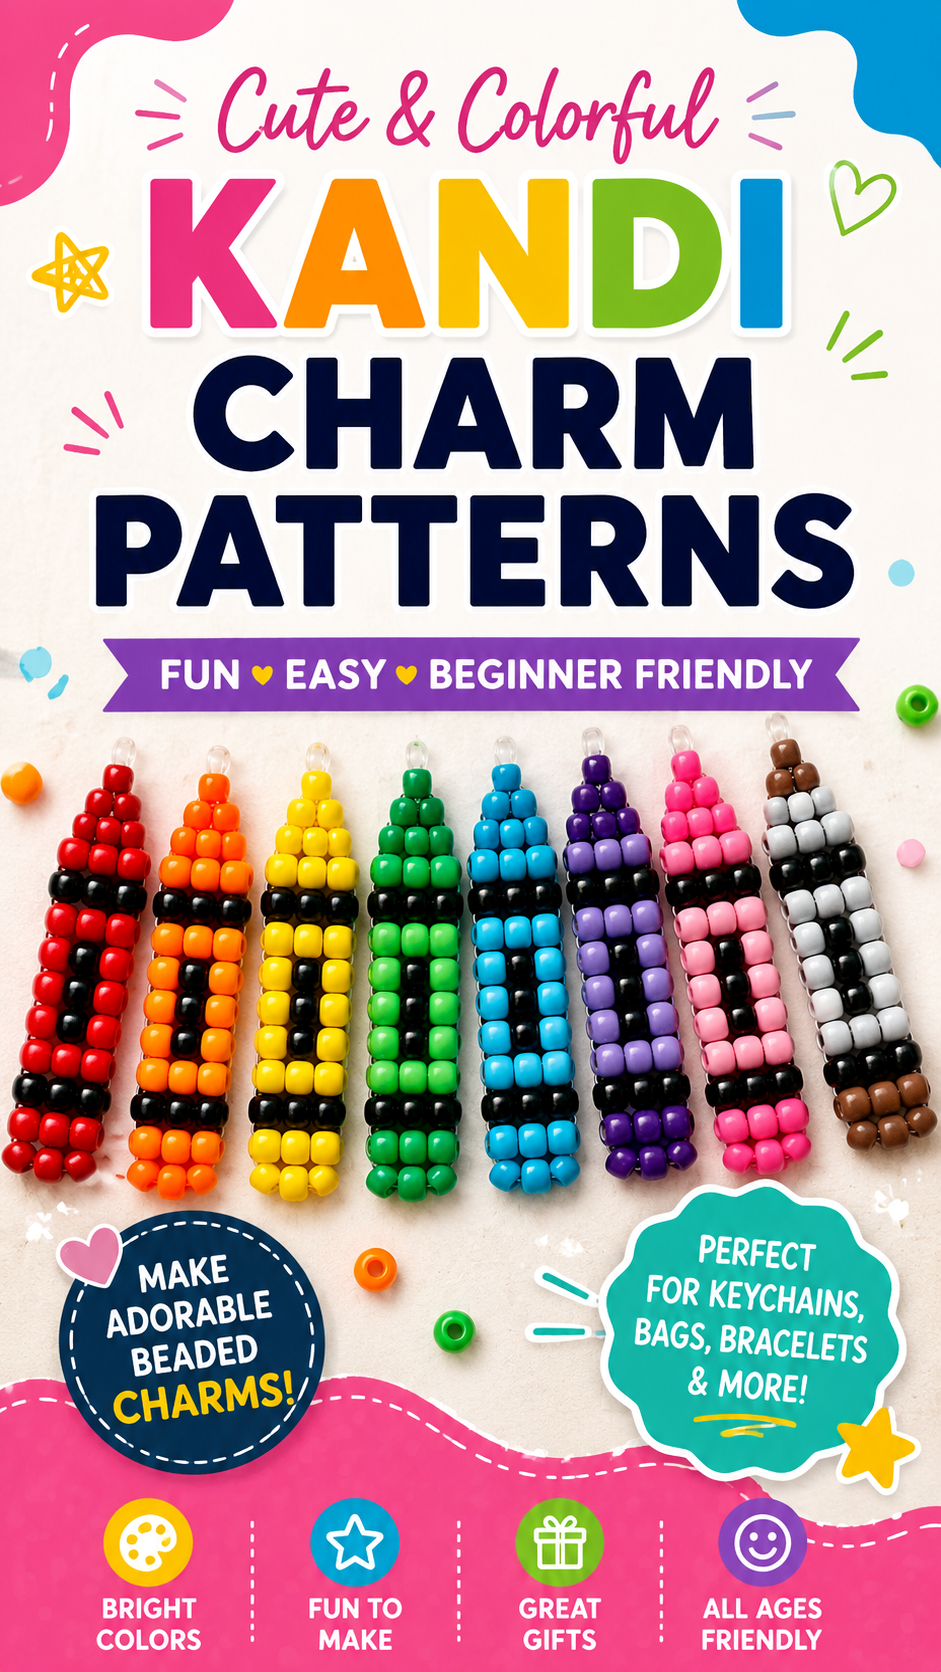
The crayon-style charms in this kind of design are a perfect example of how simple beads can create a clear visual idea. Each charm uses a long rectangular shape, bright outer colors, black band details, and lighter color sections to mimic the look of a crayon wrapper. The repeated layout makes the set feel cohesive, while the variety of colors makes every piece stand out.
Important: The best kandi charm patterns balance creativity with structure. A design can be playful and bold, but the rows still need a clear layout so the finished charm keeps its shape and reads well from a distance.
Why Crayon Kandi Charms Are So Popular
Crayon-inspired kandi charms have a nostalgic quality that makes them instantly lovable. They remind many people of childhood art projects, school supplies, coloring books, and creative afternoons. That familiar shape translates beautifully into pony beads because crayons already have strong color blocks and simple geometric details.
These charms also photograph well, which makes them ideal for Pinterest, craft blogs, and social media inspiration boards. A row of colorful kandi crayons creates a rainbow effect that feels cheerful, organized, and eye-catching. For crafters who sell handmade accessories, this type of design can also work well as a product idea because it is recognizable, customizable, and easy to style in groups.
A Great Pattern for Beginners
Many kandi patterns can feel intimidating when they include detailed characters or complex shapes. Crayon charms are much easier to approach because they rely on straight rows and repeated sections. Once you understand the basic structure, you can change the colors, adjust the length, or add small details without completely redesigning the pattern.
Beginners can start with a simple two-color crayon charm, then move on to rainbow sets, pastel sets, neon sets, or themed color palettes. The pattern teaches useful beadwork skills like counting beads, keeping rows even, and creating clean edges.
Perfect for Kandi Trading and Festival Accessories
Kandi culture is closely connected to friendship, creativity, and trading handmade pieces. A small charm adds personality to a bracelet stack and can make a handmade piece feel more special. Crayon charms work especially well because they can represent favorite colors, friendship themes, group looks, or creative energy.
You can attach one crayon charm to a cuff, create a matching set for friends, or make a rainbow collection to clip onto a festival bag. The design is playful without being too complicated, which makes it easy to produce several charms in different colors.
Supplies You Need for Kandi Charm Patterns
One of the best things about kandi charms is that the supply list is simple. Most materials are easy to find at craft stores or online, and you can build a large color collection over time.
- Pony beads in your chosen colors
- Black pony beads for outlines and band details
- White, gray, or clear beads for highlights if desired
- Elastic cord, fishing line, or sturdy beading string
- Scissors
- Keychain rings, lobster clasps, or jump rings if you want hanging charms
- A bead mat or tray to keep rows organized
For crayon kandi charms, you will usually need one main color, a slightly lighter or darker shade for contrast, and black beads for the wrapper-style sections. The black beads help define the shape and make each color pop.
Choosing the Best Beads
Standard pony beads are the most common choice for kandi charm patterns. They are large enough to handle easily, which is helpful for beginners, and they come in a wide range of colors. Glossy beads create a bright, classic kandi look. Matte beads can feel softer and more modern. Transparent beads add a fun glassy effect, especially for yellow, blue, or clear crayon designs.
If you want your charm set to look neat as a group, try to use beads that are the same size and shape. Mixing different bead brands can sometimes create uneven rows because the beads may vary slightly in width.
How to Plan a Crayon Kandi Charm Pattern
Before you start stringing beads, it helps to think of the crayon charm as a small pixel-style design. Each bead acts like one pixel. The finished shape depends on how you arrange those pixels into rows and columns.
A basic crayon charm usually includes a pointed tip, a long body, a middle wrapper section, and a bottom edge. The design may look simple at first, but small choices make a big difference. The number of beads per row affects the width, while the number of rows controls the length. Black bands create the crayon wrapper look, and the main color gives the charm its personality.
Pro Tip: Lay your beads out on a flat surface before stringing. This helps you spot color mistakes, check symmetry, and make sure the finished kandi charm pattern will look balanced.
Start With a Simple Color Map
A color map is a quick visual guide for your charm. You can sketch it on grid paper, create it digitally, or simply arrange beads in rows on a table. For a crayon charm, label the main color, the wrapper color, the black details, and any highlight beads.
For example, a pink crayon charm might use bright pink for the top and bottom sections, light pink for the wrapper panel, and black for the horizontal band details. A blue charm might use teal, sky blue, and black. A brown charm might use dark brown, caramel, and black for a warmer look.
Use Contrast to Make the Design Clear
Contrast is what makes kandi charm patterns easy to read. If the main color and wrapper color are too similar, the design may look flat. Try pairing a saturated shade with a lighter version of the same color. You can also use black beads to separate sections and sharpen the visual outline.
High contrast is especially helpful when the charm will be worn or photographed. The details need to stand out even when the charm is small or seen from a distance.
Color Ideas for Kandi Crayon Charms
The image style suggests a full rainbow set, which is one of the most satisfying ways to display kandi charms. A rainbow collection feels cheerful and gives you many options for mixing and matching accessories. You can also create themed sets based on events, seasons, outfits, or personal favorites.
Classic Rainbow Palette
A classic rainbow set can include red, orange, yellow, green, blue, purple, pink, white, and brown. This kind of palette looks bright and complete, especially when the charms are lined up together. It is a great choice for Pinterest photos because the colors create an instant visual impact.
Pastel Kandi Charm Palette
Pastel kandi charm patterns are soft, sweet, and popular for cute accessories. Try baby pink, lavender, mint, pale yellow, powder blue, and peach. Use white or light gray instead of black if you want a softer look, or keep the black details for a classic crayon outline.
Neon Festival Palette
For festival kandi, neon colors are always a strong choice. Neon green, hot pink, electric blue, bright orange, and fluorescent yellow can make crayon charms feel energetic and bold. Pair them with black beads to create strong graphic contrast.
Neutral and Earthy Palette
Not every kandi design has to be rainbow bright. A neutral set with cream, gray, tan, brown, black, and muted green can look stylish and unexpected. This palette is great for bag charms, school accessories, or handmade gifts with a calmer aesthetic.
Expert Insight
The most successful kandi charm patterns use a limited bead palette with clear contrast. Too many colors in one tiny charm can blur the design, while a focused palette helps the shape look crisp and intentional.
Tips for Making Kandi Charms Look Neat
Even simple kandi charm patterns can look messy if the tension is uneven or the rows twist. A polished finish comes from patience, consistent bead size, and careful stringing.
Keep Your Tension Consistent
Tension controls how tightly the beads sit together. If the string is too loose, the charm may flop or lose its shape. If it is too tight, the design may curl. Aim for a firm but flexible finish. The beads should sit close together without pulling the charm out of alignment.
Count Every Row Before Moving On
A single missing bead can shift the entire pattern. Take a moment to count each row before tightening the string. This is especially important when working with repeated black band details, since one misplaced bead can make the crayon wrapper look uneven.
Secure the Ends Carefully
Because charms are often attached to bags, keys, or bracelets, they may get tugged during use. Tie strong knots and tuck the ends into nearby beads when possible. Some crafters add a tiny dot of clear craft glue to the knot for extra security, but be careful not to use too much.
Important: Durability matters if the charm will be worn often. A cute pattern is only successful if the finished piece can handle everyday movement, clipping, trading, and storage.
Creative Ways to Use Kandi Charm Patterns
Once you make a few crayon kandi charms, there are many ways to use them. They can be accessories, gifts, decorations, or part of larger bead projects. The charm format makes them flexible and easy to personalize.
Add Them to Kandi Bracelets
A crayon charm can hang from a single-strand bracelet or become the centerpiece of a larger cuff. Match the bracelet beads to the charm color for a coordinated look, or use rainbow beads for a playful mixed-color style.
Turn Them Into Keychains
Keychains are one of the easiest ways to use bead charms. Add a jump ring or keychain ring to the top of the crayon charm, and you have a cute accessory for keys, backpacks, pencil cases, or tote bags. This is also a great option for handmade gifts.
Make Matching Friend Sets
Crayon kandi charms are perfect for friendship sets because each person can have a different color. You can create a full rainbow group, assign favorite colors, or make matching charms with slightly different details. This idea works well for parties, festivals, craft nights, and school-themed gifts.
Use Them as Craft Fair Products
If you enjoy selling handmade items, small kandi charms can be a fun addition to your table. They are colorful, lightweight, and easy to display. A rainbow row of crayon charms catches attention quickly and gives shoppers many color choices.
How to Photograph Kandi Charms for Pinterest
Since kandi charm patterns are so visual, good photography helps your projects shine. A simple background, natural lighting, and organized layout can make bead designs look much more professional.
The outdoor textured surface seen in this style of photo gives the beads contrast and makes the glossy colors stand out. Sunlight can create beautiful highlights, but avoid harsh glare that hides the bead details. A shaded outdoor spot or bright window light often works best.
Arrange Charms by Color
For a Pinterest-friendly photo, line the charms up in rainbow order or group them by palette. Repetition makes the image feel satisfying, while color variety keeps it exciting. Make sure the charms are straight and close enough together to show the full collection.
Keep the Background Simple
A busy background can distract from the bead pattern. Neutral surfaces like concrete, wood, fabric, poster board, or a craft mat work well. The goal is to let the kandi charm colors become the focus.
Capture Detail Shots
Close-up photos are useful for showing how the beads connect and how the pattern is built. These detail shots can help readers recreate the design and understand the row structure more easily.
Common Mistakes to Avoid
Even experienced crafters run into small issues when making kandi charms. The good news is that most mistakes are easy to fix once you know what to watch for.
- Using uneven beads: Mixed sizes can make rows look crooked.
- Skipping the layout step: Planning the design first helps prevent color placement errors.
- Pulling too tightly: Over-tightened string can cause curling.
- Leaving knots exposed: Tucking the ends gives the charm a cleaner finish.
- Using low contrast colors: Similar shades can make the crayon details hard to see.
Taking your time is the easiest way to improve your finished pieces. Kandi crafting is meant to be enjoyable, so do not rush the process. Each charm becomes cleaner and easier as you repeat the pattern.
Beginner-Friendly Pattern Variations
After you make a basic crayon charm, try changing the pattern to create new designs. Small variations can make your set feel more original without requiring a complicated new technique.
Mini Crayon Charms
Shorten the body by a few rows to create mini charms. These work well for earrings, phone straps, zipper pulls, or small bracelet accents. Mini versions are also faster to make, which is helpful for party favors or bulk crafting.
Glitter or Transparent Bead Accents
Add a few glitter, pearl, or transparent beads to create a special finish. Use them sparingly so the crayon shape stays clear. Transparent yellow, blue, or pink beads can create a bright candy-like effect.
Personalized Color Themes
Try school colors, favorite color combos, holiday palettes, pride-inspired rainbows, or coordinated shades for a friend group. Personalized color themes make the charm feel more meaningful and help your project stand out from basic patterns.
At a Glance
- Best for beginners: simple crayon kandi charm patterns with repeated rows.
- Best colors: bright rainbow, pastel, neon, or personalized palettes.
- Best uses: keychains, bag charms, kandi bracelets, and friendship gifts.
- Best finish: even bead rows, strong knots, and clear color contrast.
Conclusion: Make Kandi Charm Patterns That Feel Fun and Personal
Kandi charm patterns are a joyful way to explore color, creativity, and handmade style. Crayon-inspired bead charms are especially fun because they are simple enough for beginners but still bold enough to make a statement. With bright pony beads, clean black details, and a little planning, you can create a full set of colorful charms that look playful, polished, and ready to use.
Whether you are making festival kandi, backpack charms, keychains, friendship gifts, or craft fair pieces, this type of pattern offers endless room for customization. Start with one favorite color, then build a rainbow collection as your confidence grows. The more you experiment with palettes, bead finishes, and charm sizes, the more personal your kandi projects will become.
Final Tip: Save your favorite kandi charm patterns and color combinations as you create them. A simple pattern library makes it easier to repeat designs, build matching sets, and plan future DIY bead projects.
Tags
Kandi Charm Patterns Pony Bead Crafts Beaded Charms DIY Kandi Crayon Kandi Rave Accessories Handmade Keychains Colorful Bead Ideas