Creating your own jewelry is more than just a craft project, it is a relaxing and rewarding way to express personal style. This DIY beaded bracelet tutorial showcases how simple materials like seed beads, pearls, and floral accents can come together to form a delicate, aesthetic accessory that feels both modern and timeless. Inspired by soft color palettes and minimalist design trends, this bracelet style is perfect for beginners and experienced crafters alike who want to create handmade jewelry with a polished finish.
Key Takeaways
- Learn how to create a cute aesthetic beaded bracelet using simple materials
- Combine pearls, seed beads, and floral beads for a trendy handmade look
- Perfect beginner-friendly DIY jewelry project with easy step-by-step flow
- Customizable design ideas to match personal style or gifting needs
- Low-cost craft idea ideal for hobbies or small creative businesses
The Beauty of DIY Beaded Bracelet Designs
DIY jewelry has become increasingly popular because it blends creativity with practicality. A beaded bracelet is one of the easiest entry points into handmade accessories, offering endless combinations of colors, shapes, and textures. The featured design focuses on a soft, aesthetic theme using pearl beads, gold spacers, and delicate flower beads that create a balanced and feminine finish.
Important: One of the biggest advantages of making your own bracelet is customization. You are not limited to store designs. Instead, you can choose bead sizes, color palettes, and patterns that reflect your personality or match specific outfits. This makes each piece feel unique and meaningful.
Why This Bracelet Style Is Trending
Aesthetic beaded bracelets have gained attention on social platforms because they combine simplicity with elegance. The mix of pearls and soft pastel tones creates a visually soothing design that appeals to minimalism lovers. These bracelets are also lightweight, comfortable, and versatile enough to be worn daily or layered with other jewelry pieces.
Expert Insight
Combining different bead textures is the secret to achieving a professional-looking handmade bracelet. Alternating between smooth pearls, metallic spacers, and shaped beads creates rhythm and visual interest without overwhelming the design.
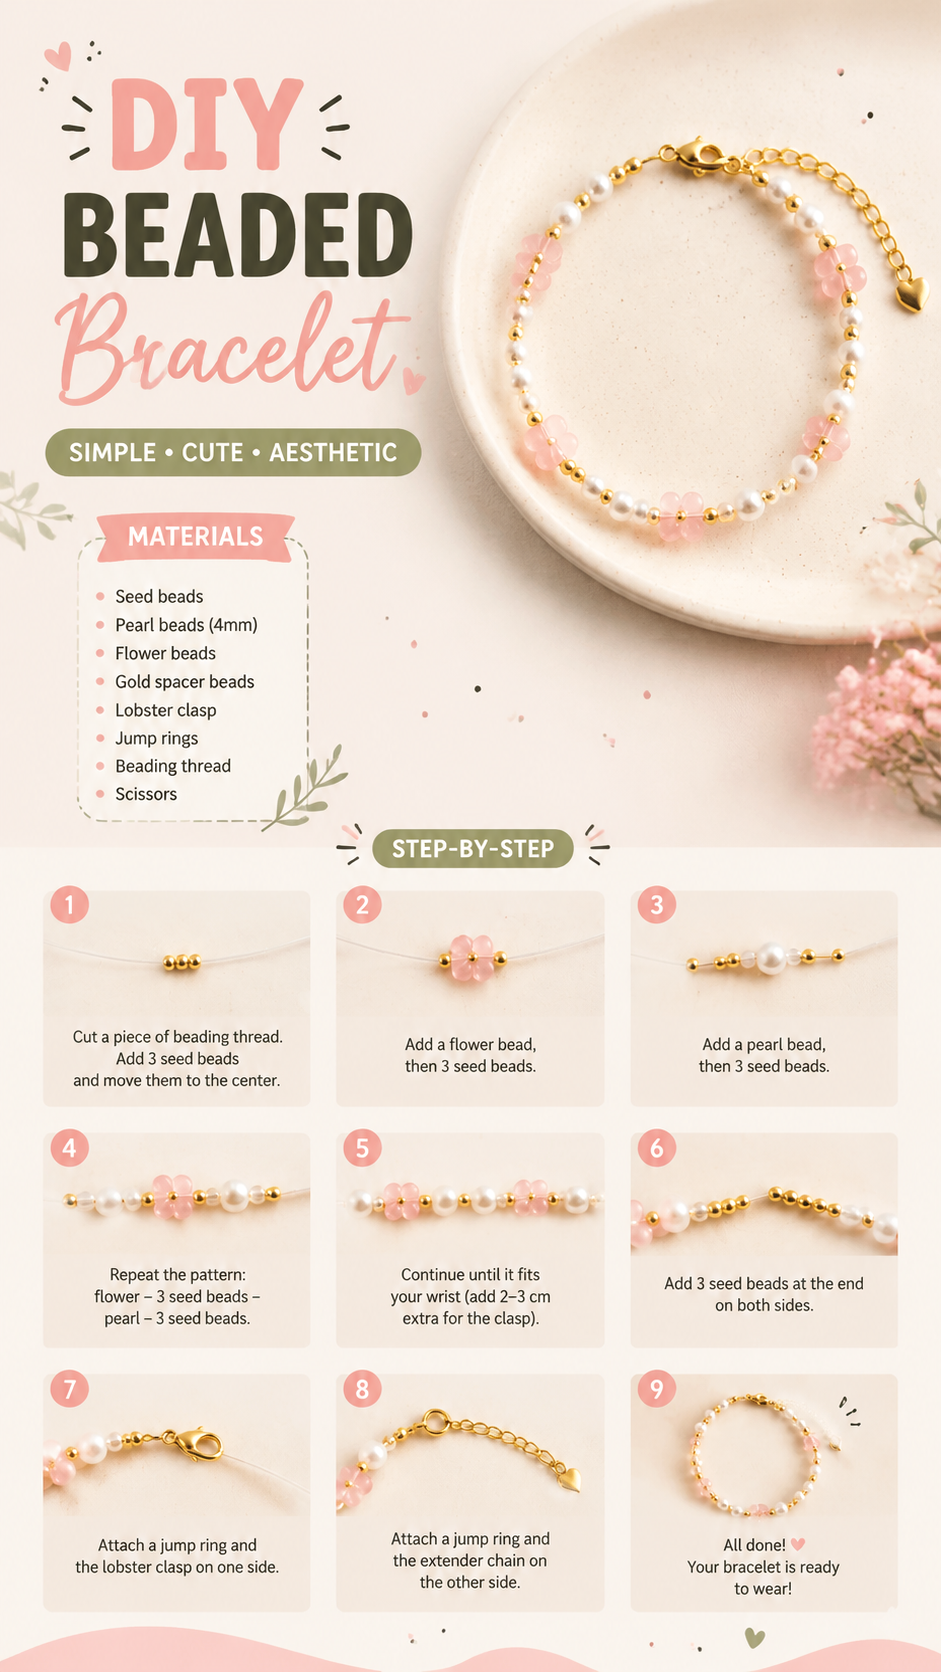
Materials Needed for a Beaded Bracelet
To recreate this aesthetic bracelet style, you only need a few basic materials. Most of them are affordable and easy to find in craft stores or online marketplaces. The simplicity of the supplies is what makes this project so beginner-friendly and accessible.
- Seed beads for spacing and structure
- Pearl beads (4mm recommended for elegance)
- Flower beads for decorative accents
- Gold spacer beads for contrast and shine
- Elastic thread or beading wire for durability
- Lobster clasp and jump rings for closure
- Scissors and basic jewelry tools
Pro Tip: Always choose high-quality elastic thread if you want your bracelet to last longer. Cheap thread may stretch out quickly and affect the overall durability of your design.
Step-by-Step Bracelet Making Process
The process of making a beaded bracelet is simple and structured. By following a repeating pattern, you can create a balanced and visually appealing design without needing advanced crafting skills.
Step 1: Prepare Your Base
Cut a piece of beading thread approximately 30 to 35 cm long. Add a few seed beads to secure your starting point and move them toward the center of the thread.
Step 2: Add Decorative Beads
Begin your pattern by adding a flower bead followed by three seed beads. This creates the foundation of your repeating sequence.
Step 3: Introduce Pearls
Add a pearl bead next, followed again by three seed beads. This alternating structure helps maintain balance and rhythm throughout the bracelet.
Step 4: Repeat the Pattern
Continue alternating between flower beads, pearl beads, and seed bead spacers until the bracelet reaches the desired length. Ensure you leave about 2 to 3 cm extra space for the clasp attachment.
Important: Maintaining consistent tension while stringing beads is essential. If the thread is too loose, the bracelet may look uneven. If it is too tight, it may not flex comfortably around the wrist.
Adding the Finishing Touches
Once your bead pattern is complete, the final step is assembling the closure. Attach a jump ring to one side of the bracelet and secure a lobster clasp on the other. For added comfort and adjustability, you can also include an extender chain.
Quick Note
Adding an extender chain is a simple upgrade that makes your bracelet more versatile. It allows one piece to fit multiple wrist sizes comfortably, which is especially useful for handmade gifts.
Design Ideas and Creative Variations
One of the most enjoyable aspects of DIY bracelet making is experimenting with different styles. You can adjust bead colors to match seasonal trends, special occasions, or personal aesthetics. Soft pink tones create a romantic look, while gold and white combinations offer a more elegant and classic feel.
- Use pastel beads for a soft aesthetic vibe
- Mix metallic accents for a luxury-inspired design
- Try monochrome styles for a minimalist look
- Combine multiple bracelet layers for stacking fashion
Pro Tip: Keep a small collection of bead colors and swap them depending on your mood or outfit. This makes your handmade jewelry collection feel fresh and versatile.
Common Mistakes to Avoid
While beaded bracelet making is simple, beginners often make small mistakes that affect the final result. Uneven spacing, inconsistent bead sizing, and weak knots are the most common issues. Taking your time during assembly helps ensure a polished and professional finish.
Why This Matters
- Consistency improves overall design quality
- Strong knots ensure long-lasting durability
- Balanced spacing creates a more professional appearance
At a Glance
- Beginner-friendly DIY jewelry project
- Uses affordable and accessible materials
- Highly customizable aesthetic design
- Perfect for gifts, hobbies, or small business ideas
Final Thoughts
Creating a cute beaded bracelet is more than just a craft activity, it is a creative experience that allows you to design something meaningful with your own hands. Whether you are making it for yourself, as a thoughtful gift, or as part of a small handmade business, this aesthetic jewelry style offers endless possibilities. With just a few materials and a bit of patience, you can create beautiful accessories that reflect your personality and creativity.
Tags
DIY Beaded Bracelet Aesthetic Jewelry Bracelet Tutorial Handmade Accessories Beadwork Ideas Creative Crafts DIY Jewelry Making