Creating a beautiful backyard does not always require an expensive landscaping budget. With a little creativity and a few affordable materials, you can transform an old tire into an eye-catching garden pond that becomes the centerpiece of your outdoor space. This DIY project combines recycling, landscaping, and water gardening into one rewarding weekend activity. The result is a relaxing water feature surrounded by natural stone, lush plants, and gentle movement that brings life to your garden.
Whether you have a large backyard or a compact garden, this simple pond design can be adapted to fit your available space. The layered stone border creates a timeless appearance, while the pond liner ensures reliable water retention. Add a small fountain, aquatic plants, or decorative rocks to personalize the finished project and make it uniquely yours.
Key Takeaways
- Transform an old tire into an attractive backyard pond.
- Natural stone edging creates a polished landscape appearance.
- A pond liner protects against leaks and extends durability.
- Aquatic plants and fountains improve beauty and water quality.
- This project is affordable, beginner friendly, and highly customizable.
Why an Upcycled Tire Pond Is a Brilliant Garden Upgrade
Repurposing old materials has become one of the most popular trends in modern landscaping. Instead of throwing away a large tire, it can serve as a durable framework for a decorative garden pond. The thick rubber provides excellent structural support while reducing waste that would otherwise end up in a landfill.
A water feature instantly changes the atmosphere of an outdoor space. The reflective surface of water adds depth, while the sound of a small fountain creates a peaceful environment perfect for relaxing after a busy day. Even a compact pond attracts birds, butterflies, and beneficial insects, making the garden feel more vibrant.
Important: One of the biggest advantages of this project is its flexibility. You can build a simple decorative pond or expand it with lighting, aquatic plants, and a solar fountain as your garden evolves over time.
Planning Your DIY Garden Pond
Before gathering materials, spend a little time deciding where your pond will be located. Choosing the right position has a significant impact on both maintenance and appearance.
Choose the Ideal Location
Select a relatively level area that receives a balance of sunlight and shade. Too much direct sunlight encourages algae growth, while too much shade may limit the variety of plants you can include.
- Avoid placing the pond directly beneath large trees.
- Ensure easy access for maintenance.
- Keep enough surrounding space for landscaping.
- Consider how the pond looks from patios or windows.
Gather Your Materials
Most homeowners can complete this project with readily available materials.
- Large used tractor or truck tire
- Quality pond liner
- Gravel or compacted soil
- Natural landscaping stones
- Decorative pebbles
- Aquatic plants
- Small fountain pump (optional)
- Garden shovel
- Level
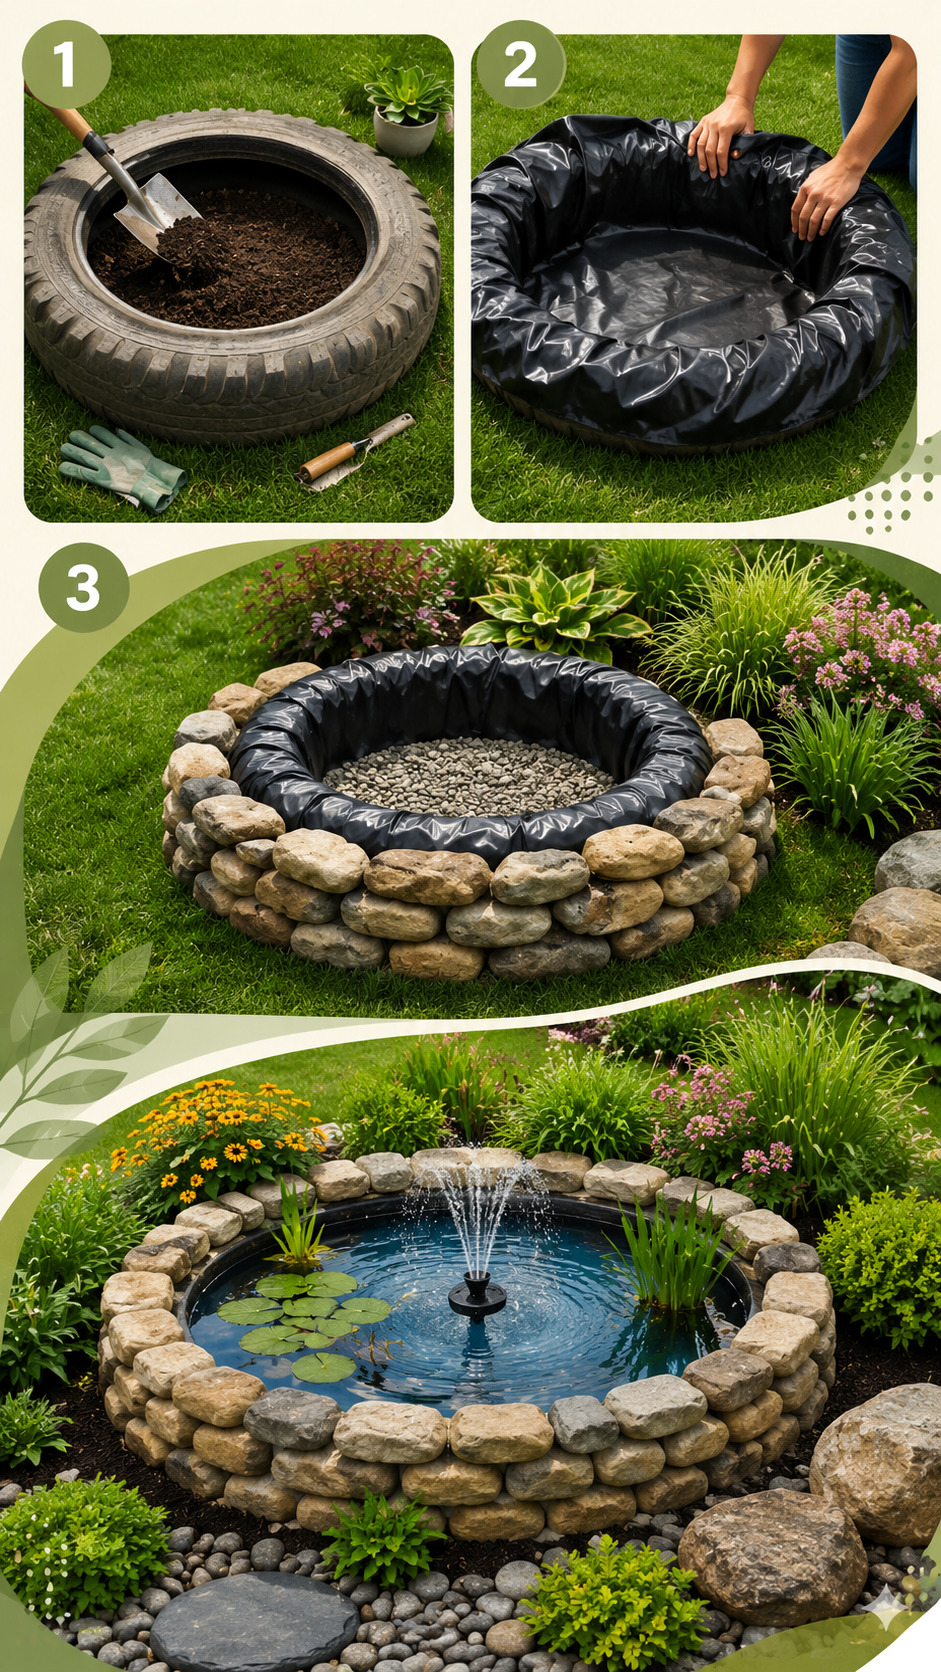
Step 1: Prepare the Base
The first stage focuses on creating a stable foundation. Place the tire where the pond will remain permanently. Remove grass and level the ground before adding compacted soil or gravel inside the tire.
A level base prevents uneven water distribution and helps the finished pond appear professionally installed.
Step 2: Install the Pond Liner
Carefully position a flexible pond liner inside the tire. Press it gently into every curve while leaving enough material around the edges to secure it later beneath decorative stones.
The liner acts as the waterproof barrier that keeps water contained. Taking your time during this step helps eliminate wrinkles and creates a cleaner appearance once the pond is filled.
Expert Insight
Using a slightly oversized liner makes installation much easier. Extra material can always be trimmed after the stones are positioned, giving you a cleaner and more secure finish.
Step 3: Build a Natural Stone Border
Adding stacked stones around the tire completely transforms its appearance. Instead of seeing recycled rubber, visitors notice a beautiful circular stone pond that blends naturally into the surrounding landscape.
Choose stones with varied sizes and textures for a more authentic look. Dry stacking often provides excellent results, although landscape adhesive may be used for additional stability if desired.
Pro Tip: Mix larger stones with medium and smaller rocks instead of using identical sizes. The natural variation creates depth and makes the border appear professionally landscaped.
Adding Water, Plants, and a Fountain
Once the stone border is complete, fill the pond gradually while smoothing any remaining folds in the liner. Decorative gravel placed at the bottom adds texture and helps conceal the liner.
Choose Aquatic Plants
Aquatic plants soften the appearance of the pond while contributing to a healthier ecosystem. Floating plants create shade, while marginal plants provide height around the edges.
- Water lilies
- Dwarf rushes
- Floating aquatic plants
- Marsh-loving ornamentals
Install a Small Fountain
A fountain introduces movement that keeps the water visually interesting. Gentle circulation also helps oxygenate the water and reduces stagnation.
The combination of moving water, surrounding greenery, and natural stone creates an inviting focal point that can completely transform an ordinary backyard.
Creative Ways to Personalize Your Pond
Every garden has its own personality. Fortunately, this DIY pond can easily reflect your personal style.
Decorative Ideas
- Solar-powered landscape lighting
- River rocks and polished pebbles
- Small wooden bridge accents
- Garden statues
- Flowering perennials around the pond
- Mini waterfall features
Layering different heights of plants around the pond helps integrate it into the rest of your landscape rather than making it appear as a separate feature.
Maintenance Tips for Long Lasting Beauty
A small garden pond requires surprisingly little maintenance when designed properly.
- Remove fallen leaves regularly.
- Top up water during hot weather.
- Trim aquatic plants as needed.
- Clean the fountain pump periodically.
- Inspect the stone border after heavy rain.
Important: Consistent light maintenance prevents larger problems later. Spending just a few minutes each week keeps the water feature attractive throughout the growing season.
Benefits Beyond Appearance
A decorative pond offers more than visual appeal. Flowing water creates a calming environment that encourages relaxation. Many homeowners find themselves spending more time outdoors once a water feature becomes part of their landscape.
The pond also supports local wildlife by providing a water source for birds and pollinators. Combined with flowering plants, it helps create a healthier and more diverse garden ecosystem.
Perhaps the greatest reward is the satisfaction of transforming recycled materials into something beautiful and functional. This project demonstrates how creativity and sustainability can work together to produce impressive results.
Quick Points
- Recycle an old tire into a decorative pond.
- Use a quality liner for reliable waterproofing.
- Natural stones create a premium landscape finish.
- Plants and fountains enhance beauty and tranquility.
- Regular maintenance keeps the pond looking its best.
Conclusion
A DIY tire garden pond is proof that impressive landscaping does not have to come with a premium price tag. By combining recycled materials, natural stone, attractive planting, and thoughtful design, you can create a backyard feature that looks elegant while supporting sustainable gardening practices.
Whether you are refreshing an existing landscape or starting a brand new outdoor project, this pond offers endless opportunities for customization. From peaceful water movement to vibrant greenery, every detail contributes to a relaxing outdoor retreat that family and friends can enjoy for years to come.
Tags
DIY Garden Garden Pond Backyard Landscaping Water Feature Upcycled Projects Outdoor Decor Garden Ideas DIY Landscaping