Handmade soap has become one of the most rewarding DIY projects for people who enjoy natural skincare, creative crafts, and thoughtful homemade gifts. A botanical soap featuring dandelion and turmeric combines vibrant natural ingredients with a simple melt-and-pour process, making it approachable for beginners while still producing beautiful, professional-looking bars. Whether you want to create a gentle cleanser for everyday use or simply explore a relaxing hobby, this herbal soap project offers an enjoyable balance of creativity and practicality.
Both dandelion and turmeric have earned a strong reputation in natural beauty routines. Their warm golden tones create an attractive soap that feels rustic yet elegant, while goat milk or other moisturizing soap bases help produce a rich, creamy lather. The result is a handcrafted soap that looks as beautiful as it feels.
Key Takeaways
- Dandelion and turmeric create an attractive botanical soap with natural appeal.
- Melt-and-pour soap making is beginner friendly and requires minimal equipment.
- Botanical ingredients add texture, color, and visual interest.
- Carrier oils help enhance the moisturizing qualities of the finished bars.
- Proper preparation and curing improve both appearance and durability.
Why Dandelion and Turmeric Make an Excellent Soap Combination
Dandelions are often overlooked as ordinary wildflowers, yet they have long been appreciated in traditional herbal preparations. Their bright yellow petals add a cheerful botanical appearance to handmade soap, while dried petals create attractive natural speckles throughout each bar.
Turmeric is equally popular in DIY skincare because of its rich golden color. Just a small amount transforms a plain soap base into a vibrant handcrafted creation with warm earthy tones. Together, these ingredients create a soap that immediately stands out on a bathroom shelf or inside a handmade gift basket.
Important: Botanical ingredients should always be clean and completely dry before being added to melt-and-pour soap. Excess moisture may shorten shelf life or affect the finished appearance.
Benefits of Making Your Own Herbal Soap
Homemade soap gives you complete control over the ingredients that go into each bar. Instead of relying on heavily fragranced commercial products, you can customize every batch with your preferred oils, herbs, scents, and colors.
- Create personalized gifts for friends and family.
- Experiment with different botanical ingredients.
- Control fragrance strength.
- Adjust moisturizing oils to suit your preferences.
- Produce attractive decorative soap bars.
Many hobbyists also discover that soap making becomes a relaxing creative outlet. Measuring ingredients, arranging herbs, selecting molds, and watching the soap harden all contribute to an enjoyable crafting experience.
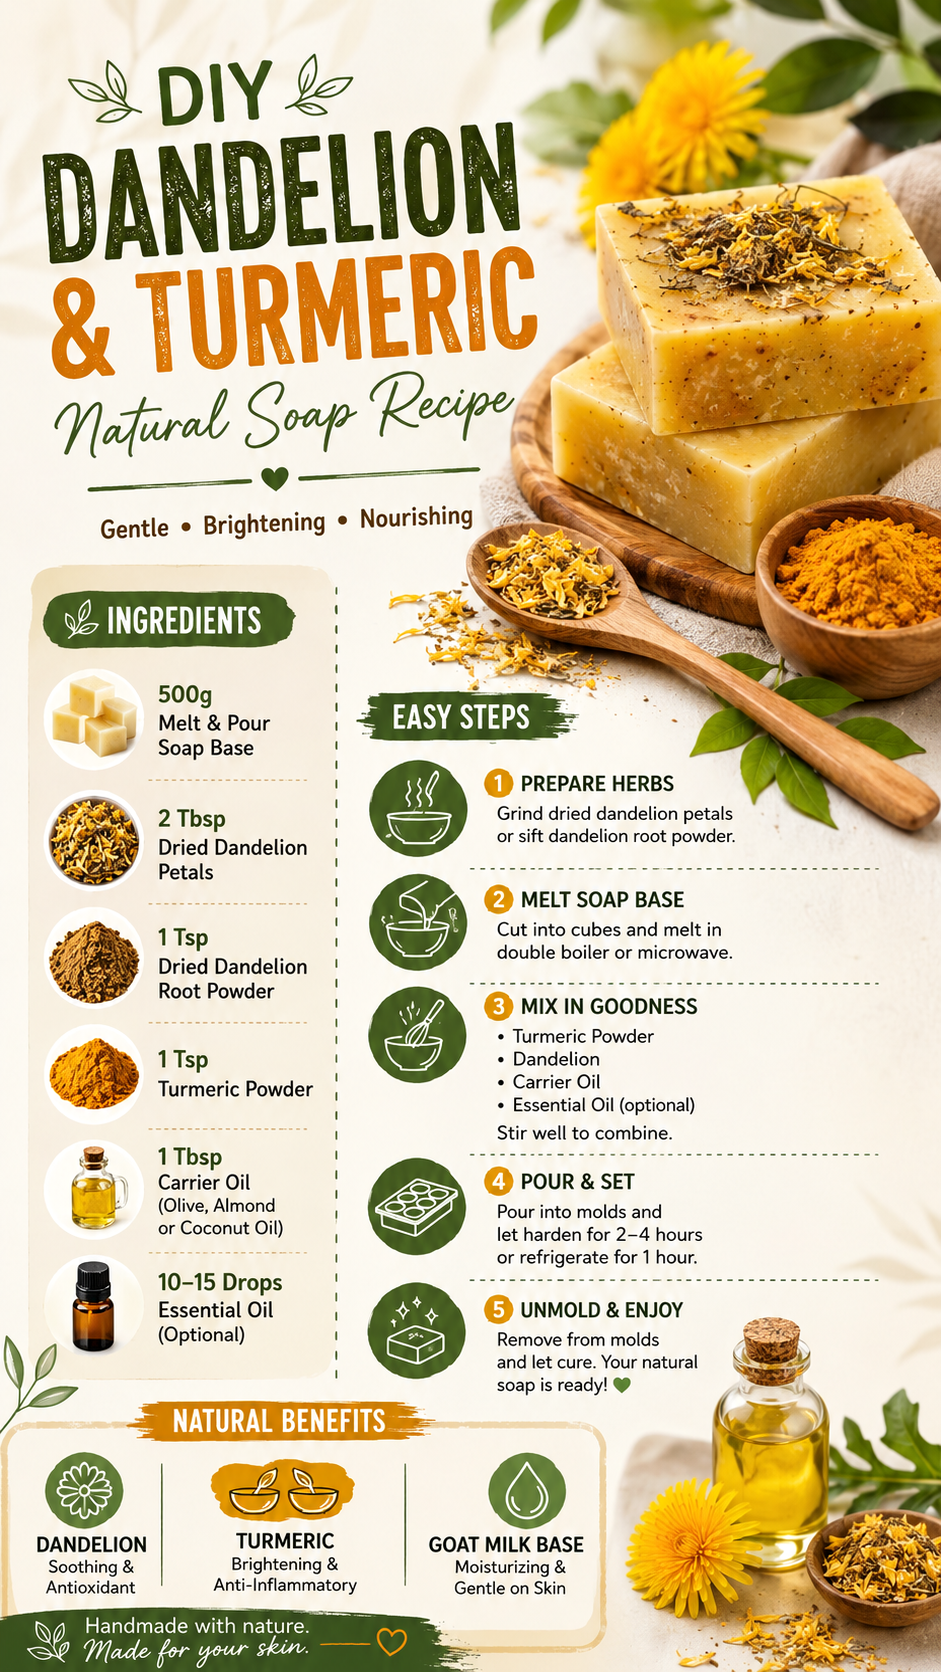
Ingredients Commonly Used in This Recipe
A simple melt-and-pour recipe keeps the process accessible for nearly anyone. Unlike cold process soap making, there is no need to work with lye, making it an excellent project for beginners.
Soap Base
A quality melt-and-pour base serves as the foundation of the recipe. Goat milk bases are especially popular because they produce creamy lather and leave the skin feeling soft. Shea butter and clear glycerin bases are also excellent choices depending on the look you want.
Dried Dandelion Petals or Root Powder
Dried petals create visual texture throughout the soap. Finely ground root powder can also be incorporated for a more even appearance.
Turmeric Powder
Turmeric contributes the signature golden hue. A modest amount usually provides beautiful color without becoming overpowering.
Carrier Oils
Olive oil, coconut oil, and sweet almond oil are popular additions because they complement the moisturizing qualities of the soap base.
Essential Oils
Optional essential oils allow you to customize the fragrance. Lavender, orange, lemon, rosemary, and cedarwood all pair beautifully with botanical soap.
Expert Insight
Adding botanicals gradually while stirring helps distribute herbs evenly throughout the soap. This creates a balanced appearance rather than allowing all the ingredients to settle in one area.
Step-by-Step Soap Making Process
1. Prepare the Botanicals
Ensure dried petals are free from moisture. If using root powder, sift it before mixing to avoid clumps.
2. Melt the Soap Base
Cut the soap base into small cubes for even melting. Heat gradually using either a microwave or double boiler while avoiding overheating.
3. Mix the Ingredients
Once melted, stir in turmeric, dandelion, carrier oil, and optional essential oils. Mix thoroughly until everything is evenly incorporated.
Pro Tip: Stir gently instead of whipping the mixture. Excessive stirring introduces bubbles that can affect the smooth finish of the soap.
4. Pour into Molds
Carefully pour the mixture into silicone molds. Spraying the surface lightly with rubbing alcohol can help remove bubbles for a cleaner finish.
5. Allow the Soap to Harden
Most melt-and-pour soaps become firm within several hours. Refrigeration may speed up the process if needed.
6. Remove and Store
Once fully hardened, gently remove each bar from the mold. Store finished soaps in a cool, dry location until ready to use or package.
Customization Ideas
One of the greatest advantages of handmade soap is flexibility. Every batch can become a unique creation.
- Add dried calendula petals for extra botanical appeal.
- Layer different colored soap bases.
- Create decorative swirls.
- Use floral silicone molds.
- Blend citrus and herbal essential oils.
- Add oatmeal for gentle texture.
Helpful Tips for Beautiful Results
Professional-looking soap is usually the result of careful preparation rather than expensive supplies.
- Measure ingredients carefully.
- Avoid overheating the soap base.
- Work quickly once everything is melted.
- Choose quality silicone molds.
- Keep tools clean throughout the process.
- Store finished bars away from humidity.
Important: If giving handmade soap as a gift, label the ingredients clearly so recipients know exactly what was used in the recipe.
Packaging Your Handmade Soap
Presentation adds tremendous value to handcrafted soap. Wrap each bar in kraft paper, wax paper, or biodegradable shrink wrap before adding a simple label. Natural twine, dried flowers, and recycled gift boxes complement the botanical theme beautifully.
These soaps make thoughtful presents for birthdays, holidays, bridal showers, housewarmings, and self-care gift baskets.
Frequently Asked Questions
Can beginners make this recipe?
Yes. Melt-and-pour soap is one of the easiest introductions to soap making because it avoids the complexity of making soap completely from scratch.
Can I change the fragrance?
Absolutely. Essential oils allow nearly endless customization depending on your personal preferences.
How should I store finished soap?
Store bars in a cool, dry place away from direct sunlight and excessive humidity to help preserve their appearance.
Quick Points
- Choose a quality melt-and-pour soap base.
- Use dry botanicals for best results.
- Mix ingredients thoroughly but gently.
- Allow enough time for complete hardening.
- Package finished bars to maintain freshness.
Conclusion
Dandelion and turmeric soap is a wonderful example of how simple ingredients can come together to create something beautiful, practical, and enjoyable to make. With a beginner-friendly melt-and-pour process, attractive botanical details, and endless opportunities for customization, this project offers a rewarding way to explore handmade skincare. Whether you craft a single batch for yourself or prepare several bars as thoughtful gifts, each soap becomes a reflection of your creativity while celebrating the beauty of natural ingredients.
Tags
DIY Soap Dandelion Soap Turmeric Soap Natural Skincare Melt and Pour Soap Botanical Crafts Handmade Soap Herbal DIY