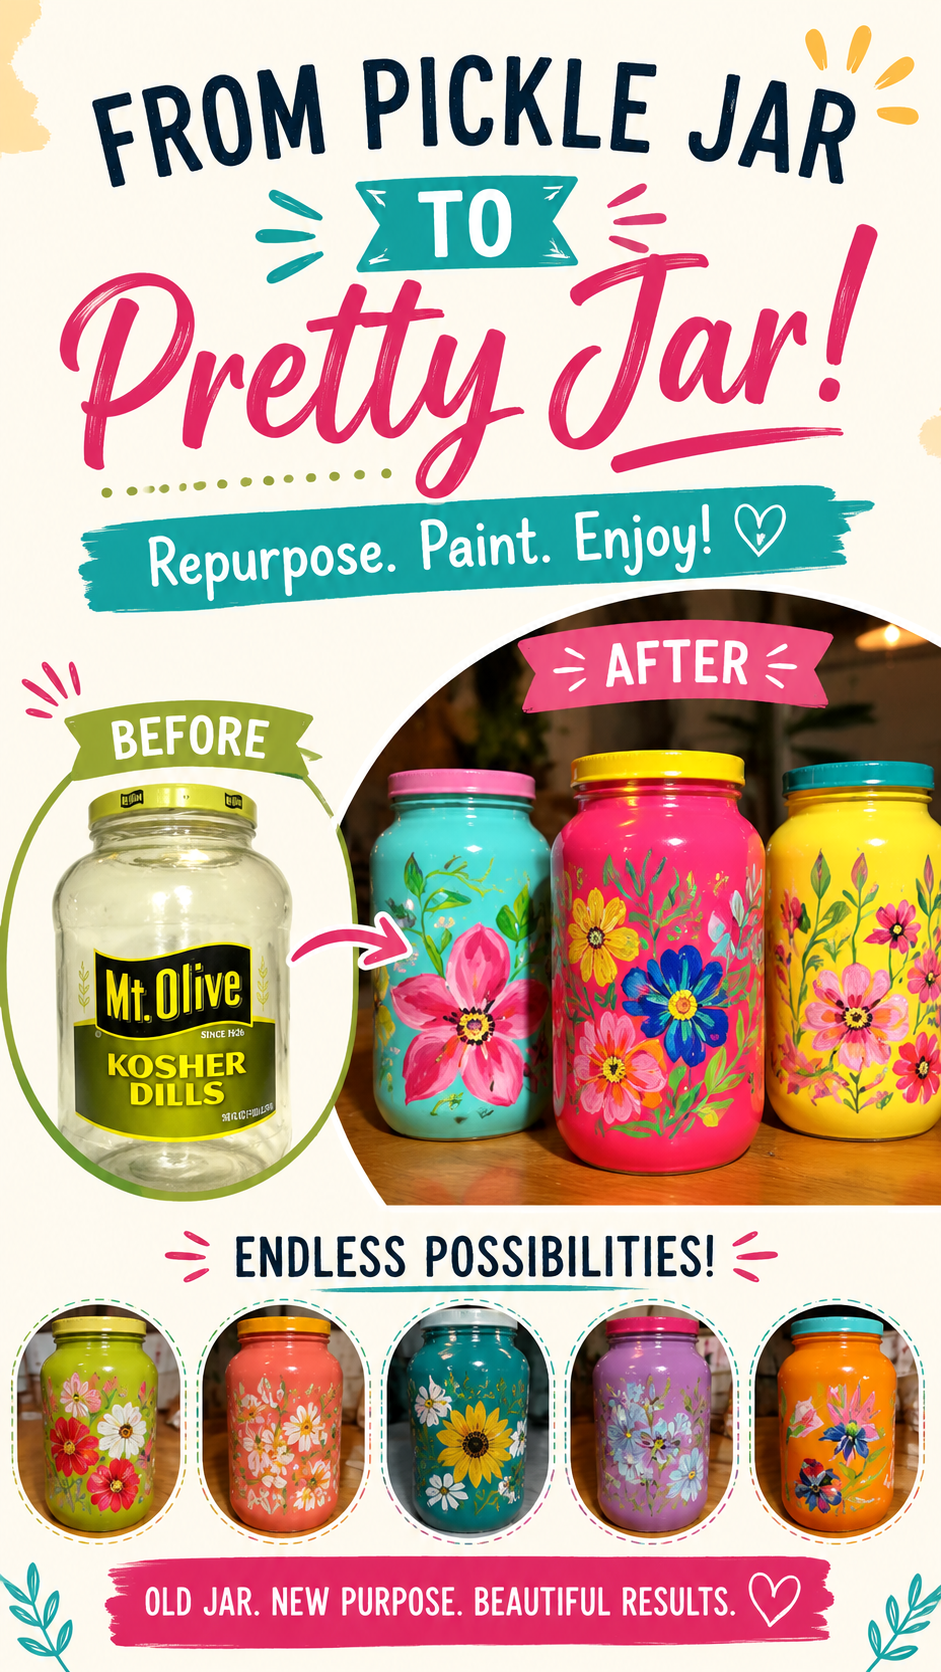
There is something incredibly satisfying about turning an ordinary household item into a beautiful piece of décor. Instead of throwing away empty glass jars, many DIY enthusiasts are discovering creative ways to transform them into colorful storage containers, decorative accents, and thoughtful handmade gifts. A simple jar that once held pickles can become a vibrant centerpiece with just a little paint, creativity, and imagination.
Repurposing glass jars is not only an enjoyable craft but also a practical way to reduce waste while creating something unique for your home. Whether you enjoy farmhouse décor, colorful floral designs, modern minimalist styles, or rustic charm, painted jars can easily match your personal aesthetic. Best of all, this project is affordable, beginner-friendly, and endlessly customizable.
Key Takeaways
- Repurpose empty glass jars into decorative and functional storage.
- Use acrylic paint and creative designs for endless customization.
- Create budget-friendly home décor with simple craft supplies.
- Painted jars work well as gifts, organizers, and seasonal decorations.
- Upcycling helps reduce household waste while encouraging creativity.
Why Painted Glass Jars Are So Popular
DIY painted jars have become one of the most popular upcycling projects because they combine creativity, affordability, and functionality. Almost every home has empty jars that can be cleaned and reused instead of being discarded.
With just a few inexpensive supplies, anyone can create custom storage containers for craft supplies, kitchen utensils, bathroom essentials, flowers, candles, or office accessories. The finished result often looks far more expensive than the materials used to create it.
Important: The beauty of upcycling is that every finished piece becomes one of a kind. Even simple floral patterns and bright colors can completely transform an ordinary glass jar into a decorative accent that reflects your personal style.
Choosing the Right Glass Jar
Almost any sturdy glass jar can become a DIY masterpiece. Larger jars provide more room for decorative painting and are perfect for storage, while smaller jars work beautifully for candles, makeup brushes, or mini flower arrangements.
Ideal Jar Features
- Thick, durable glass
- Smooth exterior surface
- Wide opening for practical use
- Matching lid that can also be painted
- No chips or cracks
Before painting, remove every label completely. Warm water combined with dish soap usually loosens paper labels, while a small amount of cooking oil or adhesive remover helps eliminate sticky residue.
Supplies You’ll Need
One reason this project is so appealing is the short supply list.
- Clean glass jars
- Acrylic craft paint
- Paint brushes in various sizes
- Painter’s tape if creating geometric designs
- Fine detail brushes
- Clear protective sealer
- Palette or paper plate
- Paper towels
- Water container for cleaning brushes
Optional embellishments include ribbon, twine, decorative labels, wooden tags, stencils, metallic paint, or vinyl decals.
Expert Insight
Allow each layer of paint to dry completely before adding another coat or decorative details. Thin, even layers create a smoother finish and reduce visible brush marks.
Preparing Your Jar for Painting
Preparation makes a noticeable difference in the finished appearance.
- Wash the jar thoroughly.
- Remove labels and adhesive residue.
- Dry completely.
- Wipe the surface with rubbing alcohol to remove oils.
- Protect your workspace with newspaper or a craft mat.
Skipping preparation often leads to uneven paint coverage or peeling later.
Creative Painting Ideas
Floral Designs
Bright flowers remain one of the most popular decorating choices. Simple petals, leaves, and colorful blossoms instantly create cheerful jars suitable for nearly every room.
Solid Color Finish
A single bold color creates a modern appearance while allowing the jar to blend with existing décor.
Rustic Farmhouse Style
Soft white, cream, sage green, and muted blue create timeless farmhouse-inspired containers that pair beautifully with natural wood and woven baskets.
Modern Geometric Patterns
Painter’s tape makes it easy to create crisp stripes, triangles, or abstract shapes that suit contemporary interiors.
Pro Tip: Mix glossy and matte finishes throughout your collection of painted jars to create visual interest without making every piece look identical.
Best Paint Options
Acrylic paint remains the preferred choice for most DIY jar projects because it is affordable, easy to apply, and available in hundreds of colors.
- Matte acrylic paint
- Multi-surface acrylic paint
- Chalk paint
- Outdoor acrylic paint for exterior décor
After painting, a clear sealer helps protect the finish from scratches and moisture.
Practical Ways to Use Painted Jars
Craft Room Organization
Store paint brushes, markers, scissors, ribbon, buttons, beads, or sewing supplies while adding color to your workspace.
Kitchen Storage
Use painted jars to organize tea bags, coffee pods, utensils, recipe cards, or snack items.
Bathroom Organization
Keep cotton balls, makeup brushes, bath salts, cotton swabs, and beauty accessories neatly contained.
Home Office
Organize pens, pencils, paper clips, sticky notes, and small office supplies while brightening your desk.
Decorative Flower Vase
Add fresh flowers, faux stems, or dried botanicals for an inexpensive centerpiece.
Seasonal Decorating Ideas
Painted jars are easy to adapt throughout the year.
- Pastel colors for spring.
- Bright florals for summer.
- Warm oranges and earthy browns for autumn.
- Metallic silver, gold, and icy blue for winter.
Changing colors instead of buying new decorations keeps seasonal decorating affordable.
Thoughtful Handmade Gift Ideas
Decorated jars make memorable gifts because they combine beauty with usefulness.
- Cookie mix gifts
- Hot chocolate kits
- Candy jars
- Spa gift sets
- Tea collections
- Homemade candles
- Succulent planters
Important: Personalizing each jar with colors, initials, or favorite flowers makes a handmade gift feel much more meaningful than a store-bought alternative.
Common Mistakes to Avoid
- Painting dirty glass.
- Applying thick coats of paint.
- Skipping drying time.
- Using poor-quality brushes.
- Forgetting a protective topcoat.
- Handling jars before paint fully cures.
Caring for Painted Jars
Hand wash decorative jars gently if needed. Avoid soaking painted surfaces for long periods unless waterproof products were specifically used. Dust regularly with a soft cloth to keep colors looking vibrant.
Why Upcycling Matters
Every jar that is reused instead of discarded helps reduce waste while encouraging mindful consumption. Small DIY projects remind us that creativity often begins with items already sitting in our recycling bin.
Repurposing household materials also helps reduce decorating costs while inspiring more sustainable habits. Instead of purchasing new storage containers, you can create personalized versions that perfectly match your home.
At a Glance
- Clean jars thoroughly before painting.
- Apply multiple thin coats for the smoothest finish.
- Seal painted surfaces for added durability.
- Use jars for storage, décor, gifts, or organization.
- Customize colors and patterns to suit your space.
Conclusion
DIY painted glass jars prove that beautiful home décor does not require expensive materials or advanced crafting skills. With a little imagination, everyday containers can become eye-catching storage pieces, decorative accents, or heartfelt gifts that reflect your personality. Whether you love bold floral artwork, simple modern finishes, or rustic farmhouse charm, each project offers an opportunity to create something both useful and beautiful.
Gather a few empty jars, choose your favorite colors, and enjoy the rewarding process of transforming ordinary glass into handcrafted décor that brings color, organization, and creativity into every corner of your home.
Tags
DIY Painted Jars Glass Jar Crafts Upcycled Home Decor Jar Painting Ideas DIY Storage Creative Upcycling Handmade Decor Stash Jar Ideas DIY