Air dry clay has become one of the most popular crafting materials for children, parents, teachers, and beginners. It is affordable, easy to use, and does not require a kiln or oven, making it an excellent choice for creative projects at home or in the classroom. Whether your child wants to create cute plant pots, decorative bowls, ornaments, miniature sculptures, or personalized gifts, air dry clay offers endless possibilities while encouraging imagination and hands-on learning.
One of the biggest advantages of air dry clay is its simplicity. With just a few basic tools and a little patience, anyone can transform a simple block of clay into a beautiful handmade creation. Learning the correct process helps ensure smoother results, fewer cracks, and projects that last much longer.
Key Takeaways
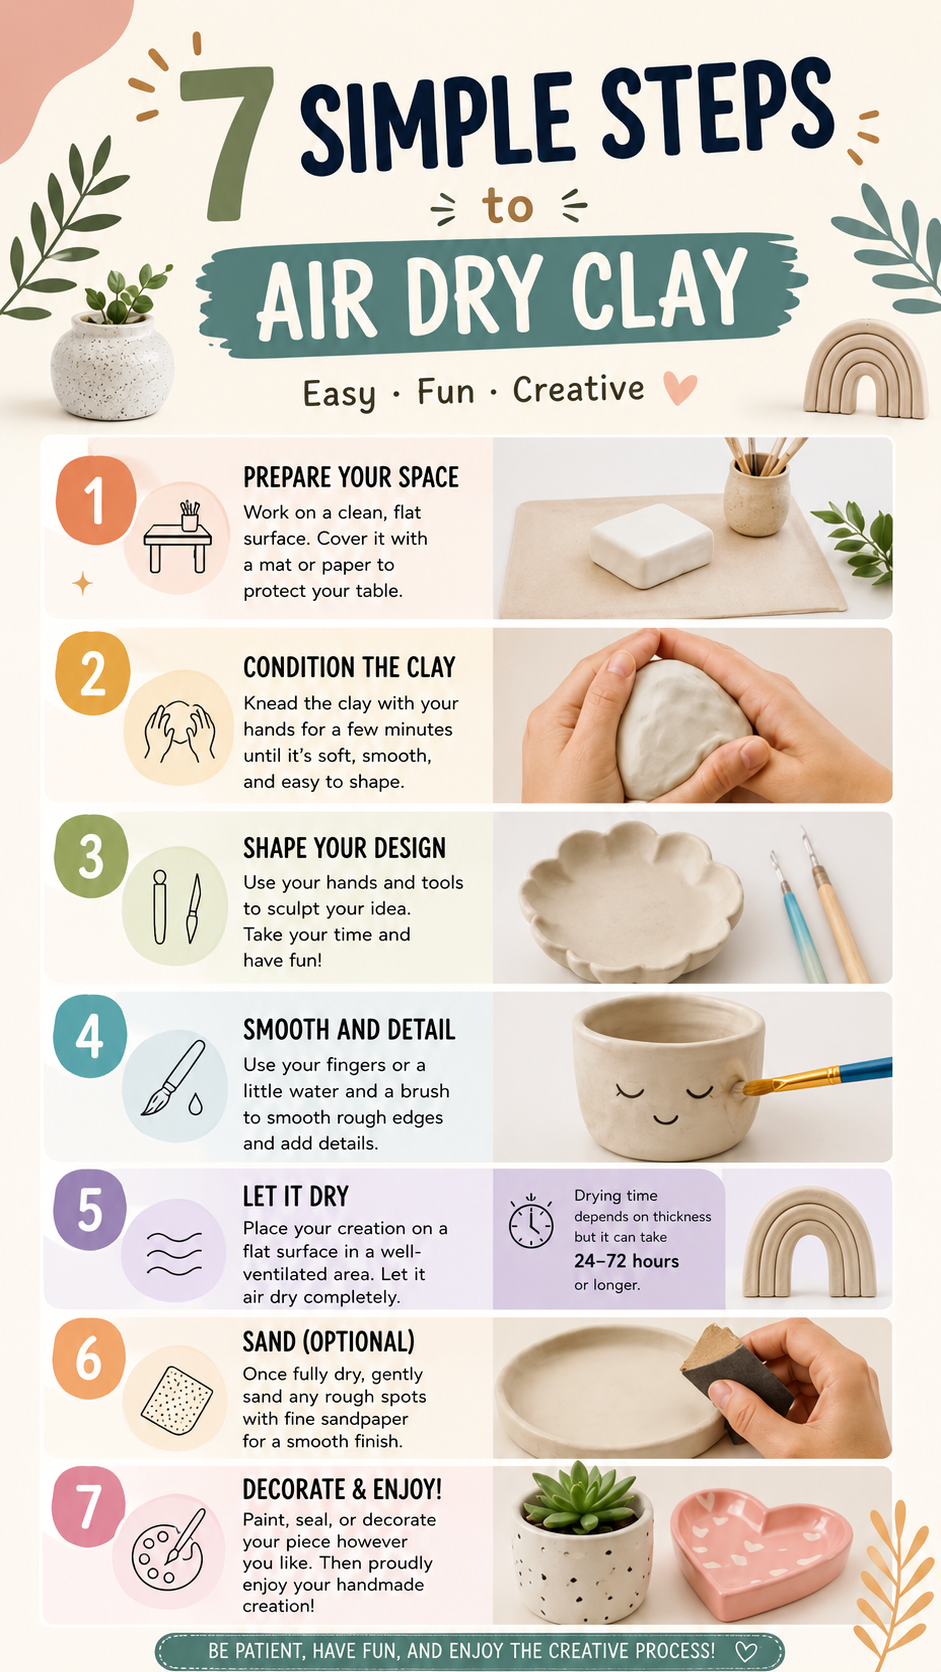
- Prepare a clean workspace before starting.
- Condition the clay thoroughly for easier shaping.
- Smooth surfaces with water before drying.
- Allow enough drying time for the clay thickness.
- Sand rough areas after drying for a polished finish.
- Decorate with paint and seal for extra durability.
Why Air Dry Clay Is Perfect for Kids
Craft activities provide much more than entertainment. Working with clay encourages children to use their creativity while improving fine motor skills, concentration, patience, and problem-solving abilities. Rolling, pinching, flattening, and sculpting strengthen small hand muscles that support writing and everyday tasks.
Unlike traditional pottery clay, air dry clay hardens naturally without special equipment. That makes it accessible for families who simply want to enjoy an afternoon of crafting without investing in expensive supplies.
Important: Air dry clay is one of the easiest craft materials for beginners because it combines simple techniques with impressive results. Even young children can create projects they feel proud to display or give as gifts.
Step 1: Prepare Your Workspace
Starting with an organized workspace makes every project more enjoyable. Cover your table with parchment paper, a silicone mat, or a reusable craft mat to protect the surface and prevent the clay from sticking.
Helpful Supplies
- Air dry clay
- Craft mat or wax paper
- Rolling pin
- Clay sculpting tools
- Small bowl of water
- Soft paintbrush
- Fine sandpaper
- Acrylic paints
- Clear sealer
Keeping tools within reach helps maintain focus and allows children to spend more time creating rather than searching for supplies.
Step 2: Condition the Clay
Fresh clay should always be kneaded before use. Conditioning warms the material, distributes moisture evenly, and creates a smoother texture that is easier to shape.
Children can roll the clay into balls, fold it repeatedly, or gently press it between their hands for several minutes. This simple preparation reduces the likelihood of cracks appearing later.
Expert Insight
If the clay feels dry, lightly dampen your fingertips with water rather than soaking the clay. Small amounts of moisture help improve workability without making the project too soft.
Step 3: Shape Your Design
This is where creativity truly begins. Children can use their hands along with simple sculpting tools to transform clay into nearly anything they imagine.
Easy Project Ideas
- Mini flower pots
- Decorative trinket dishes
- Animal figurines
- Leaf impressions
- Name plaques
- Holiday ornaments
- Pencil holders
- Jewelry dishes
- Magnets
- Picture frame decorations
Simple shapes often produce the best results for beginners. Encourage children to work slowly and enjoy experimenting with different textures and patterns.
Pro Tip: Keep projects an even thickness whenever possible. Uniform pieces dry more evenly and are less likely to crack during the drying process.
Step 4: Smooth Edges and Add Details
Once the basic shape is complete, spend time refining the design. Smooth rough edges with slightly damp fingertips or a soft brush. This small step dramatically improves the finished appearance.
Children can also add facial expressions, textures, decorative lines, dots, or patterns using wooden tools, toothpicks, or clay sculpting instruments.
Creative Texture Ideas
- Lace fabric
- Leaves
- Buttons
- Shells
- Wood grain
- Bubble wrap
- Stamps
- Forks and combs
Step 5: Let the Clay Dry Completely
Drying is one of the most important stages of every air dry clay project. Place creations on a flat surface in a well-ventilated area where they can remain undisturbed.
Drying time depends on the size and thickness of the project. Thin pieces may harden within a day, while thicker sculptures often require 24 to 72 hours or longer.
Important: Avoid rushing the drying process by placing clay in direct sunlight or near intense heat. Slow, even drying helps reduce cracking and produces stronger finished pieces.
Step 6: Sand for a Professional Finish
After the clay has fully dried, inspect the surface for rough edges or uneven spots. Fine-grit sandpaper works well for gently smoothing imperfections.
Always sand carefully using light pressure. A smoother surface creates a much better base for painting and sealing.
When to Skip Sanding
If your project intentionally includes textured details, sanding may remove those decorative features. Focus only on areas that genuinely need refinement.
Step 7: Paint, Decorate, and Protect
The final stage is often everyone’s favorite. Once the clay has completely dried, decorate it using acrylic paints, paint pens, metallic finishes, glitter, or colorful patterns.
Many crafters finish their projects with a clear sealer to improve durability and help preserve the paint over time.
Popular Decorating Ideas
- Pastel color palettes
- Minimalist geometric designs
- Cute facial expressions
- Floral patterns
- Polka dots
- Marble effects
- Gold accents
- Nature-inspired themes
Common Mistakes to Avoid
- Skipping the conditioning step.
- Making pieces too thin.
- Adding too much water.
- Moving projects before they finish drying.
- Painting damp clay.
- Ignoring rough edges before decorating.
Fun Learning Benefits for Children
Air dry clay projects combine creativity with educational value. Every project encourages experimentation while naturally introducing concepts such as shapes, symmetry, texture, measurement, and design.
- Builds confidence through completed projects.
- Improves hand-eye coordination.
- Encourages independent thinking.
- Develops patience and focus.
- Provides meaningful screen-free entertainment.
- Supports creative expression.
At a Glance
- Prepare your workspace before opening the clay.
- Knead thoroughly for smooth sculpting.
- Allow complete drying before decorating.
- Sand gently for a polished finish.
- Seal painted projects for added protection.
Conclusion
Creating air dry clay crafts is an enjoyable activity that combines creativity, learning, and relaxation into one rewarding experience. From preparing your workspace to adding the final decorative touches, each step contributes to a stronger, more attractive finished project. Whether you are crafting with young children, teaching a classroom activity, or simply looking for a relaxing hobby, mastering these basic techniques opens the door to countless creative possibilities.
With patience, imagination, and a few simple supplies, anyone can create beautiful handmade clay projects that become treasured keepsakes or thoughtful gifts. Start with simple designs, practice the basics, and enjoy watching your creativity grow with every new project.
Tags
Air Dry Clay Clay Crafts for Kids DIY Crafts Beginner Clay Projects Kids Activities Creative Learning Handmade Crafts Easy DIY Ideas